Tasks
This Section describes the use of the Task Manager screen within Stellar Create.
- You can either use the Yella PUBLIC Task Server to share Tasks with other users (both inside and outside your organization) or you may have been given access to a specific Company’s Task Server
- If you expect this to work for you and you experience problems please contact your in house IT support team first.
The Task List System allows Tasks to be assigned to one or more users and distributed anywhere in the world.
- A Task contains all the media and subtitle or script files required to do a specific task.
- Any changes to the task files (edits, additions deletions etc.) are automatically synchronized to the central store.
Logging In
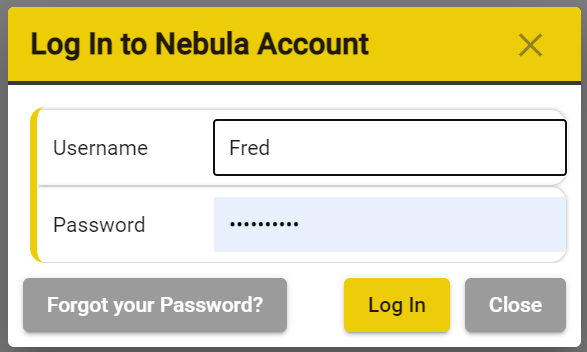
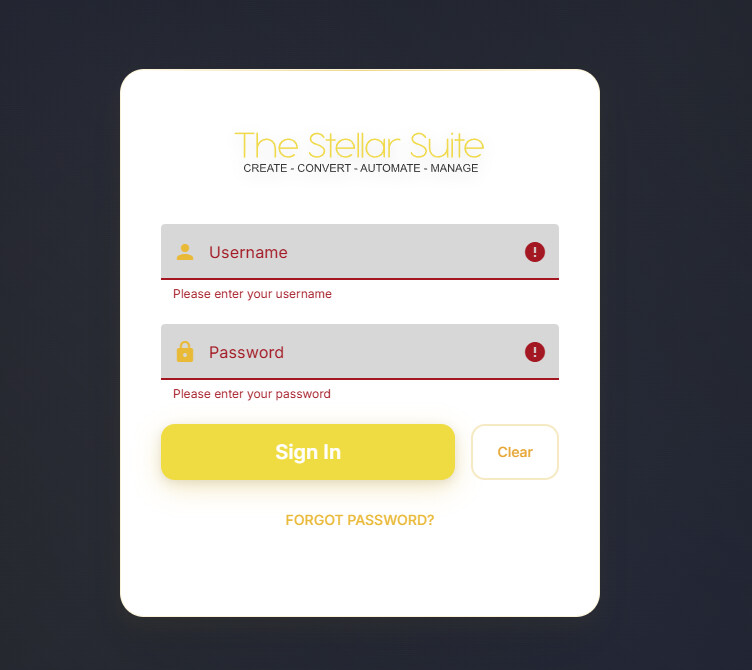
Before you can load any Stellar Create or the Tasks you must first Log In.
When you start Stellar Create you will be presented with a Log In dialog.
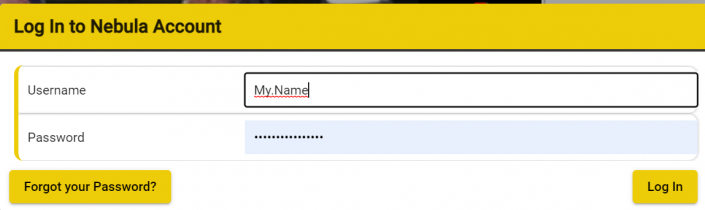
- Enter the Username and Password you were sent when you first registered.
- You can use you email address or your username
Welcome Screen

The welcome screen is the first thing that a new user will see after logging in. This window contains several links to our help system and also the options to load any of the existing tutorials. We suggest going through these basic tutorials in order to make yourself familiar with Stellar Create.
In the top right you will see the currently selected Task Server. By default you will have access to the public task server. If you account was created by a company, or if you were invited by another company to their own task server, that task server will also appear in the drop-down.
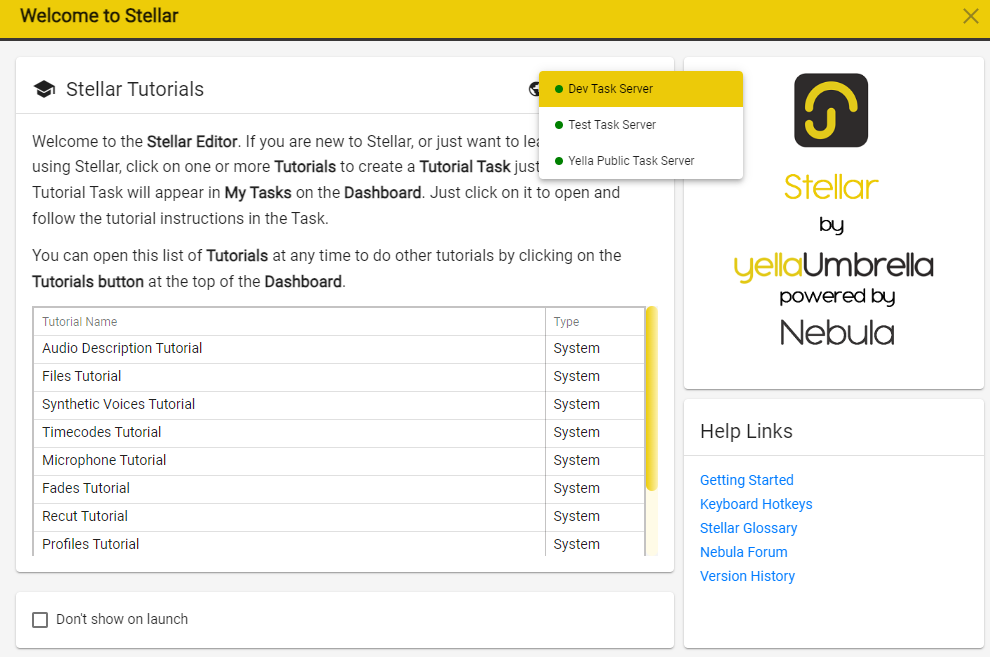
Once you have finished with the introduction and are comfortable with using Stellar Create, you have the option to hide the welcome screen on launch.

You can always manually open this window from the Dashboard by pressing
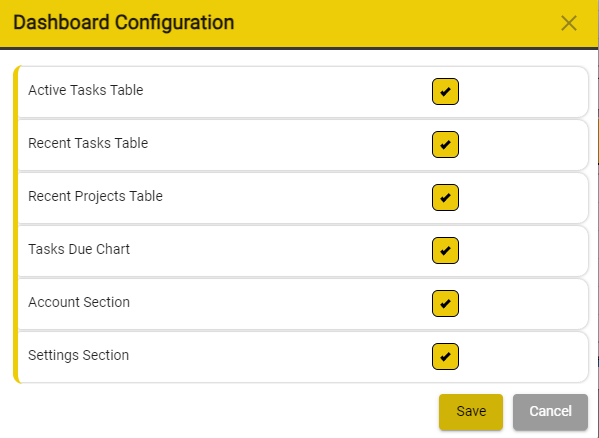
Dashboard
The Dashboard represents
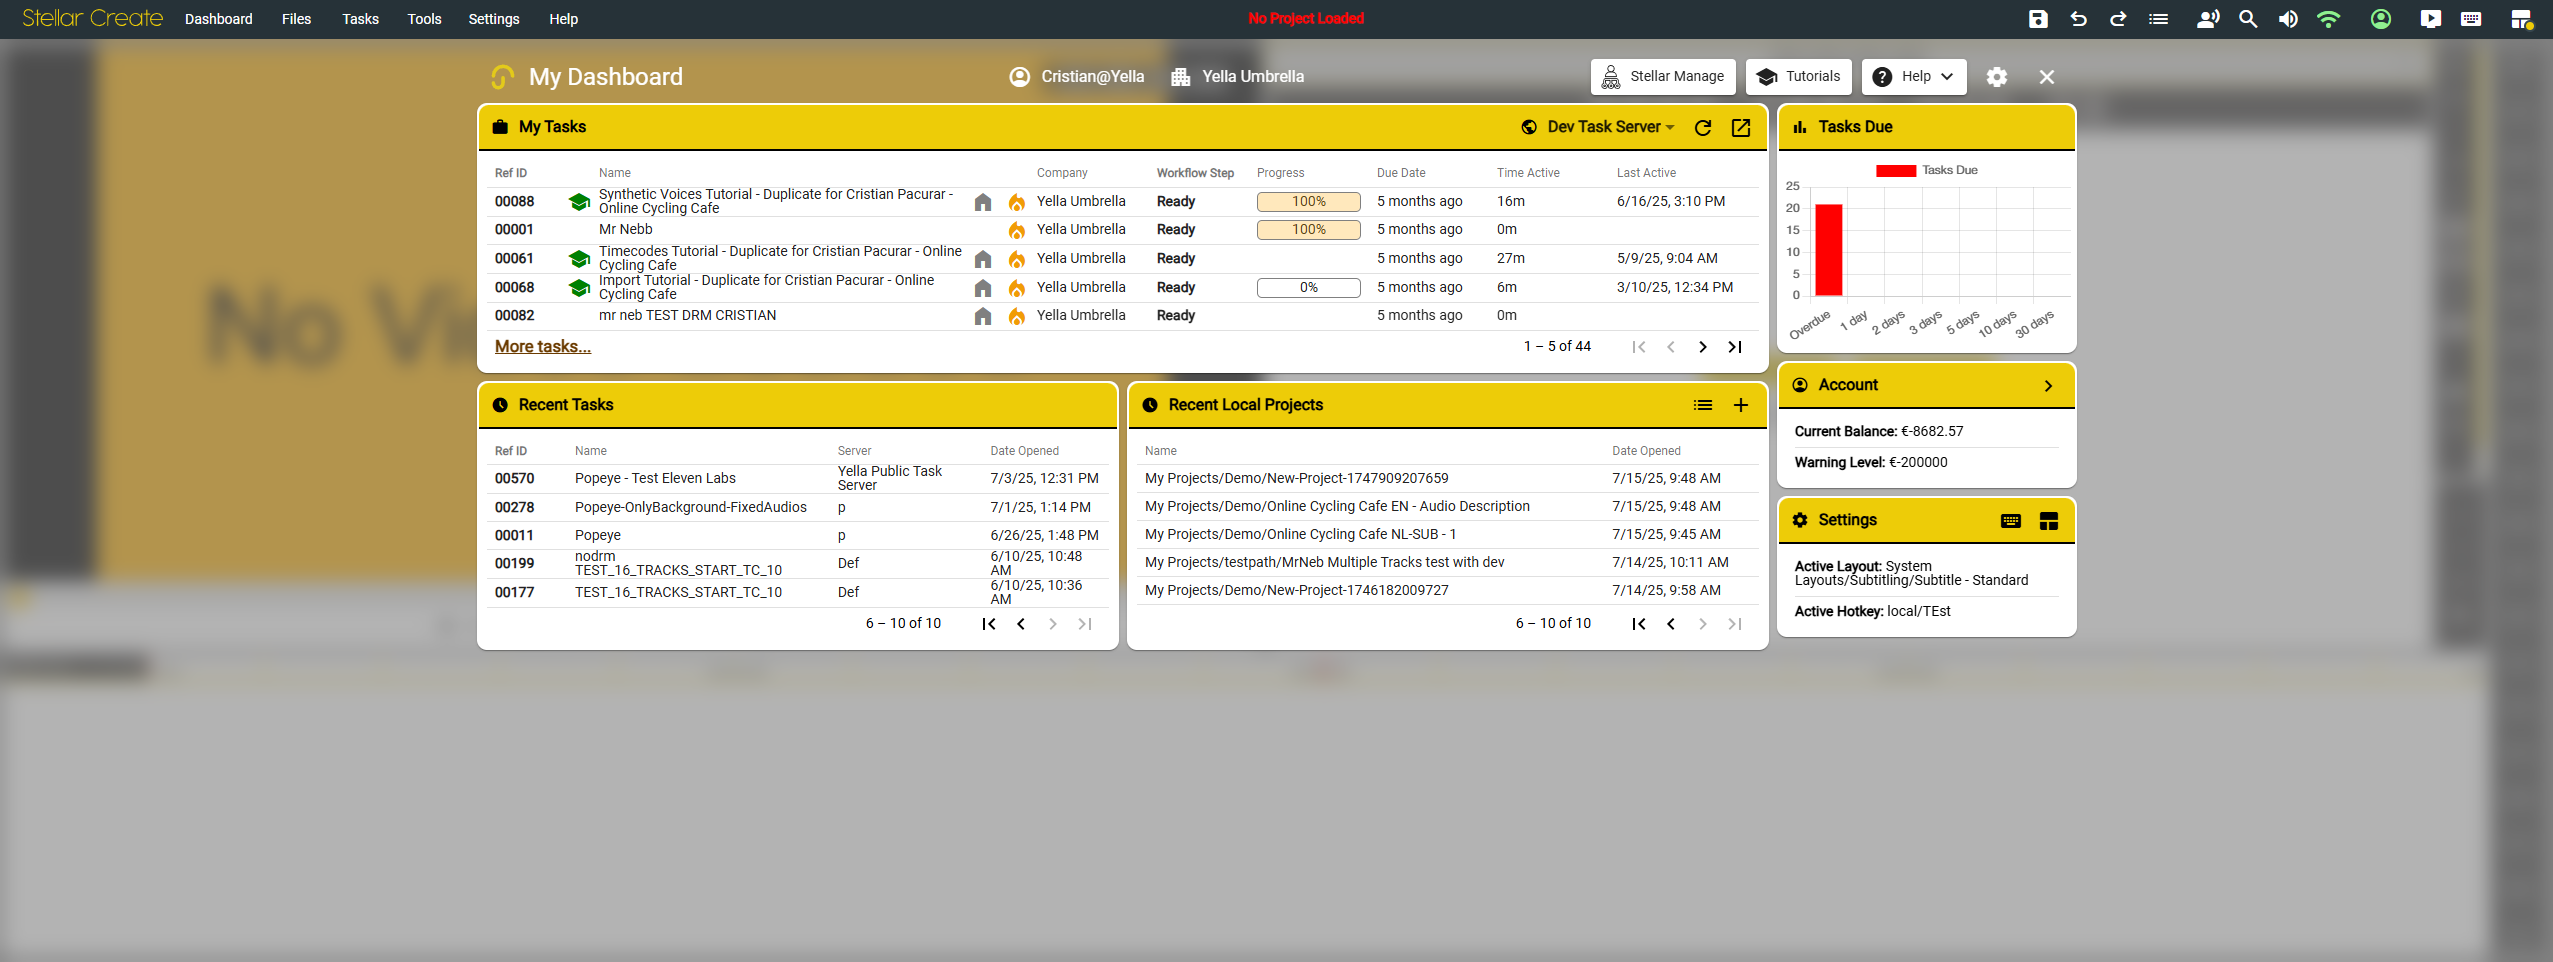
| Section | Description |
|---|---|
| My Tasks | Will show Tasks that have been already been allocated. |
| Recent Tasks | A list of recent tasks that were accessed. |
| Recent Local Projects | A list of local projects that were recently accessed. |
| Tasks Due | Graphic visualisation of Tasks which are due. |
| Account | Details about account currently logged in. |
| Settings | Details about the current Active Layout and Active Hotkey Map |
You can open the external help menu by pressing the ![]()

You can always manually open the Welcome window by pressing
You can turn on/off sections in the Dashaboard by pressing on the ![]() button to open the Dashboard Configuration window.
button to open the Dashboard Configuration window.
Accessing Tasks
Opening the Task Screen

- Click on the Task option on the top menu.
- This will show you two options: Open Tasks and Manage Tasks.
- To Open a task - please press on the Open Tasks option.
- If the Task option is not visible you need to Add the Task Widget to your Layout.
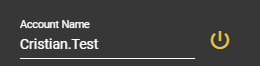
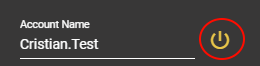
In the Task Manager you will see your login status
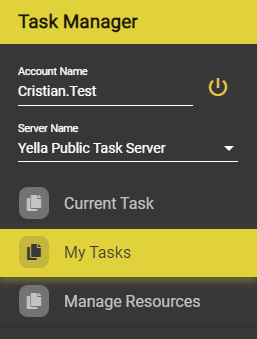
Before you can see the Task assigned to you you’ll need to Log In to the Task List server.
-
You will automatically be logged into the Task Server with user currently logged into Stellar Create.
-
This will show the login dialog.
-
Enter you User name.
-
Enter you password, Google Chrome will store this automatically if you allow it to.
-
Click Login.
- Use the Forgot Your Password option if required – this will reset you Nebula Login Password.
-
Once you enter your name any tasks assigned to you will appear in one of the Task Screen tabs, Started & Ready, Pending or Completed.
- Select the Server you want to log into from the dropdown list.
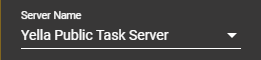
- By default, you will have access to the Yella PUBLIC Task Server.
- Other servers are run by the company or companies that you are working for and used to assign tasks to you.
- There may only be one server or you may have access to more than one.
- If you are using the Yella Public Task Server you may see Tasks assigned to you by more than one company.
- You can always click on the Refresh button to reload the list of Tasks to make sure it’s up to date.
- Any Tasks assigned to you will appear in this window.
- Select the Server you want to log into from the dropdown list.
You can see which Task Server you are currently signed into on the Server Name line.
To change servers (if more than one is available to you) with the Dropdown and then click the Connect to Server button next to the name.
To Log Out click on the Log Out button.
Second Factor Authentication
In some cases you may need to use Second Factor Authentication (2FA) before you can load a Task.
This is an additional level of security and can be set by the owner of the Task Server you are accessing.
![]()
-
Next to each task there may be a small Smartphone Icon.
-
No Icon – this means that the task doesn’t need any additional security
-
A Red Icon – This means the task requires 2FA and is still locked

-
A Green Icon – This means the task requires 2FA and has already been unlocked.

When you try and download a Task with a Red icon you will see a screen asking you to Select how you want to receive Authentication Link; this can be either via an SMS text message or via email.
The email address or phone number must already be set in the workflow system of the company assigning you work. If this has not been done you need to contact the company supplying you with the Tasks.
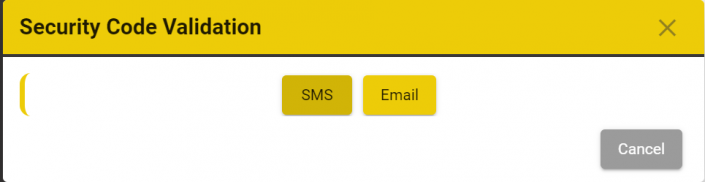
- Click on either SMS or email.
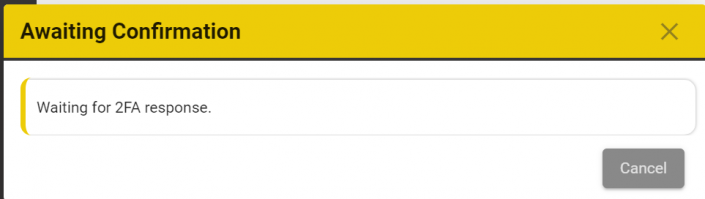
The Awaiting Confirmation dialog will be shown.
- At this point check you email or SMS texts for the message.
- This will consist of a link, just click on the Link.
- This will show a simple web page with Accept and Reject buttons.
- Click on Accept.
- The Awaiting Confirmation dialog will close and the Icon will change to Green.
- The task will start to download.

If the SMS or email doesn’t arrive:
- Close the Awaiting Confirmation dialog and try again.
- If you continue to have problems contact the company providing you with the Tasks to check that you have the correct phone number and second email address configured in Nebula.
- Go to Log In ‹ Nebula — WordPress and Edit Profile to update your details.
Task Screen Layout
Tasks → Load Task
The Task Screen can have two or three Tabs:
- Current Task - information about the currently loaded task
- My Tasks - details about the tasks that have been assigned to you
- Tutorial Tasks - training tasks that we available for all users.
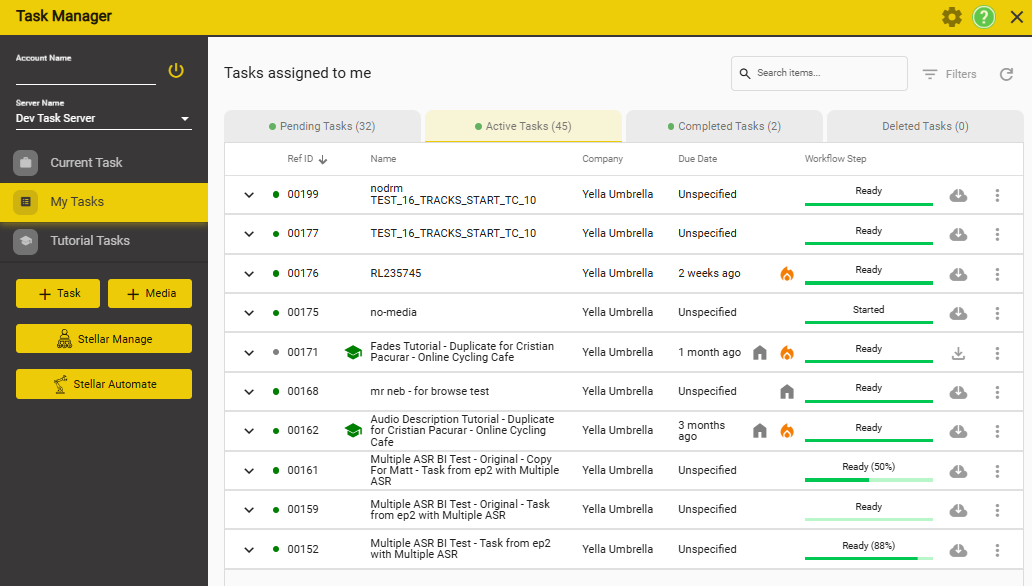
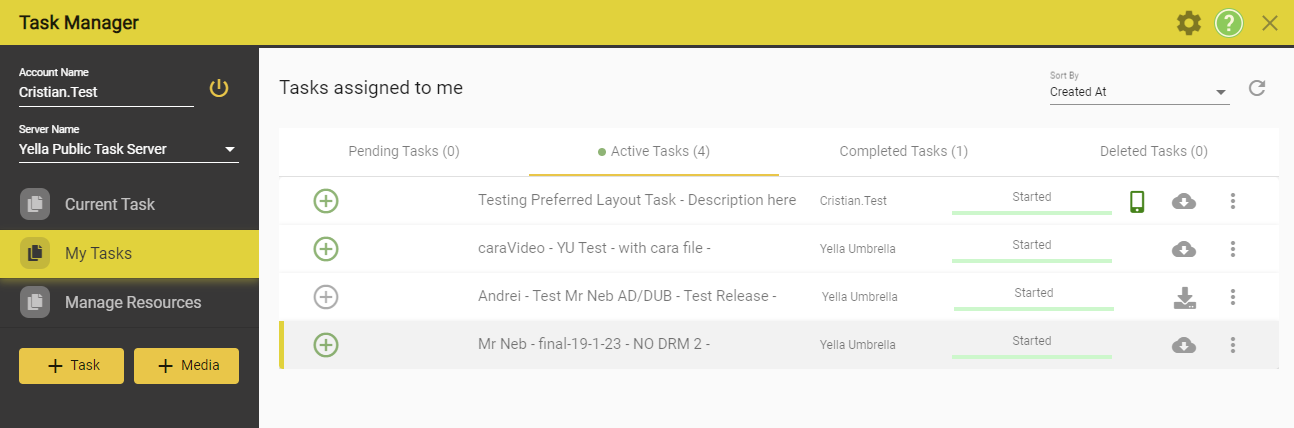
My Tasks
Tasks → Open Task
The My Tasks tab lists all Task assigned to you.
-
There are three sub tabs on the page:
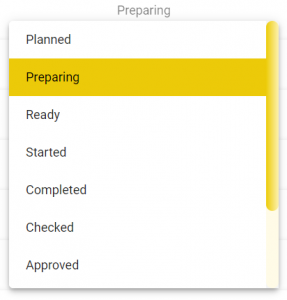
- Active Tasks – Lists all Tasks assigned to the logged in user that have their state set to Ready or Started.
- Pending Tasks – Lists all Tasks assigned to the logged in user that are in state Planned or Preparing.
- Completed Tasks – Lists all Tasks assigned to the logged in user that are in state Completed, Checked or Delivered.
- Note: Status names and sequence may vary between companies.
- Deleted Task - Tasks marked to be deleted. They will disappear from this list after 24 hours.
(currently only Managers / Admins can mark a Task for Deletion.)
-
You can sort or filter the list by clicking the header of each column.

↑- ascending sort
↓- descending sort
- Select what field to sort by.
- Select Ascending or Descending order.
-
Filter
- Click on the filter button.
- Click on the filter button.
-
Task can be filtered by: Workflows, Owner, Assigned Users, Assigned User Groups, Tutorial, Tags, Language Tags.
-
Click on the three lines
 button to clear any applied Filter. This will bring you back to the full, unfiltered, list of tasks.
 -
You can see more information about a Task by clicking on the Show Details Icon
v -
- This will open the Task Information section.
- Click again to close.


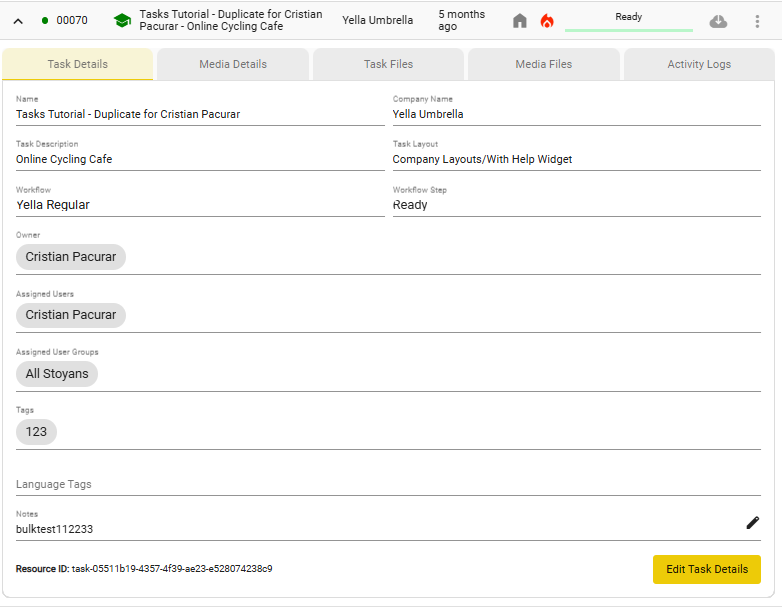
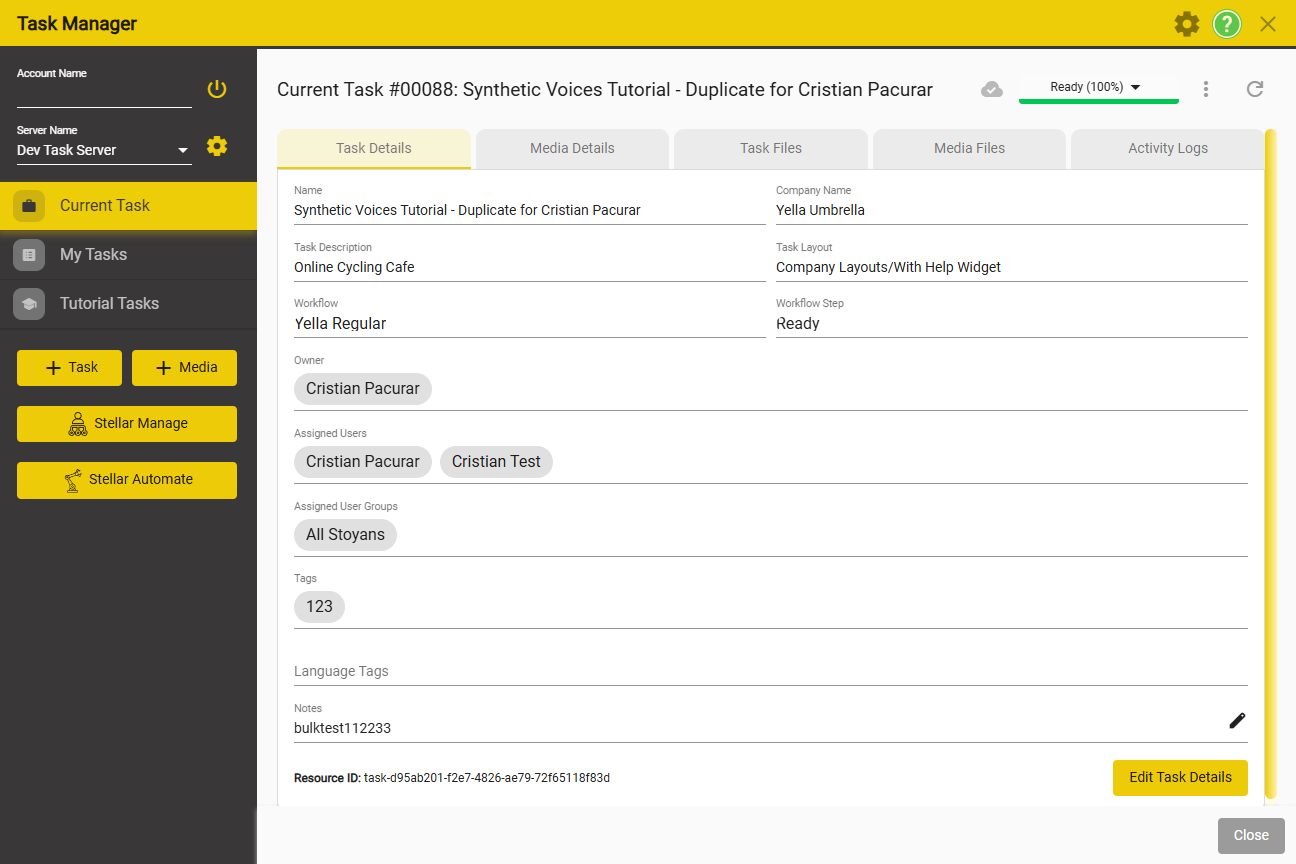
Task Details - All the details related to a task.
| Option | Details | Default |
|---|---|---|
| Media Details | The media assigned to the current Task. You can change it, but then the new Task won’t be the same as the current one. | |
| Task Name | Name of your Task | Will default to media name |
| Task Status | Select one of the available statuses. | Preparing |
| Two Factor Authentication | If selected, all users must authenticate by email or SMS when downloading this Task. | False |
| Assigned Users | The current user is added by default; click in the blank area to select additional users from all available. | Current user |
| Assigned User Groups | Start typing to see a filtered list of groups; you can assign any group of users in your company’s user list. | Empty |
| Notes | Enter free-form text instructions for this Task. | Empty |
| You can’t set DRM encryption | The media may have had DRM set when it was first uploaded. | Default to Media DRM status |
| Metadata | Accepts key-value pairs. | Empty |
Media Details
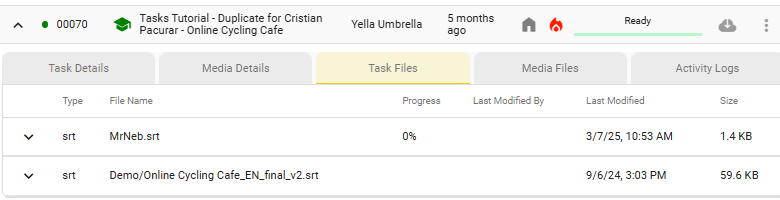
Task Files - details about the text files present in the task.
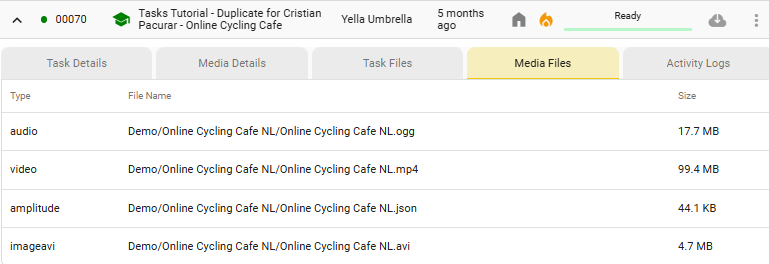
Media Files - list of media files present in the task
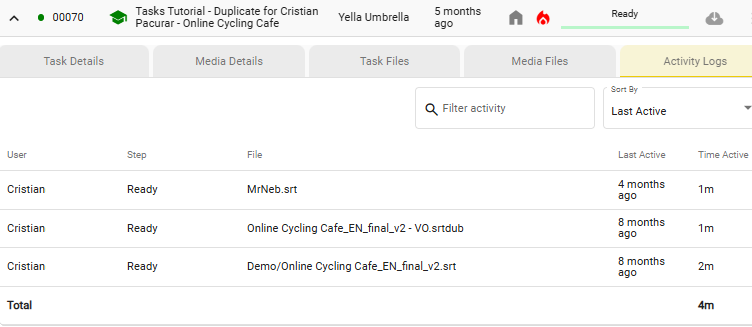
Activity Logs - activity logs
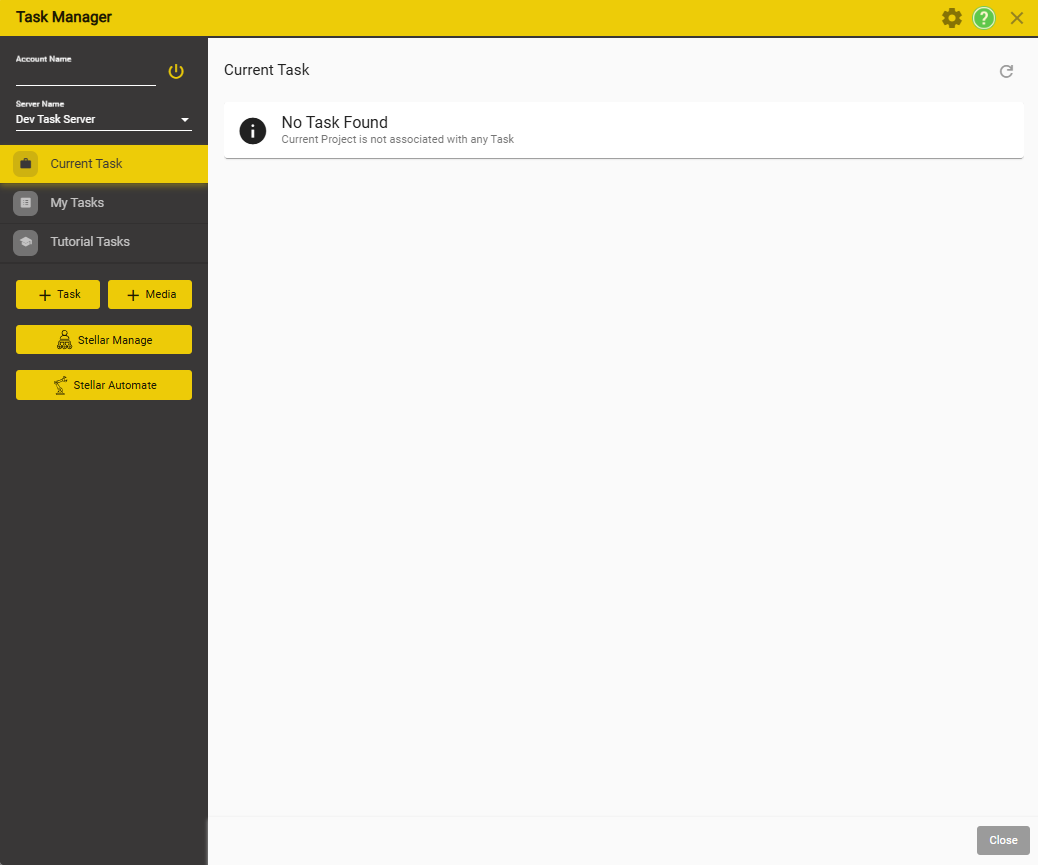
Current Tasks
Once a Task has been loaded, an extra option will appear in the Task menu.
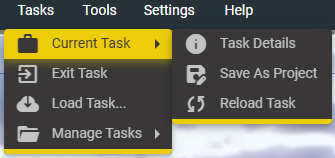
To access the Current Task: Current Task → Task Details
To save the Current Task as a project: Current Task → Save As Project
To reload the Current Task: Current Task → Reload Task
To exit the Current Task: Exit Task
To load different Task: Load Task….
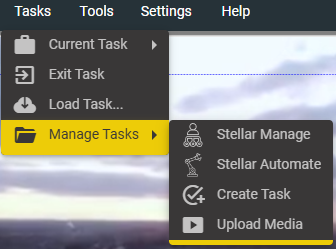
To manage Tasks: Manage Tasks → Stellar Manage (help page)
To manage Task Creation → Manage Tasks → Stellar Automate (help page)
- The Current Task Tab will only be populated once you have loaded a Task.
- This tab shows all the data about the current task based on the Task management system.
Click on Active Task to see further details.

Click on Active Media to see more details about the Media which is active in the task.
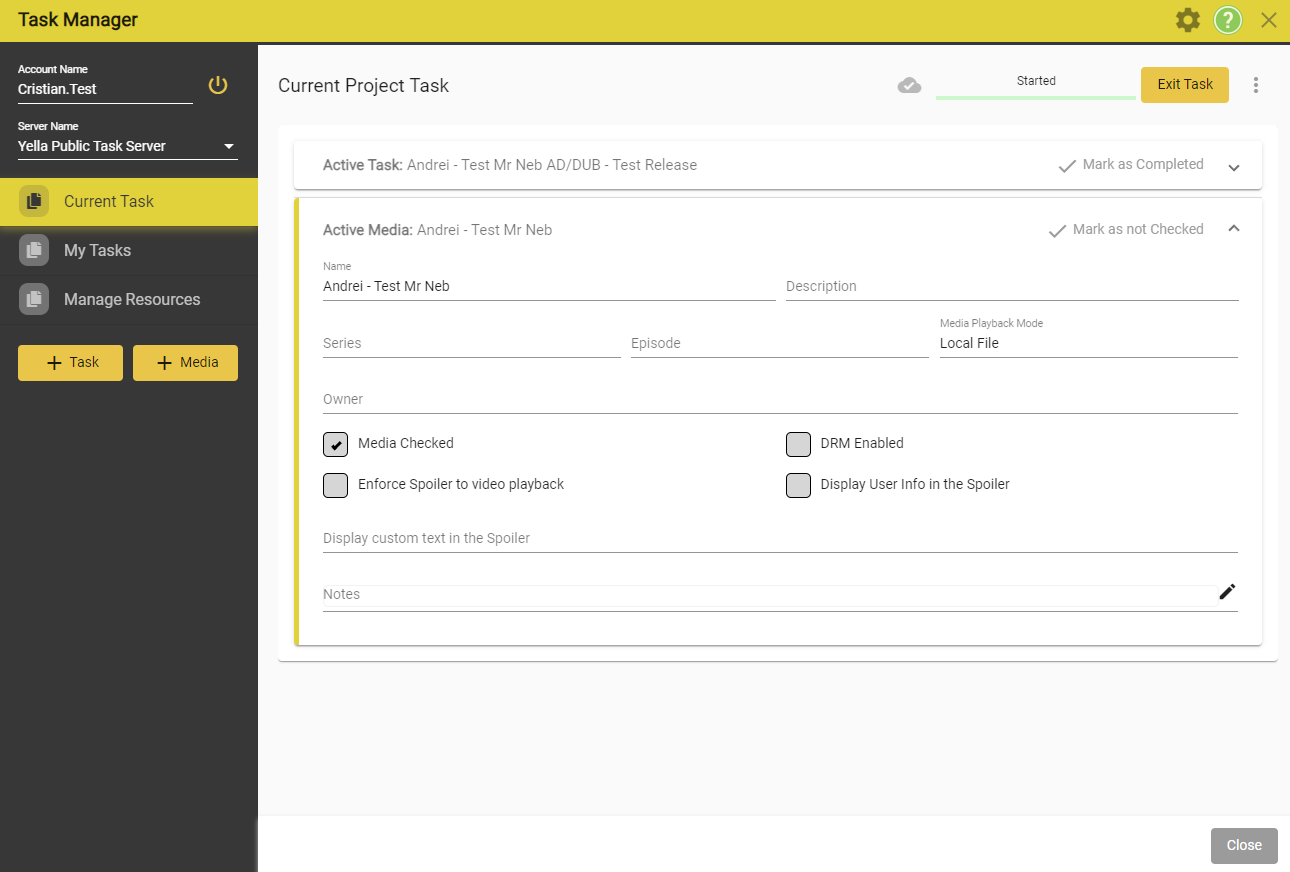
Current Task Controls
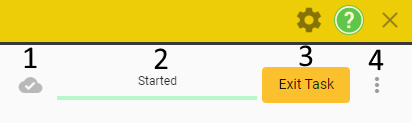
If there are no current actions being done to the task
1 - Hovering over this icon will tell you if your files are synchronized with the could storage.
2 - Will indicate the Status of the the current Task.
3 - Exits the current task.
4 - More Actions
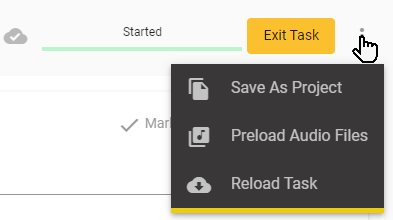
- Save as Project - Save the current Task as a Local Project. This copy is independent from the Task. Any changes done on this project WILL NOT be reflected in the task.
- Preload Audio Files - For Task which have Audio in them. Requests to download all audio files associated with this project task.
- Reload Task - Reloads the current task.
Loading a Task
-
Before you can work on a Task you first have to download it.
-
On the Tasks Started & Ready Tab select the task you want and click on the corresponding Download button.

-
You will be asked if you want to download the required files – Click Yes
-
You may be asked if you want to download additional media files. Unless you know you already have these on your machine - click Yes.
-
You will be asked if you want to open the Project for the selected Task.
- Click Yes to start work immediately.
- Click No if you’re just downloading the files for later use.
- Note: A Project within Stellar Create is the collection of media, script and audio files for a single Task.
-
To load a task that was already downloaded, click on the Load Task button.

Adding Subtitle or Script Files
- Once the media has been checked the next step is to add the Subtitle or Script file(s).
- To add the subtitle or script files:
- First download the Task as above.
- Once you have the Task open with the media visible you need to add one or more subtitle or script files.
- Use the Add Existing text files option. See Here.
- After you have added the files you need to check them to see if they are correct, match the media, have the correct timecodes and all the required Roles are present in any Script file.
Working on a Task
- Once a Task is in the state Ready you can start working on it.
- Depending on the Task this can be creating new subtitles, QC, editing the script, translating, adapting, recording, reviewing or mixing.
- First load the Task
- This will load all the files you need to do the task and may include video, additional audios, shot change list, subtitle or script file(s) and other settings.
Editing / changing the Status of a Task
-
To upload a media file you must have Manager or Admin level access for the Company you want to change the Status of a Task not assigned to you.
-
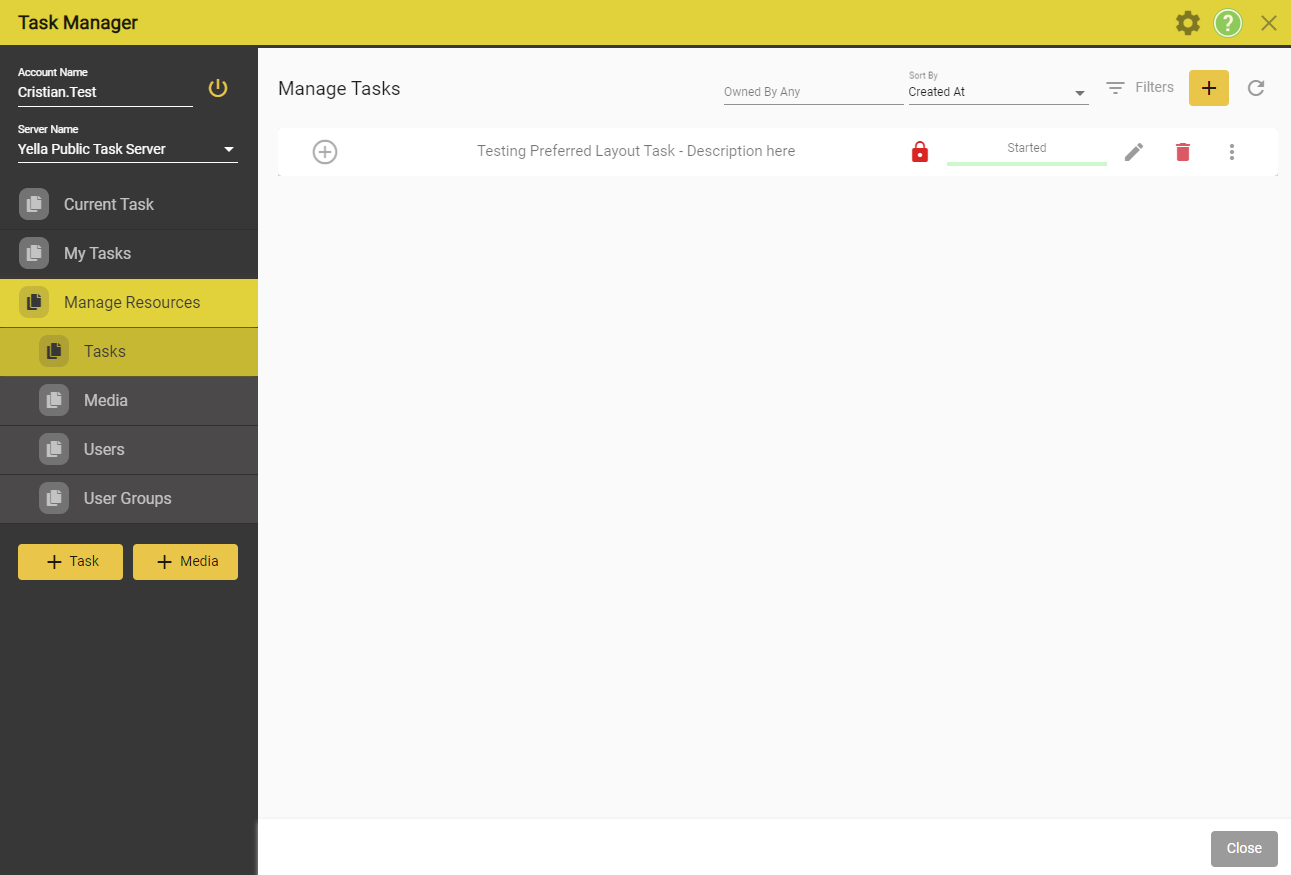
Click on the Manage Resources – Tasks Tab
-
Scroll to find the Task you want to change.
-
To Edit the Task:
- Click on the Pencil Button
- You can now edit all the Task settings
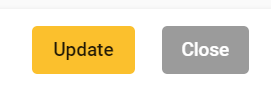
- Click Update to save
-
To quickly change the Status
- Click directly on the Status text above the green progress bar.
- You will see a dropdown of the available Statuses which can be assigned.
-
Click on the new Status.
-
This will be saved automatically.
How to Create a New Task
- To create a New Task you must have Manager or Admin level access for the Company you want to create a Task for.
- If you have Admin or Manager level of Access you will see the Manage Recourses option in the Task screen.
- Click on the + Task button
There are four ways to create a New Task based on Project, a Task or Remote Media.
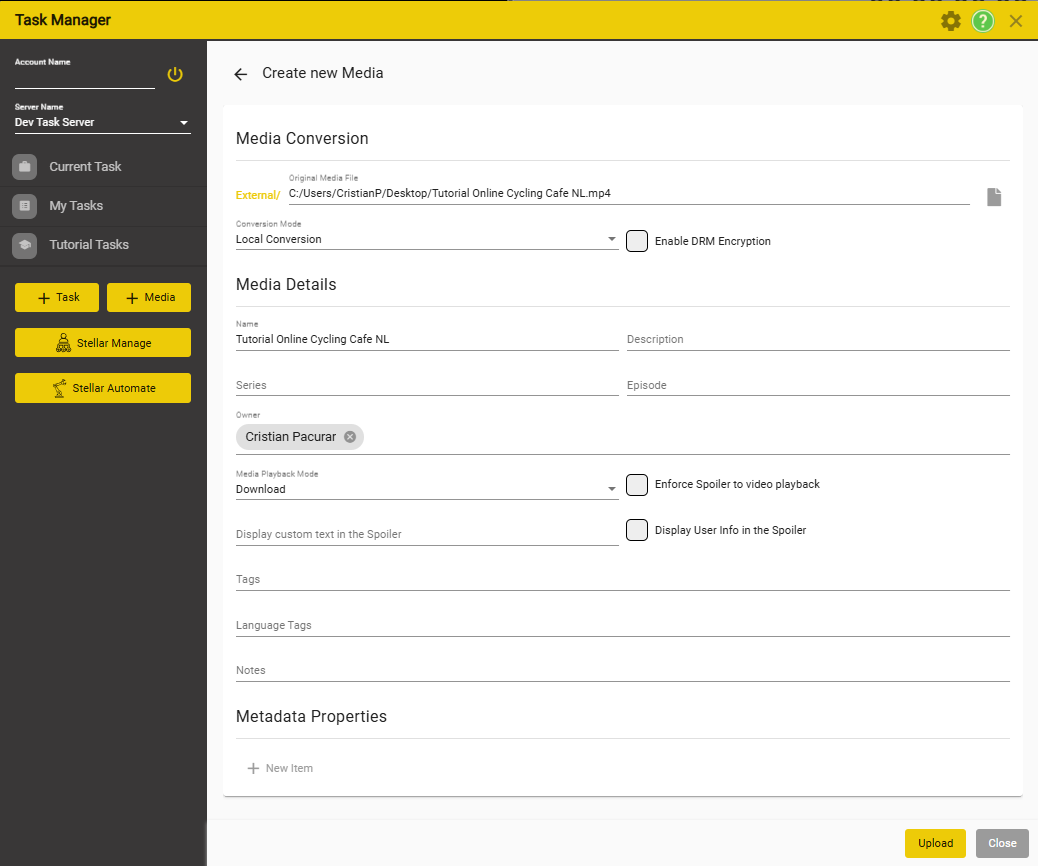
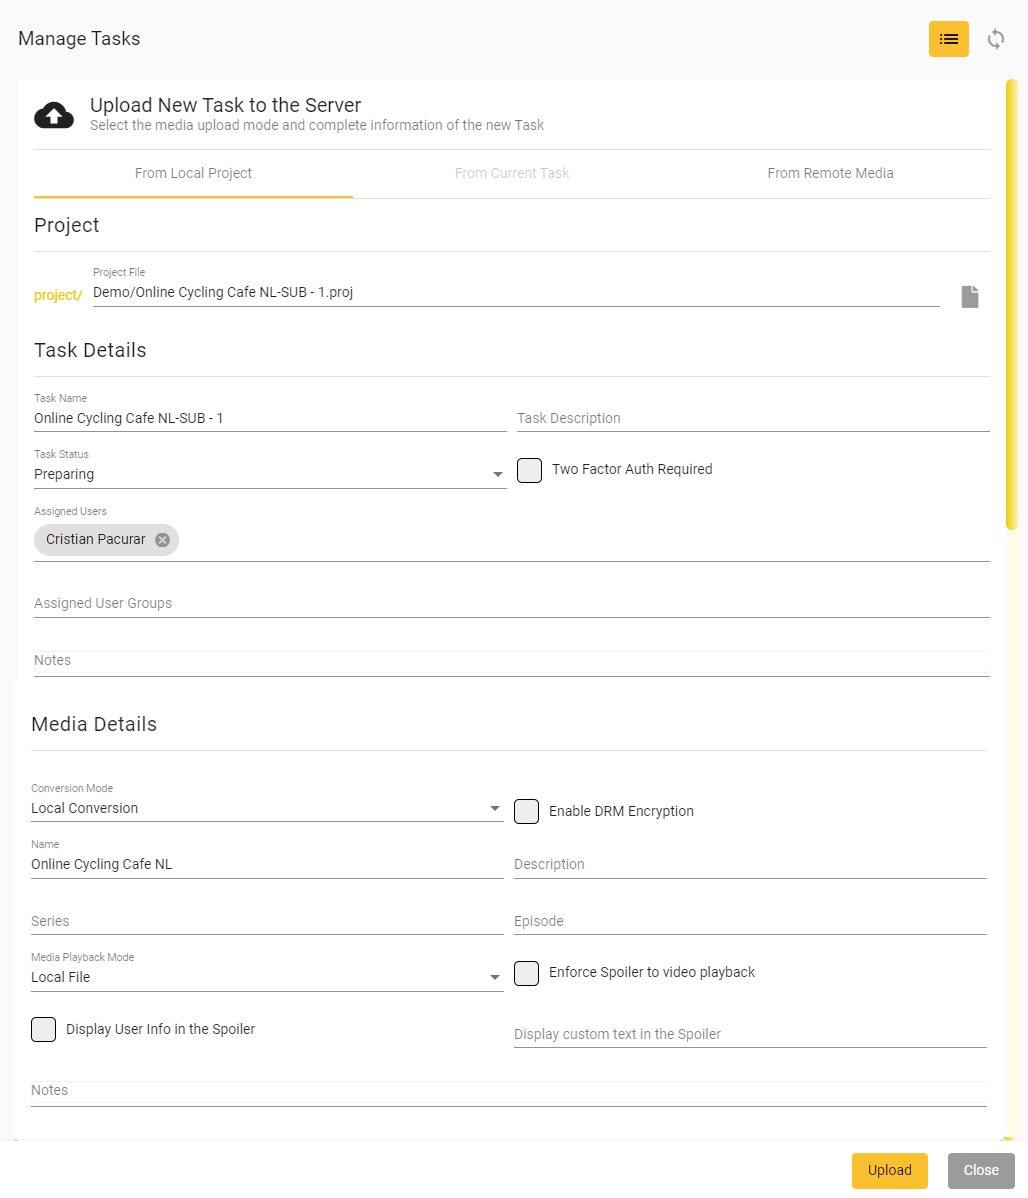
- Create a Task based on the current Project. – This is the simplest option.
- Create a normal Stellar Create Project with the media and any existing subtitle or script files.
- Upload the whole set to the server as a single Task.
- You can set DRM encoding on the media if required.
- Create a normal Stellar Create Project with the media and any existing subtitle or script files.
From Local Project
-
Project
- This defaults to the current Project.
- You can select a different Project by clicking on the document icon.
- This defaults to the current Project.
-
Task Details
- Enter as many details as you want, most entries are for information only.
- Task Name – Required
- Task Status – Default is Preparing
- Two Factor Authentication – If selected all users will have to authenticate by email or SMS when downloading this Task.
- Assigned users – The current user is added by default – Click in the blank area to select available users.
- Start typing to see a filtered list of users.
- You can assign any User who has been added to your Companies user list.
- Assigned User Groups - Allows sharing the task to a group of users.
- Notes – Enter a name for the new Media associated with the Project
-
Media Details
- Conversion Mode
- Local Conversion - The video file will be converted, and DRM added is selected, by your own PC or Mac.
- Remote Conversion - This is an option and will only be available if configured by your company
- Enable DRM Encryption - Forces DRM encoding of the media prior to uploading.
- Name - Enter a name for the new Media associated with the Project.
- Description - Allows you to add a description for this task.
- Series - Series Name
- Episode - Episode Number
- Media Playback Mode - Allows you to pick between local or streamed.
- Enforce Spoiler to video playback - Adds watermark over media.
- Display user info in the Spoiler - Displays the current user information in the media Watermark.
- Display Custom text in the Spoiler - Displays Custom text in the media Watermark.
- Notes - Enter free text notes for this media item.
- Conversion Mode
-
Create a Task based on the current Task – This is useful for creating multiple Tasks based on the same media.
- EG Subtitle into multiple languages so you can create one task per language.
- The media is already assigned to the Task.
- You can’t add DRM encryption, but it might have been applied to the media when the initial Task was created.
- EG Subtitle into multiple languages so you can create one task per language.
From Current Task
Only available if a Task is loaded
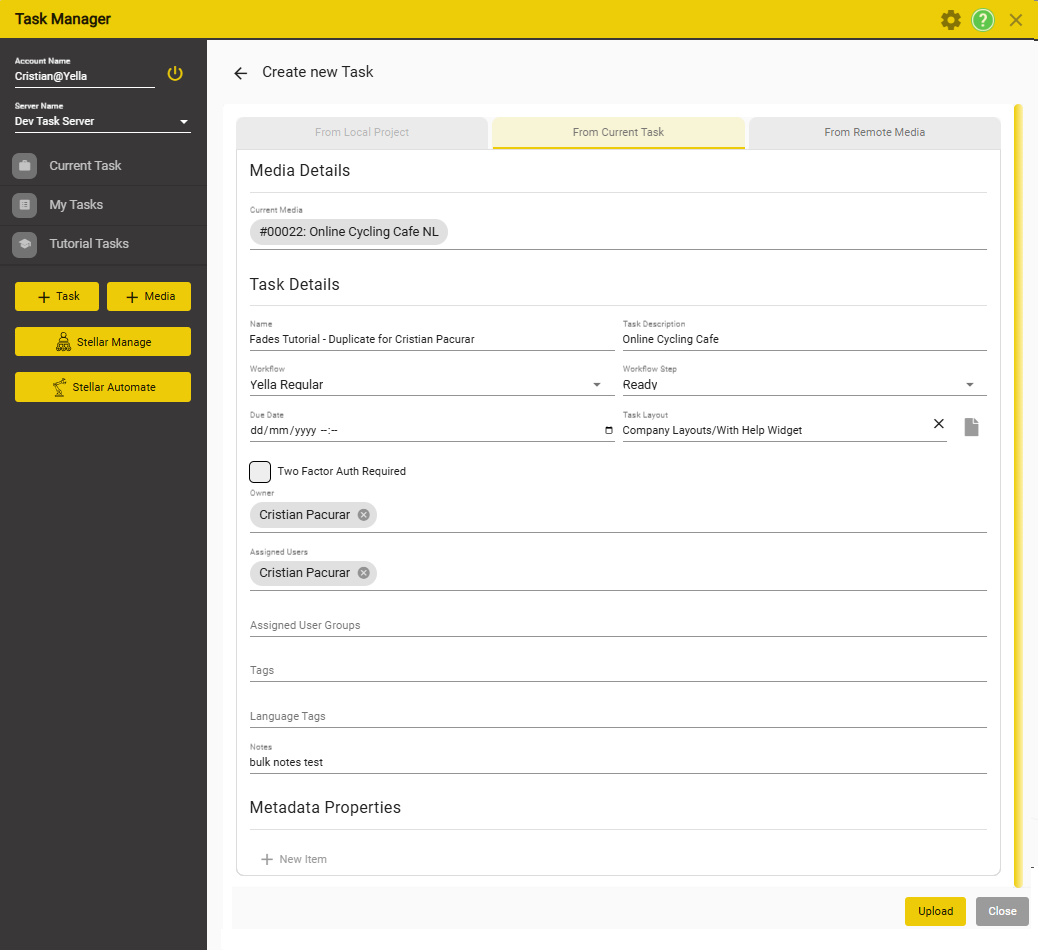
| Option | Details | Default |
|---|---|---|
| Media Details | The media assigned to the current Task. You can change it, but then the new Task won’t be the same as the current one. | |
| Task Name | Name of your Task | Will default to media name |
| Task Status | Select one of the available statuses. | Preparing |
| Two Factor Authentication | If selected, all users must authenticate by email or SMS when downloading this Task. | False |
| Assigned Users | The current user is added by default; click in the blank area to select additional users from all available. | Current user |
| Assigned User Groups | Start typing to see a filtered list of groups; you can assign any group of users in your company’s user list. | Empty |
| Notes | Enter free-form text instructions for this Task. | Empty |
| You can’t set DRM encryption | The media may have had DRM set when it was first uploaded. | Default to Media DRM status |
| Metadata | Accepts key-value pairs. | Empty |
- Create a Task based on Remote Media (Media already stored on the server) – Useful if you want to re-use the same media in multiple task.
- You can then optionally download the Task and add additional subtitle or script files.
- These will be automatically published to the server.
- You can then optionally download the Task and add additional subtitle or script files.
From Remote Media
- You can select any of the media that has already been uploaded to the task server. You can use the drop down to search any exiting video.
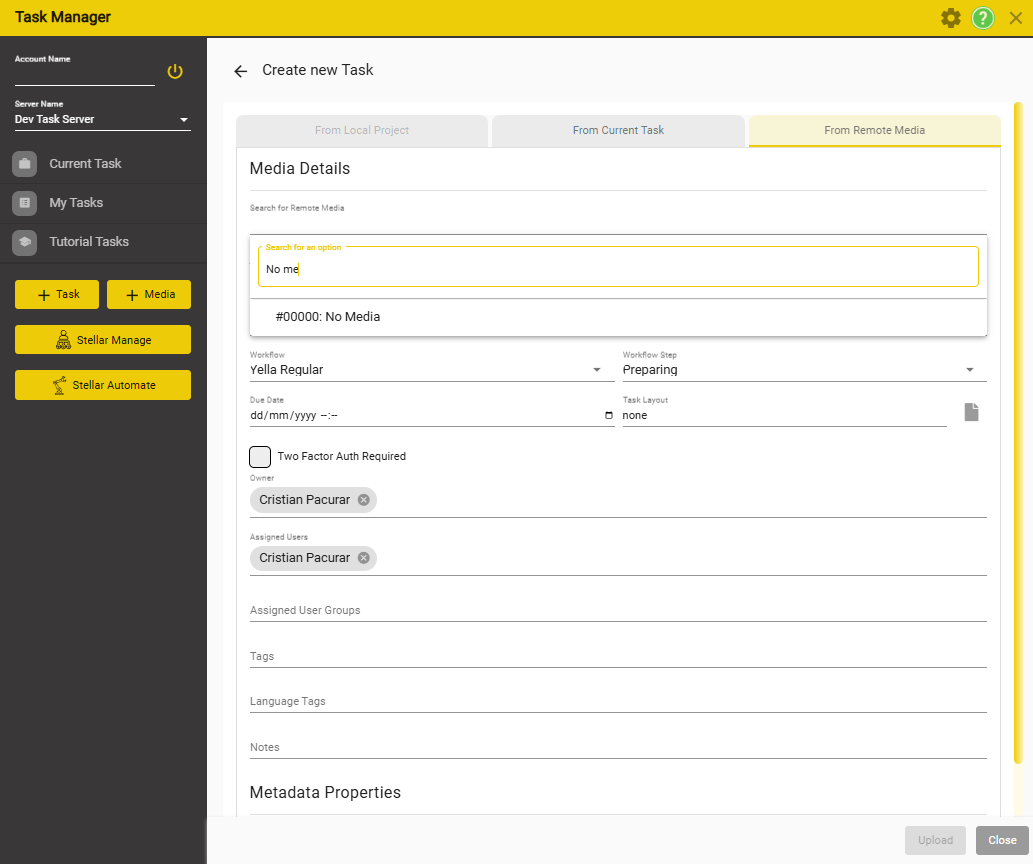
| Option | Details | Default |
|---|---|---|
| Media Details | The media assigned to the current Task. You can change it, but then the new Task won’t be the same as the current one. | |
| Task Name | Name of your Task | Will default to media name |
| Task Status | Select one of the available statuses. | Preparing |
| Two Factor Authentication | If selected, all users must authenticate by email or SMS when downloading this Task. | False |
| Assigned Users | The current user is added by default; click in the blank area to select additional users from all available. | Current user |
| Assigned User Groups | Start typing to see a filtered list of groups; you can assign any group of users in your company’s user list. | Empty |
| Notes | Enter free-form text instructions for this Task. | Empty |
| You can’t set DRM encryption | The media may have had DRM set when it was first uploaded. | Default to Media DRM status |
| Metadata | Accepts key-value pairs. | Empty |
|  |
- Hint: To add subtitle or script files to the Task Download it and add the new files.
- Changes will be uploaded automatically.
From New Media - Using the Wizard
Make sure that the Enable Stellar Link Library is toggled on.
By default the Library will be set to %deafaultfolder% which will point to your Downloads folder.
If you want it to point to the root of your machine, please leave the Stellar Link Library Root empty.
If you want a specific path or drive letter, please input into the Stellar Link Library Root field.
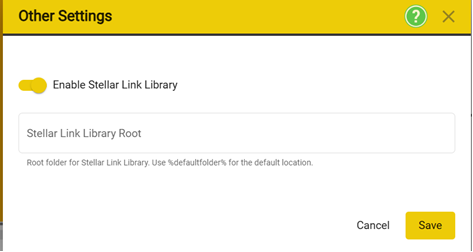
Once you have set it up, please press Save to apply the changes.
-
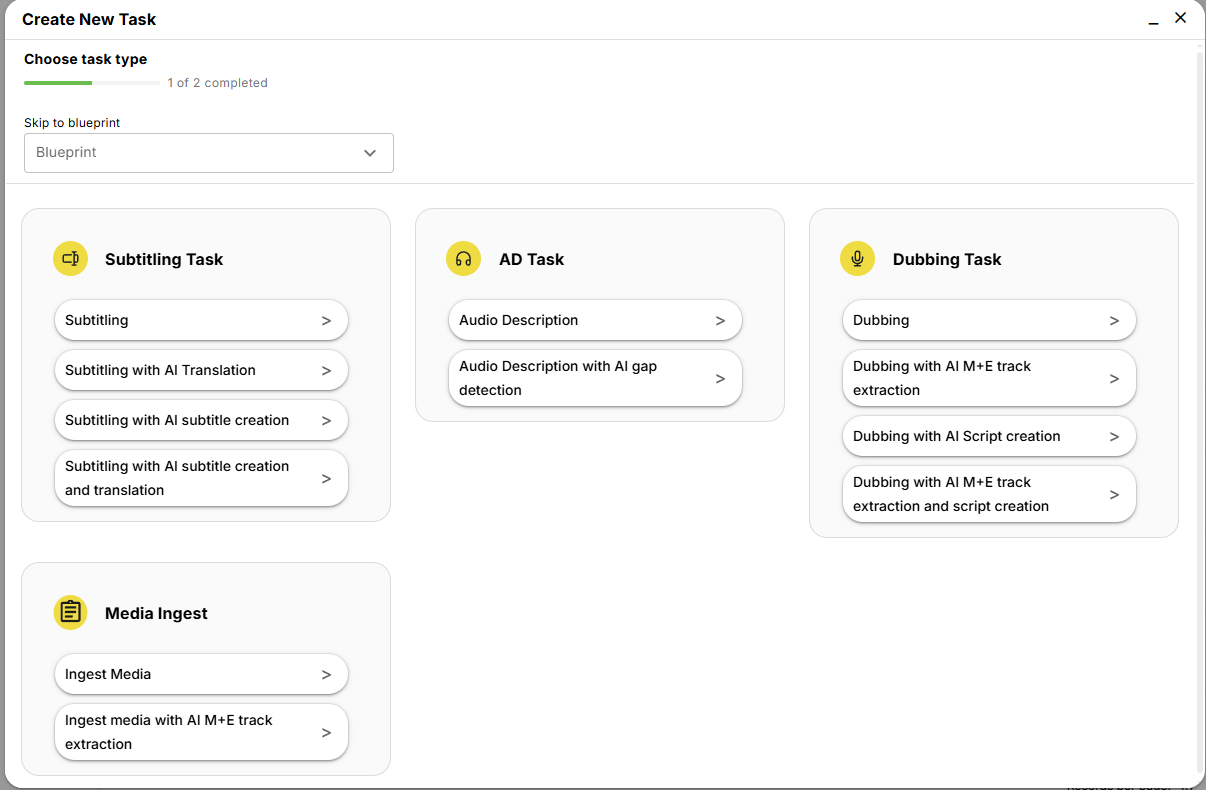
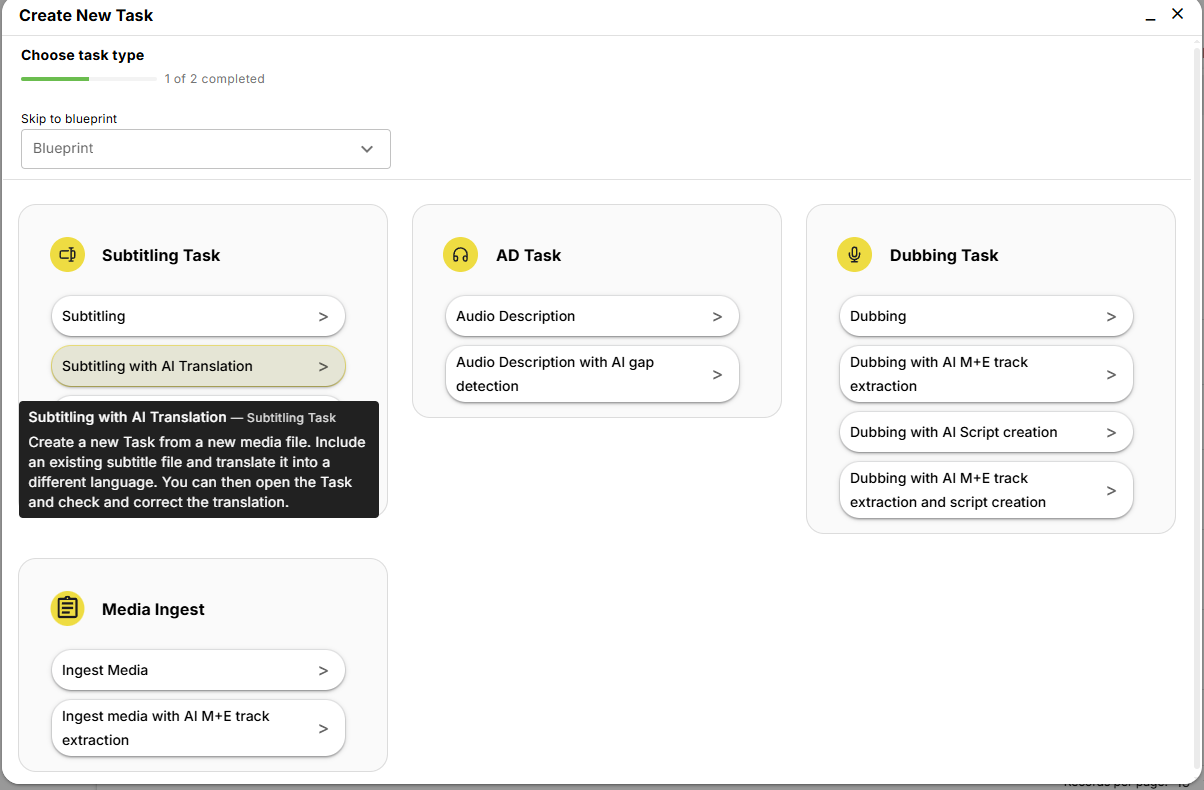
You can create a new Task directly from a Media by selectin the From New Media tab.
-
If you are logged in to the Manager, you will see the Create New Task window appear.
-
If not, you will have to first log in and then you will be able to see the Create New Task window appear.
-
You will see several options that are grouped based on the type of task.
-
The wizard will guide you through everything step by step.
-
Each option has a hover help tooltip that will give you all the information needed.

Adding a new user
To add a new user open the Stellar Manage Page
Tasks → Manage Tasks → Stellar Manage → Log In with your credentials.
Follow the tutorial.
How to upload a media file
Setting the library path
Make sure that the Enable Stellar Link Library is toggled on.
By default the Library will be set to %deafaultfolder% which will point to your Downloads folder.
If you want it to point to the root of your machine, please leave the Stellar Link Library Root empty.
If you want a specific path or drive letter, please input into the Stellar Link Library Root field.
Once you have set it up, please press Save to apply the changes.
Uploading Media
-
To upload a media file you must have Manager or Admin level access for the Company you want to add the media for.
-
By Uploading a media file you are making it available to any other user in the same company via the Task Server.
-
Uploading a media file will automatically trigger the creation of shot change, proxy video and audio files and audio waveform files.
-
Click on the + Media Button
-
This will open Stellar Manager and you will have to log in using your username/password.
-
Once you have signed in, you will see the Ingest Media window.
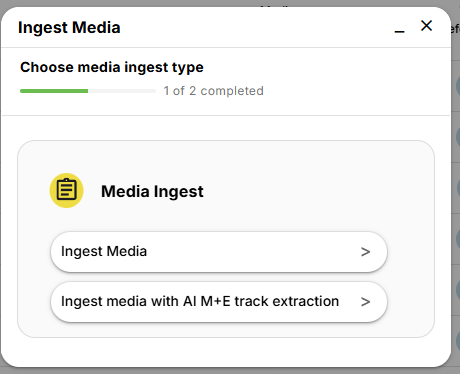
- At this point, you can select one of the two options:
- Ingest Media - will transcode the file and upload the proxy to the server.
- Ingest with Music and Effects Track extraction - will use AudioShake’s service to extract the Music and Effect track and then it will insert it into a new video. The resulting video will then be transcoded and then uploaded to the task server as proxy.
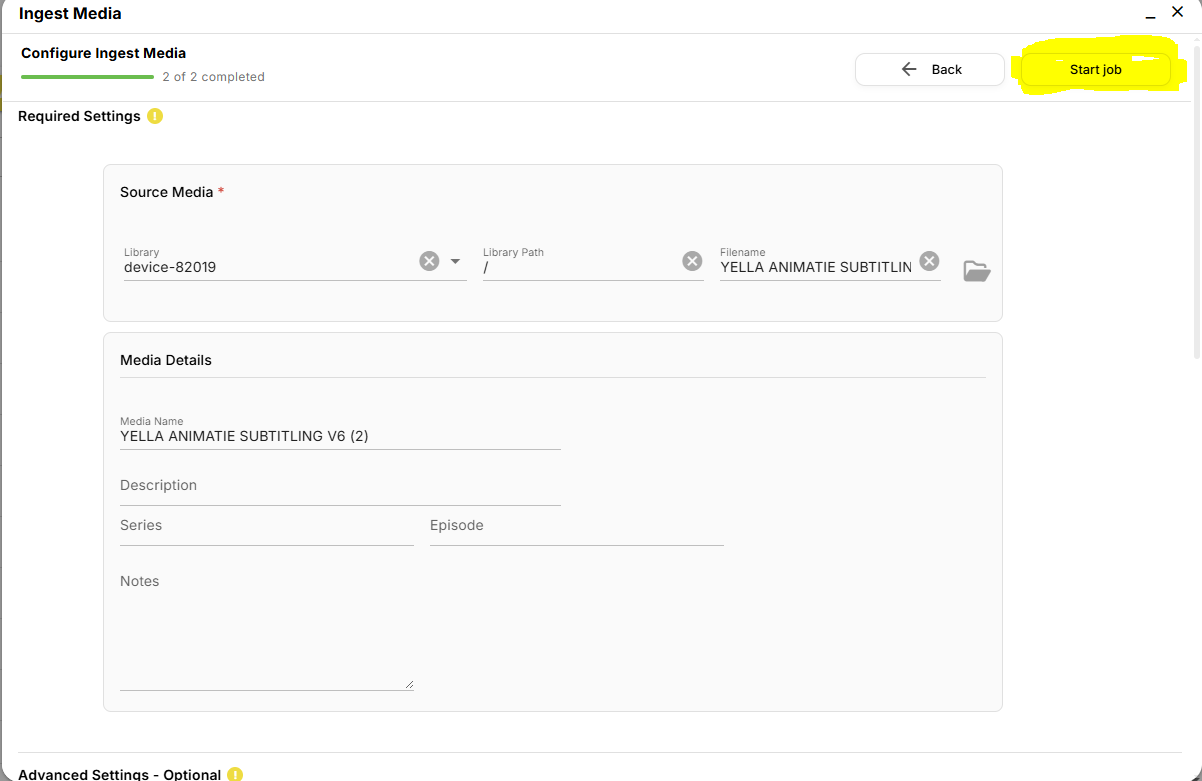
Ingest Media
-
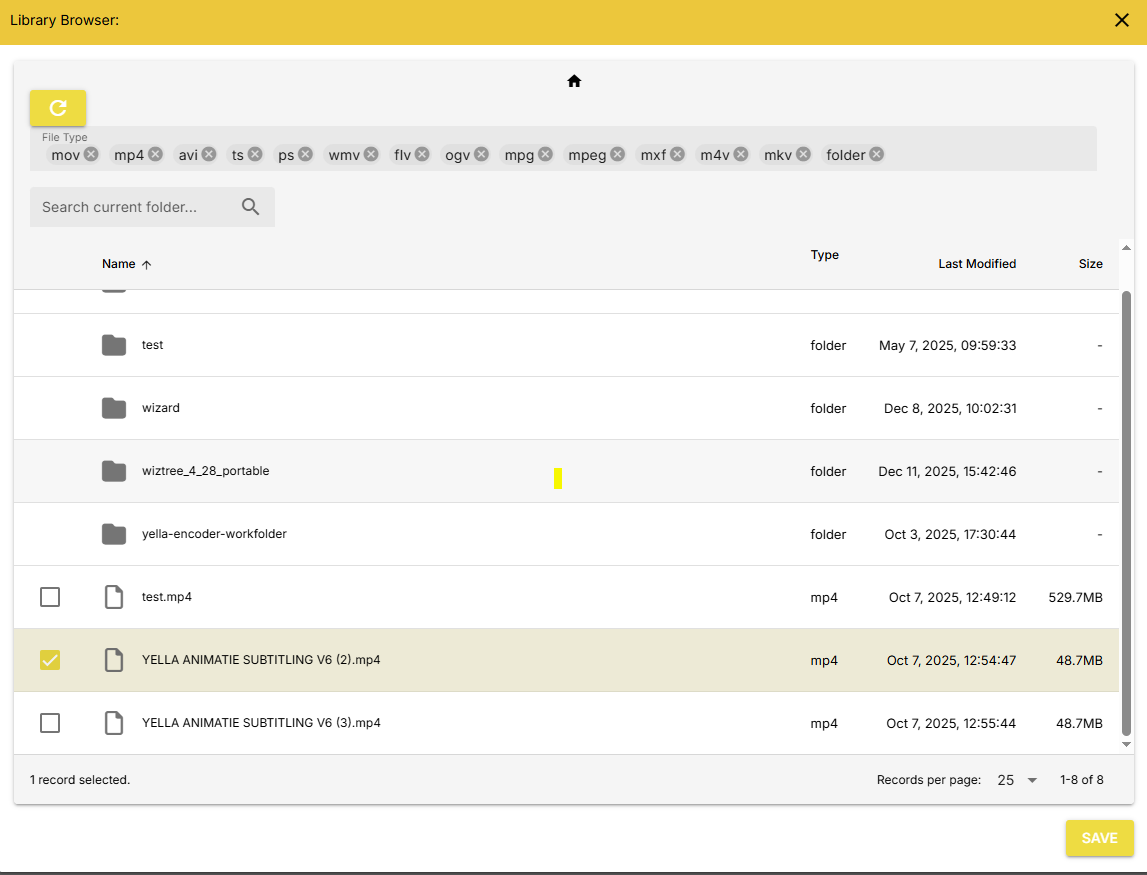
Click on the Folder Icon to browse for your video.
Currently the default folder is set to your Downloads folder.
-
Use the check box to select which video you want to process and then click Save.
-
(Optional) Modify the Media Details, such as:
- Media name - defaults to media file name
- Description - default empty
- Series/Episode - default empty
- Notes - default empty
-
Additional Advanced settings are available

| Option | Details | Default | Options |
|---|---|---|---|
| Audio Interpretation | How the audio will be processed. | Process config | Process config / First Stereo / Tracks as Stereo Pairs |
| Video Processing | How the Proxy will be generated. | Low Res 240p | Low Res 240 |
| Med Res 480 | |||
| High Res 720 | |||
| HD Res 1080 | |||
| Copy Video | |||
| Copy Video and Audio | |||
| Timecode Start | The start time of the video | 00:00:00:00 | Manual Values |
| Enable DRM | Enables DRM on the selected media. | Off | On/Off |
| Playback Mode | Sets the playback mode of the video | Download | Download/Stream |
| Watermarking | Enables watermaking for the media | Off | Off/On |
| Shotchanges | Enables the creation of shotchange track | On | On/Off |
| Waveform | Enables the creation of the waveform | On | On/Off |
-
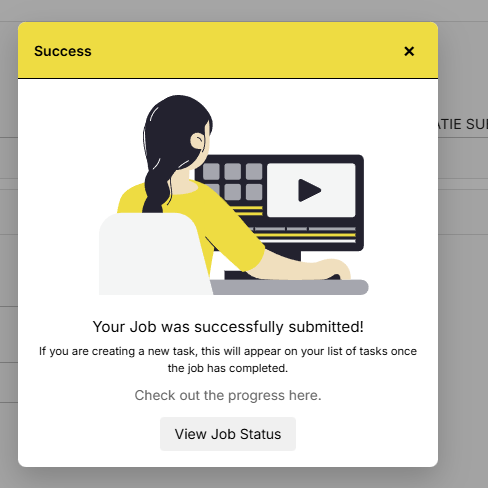
Once you have configured your media ingest, press on the Start Job Button
-
The confirmation popup will appear.
-
You can click on View Job Status to see progress.
It will be appearing as processing

-
Once it completes, the status will change to Complete
![]()
Delete a Task
To Delete a Task you must have Manager or Admin level access for the Company you want to delete the task from.
-
Click on the Manage Resources – Tasks tab
-
Find the Task you want to delete.
-
Click on the red Bin button for that Task

-
The Task will be marked as Deleted and won’t show in the Task list.
- The actual files won’t be deleted until the next scheduled Clean-up process.
- Media Files won’t be deleted.
- See the Media tab for Delete Media controls.
Active Users in a Task
If there are more than one active user on a task, a new icon will appear in the top bar. This icon will indicate the number of users which currently have the Task Open.
![]()
Clicking on the Users Icon will open the Participants list.
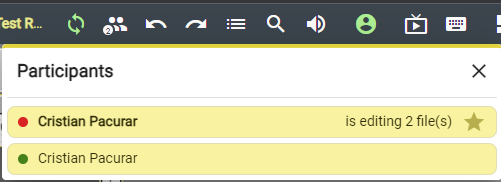
The user which has opened the Task first, will be considered as the Task Master. You can see which entered the task first by checking if they have a star in their Name Entry.
User Status
Each user has a dot in front of their name.
If the dot is red - the user has been away for more than 10 minutes. When dot turn red, the user automatically relinquishes control of all the files they were having control at that time.
If the dot is yellow - the user has been away for more than 5 minutes.
If the dot is green - the use is active on the task.