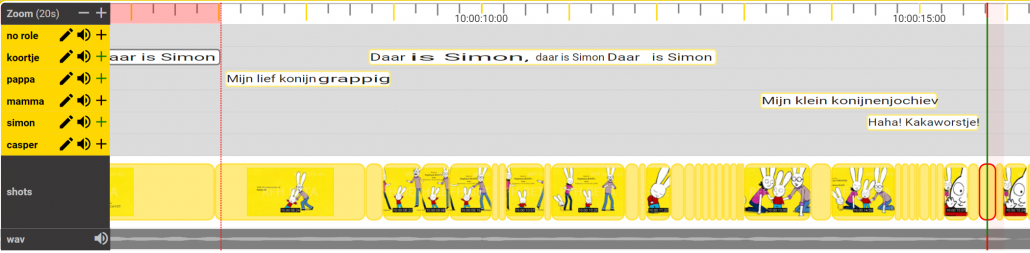
The Timeline Widget
The Timeline is a central part of Stellar and is used in all workflows, Subtitling, Captions, AD, Dubbing and Transcription.
By representing text and audio on a timeline you can see how all the components fit together as well as editing the timing of text and audio components.

The Timeline Widget can be configured to displays a range of timeline types (Rows):
-
Time Track – always visible and on the top row.
- Includes time line zoom controls.
- Includes time line zoom controls.
-
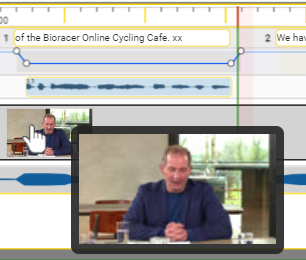
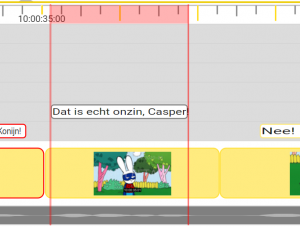
Timed text – Captions and Subtitles,
-
Transcripts – Timed word lists from Speech to Text engines
-
Program audio wave form(s).
-
Shot change tracks.
-
Audio Description track – includes text, fade and audio tracks.
-
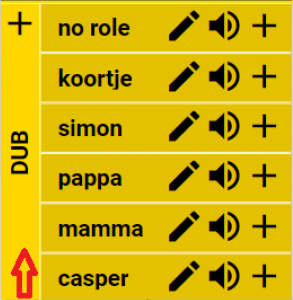
Dubbing track – includes multiple Roles each with text, fade/gain (optional) and multiple audio Takes
-
Other graph type data and metadata.


The type of row displayed will depend on the types of files loaded.
- Shot changes will be shown only if a shot change file is included in the Project.
- Program audio waveform(s) will be shown only if a waveform graphic file (json) is included in the Project.
- Multiple waveform files can be loaded which may represent different program audio elements (separate M+E for example).
- Subtitles will be show for each subtitle file included in the Project
- Audio Description text, fade and audio clips will be shown for each AD file (srtad or esf) included in the Project
- Audio Dubbing rows for multiple Roles will include text, fade/gain and multiple audio clips (Takes) is a dubbing file (srtdub or TTAL) is included in the Project.
- Transcript rows for each timed text (JSON) file included in the Project.
The green vertical bar represents the current media time or Play Head.
Darker outlines highlight on either a subtitle, text or shot-change object indicate that it is valid for the current media time.

A grey Subtitle box indicates this is the current title selected for editing

Controls
Zoom Controls:
- Use the + and – buttons to zoom the timeline view
- With the mouse pointer in the timeline Ctrl+Shift+ Scroll wheel will zoom the timeline
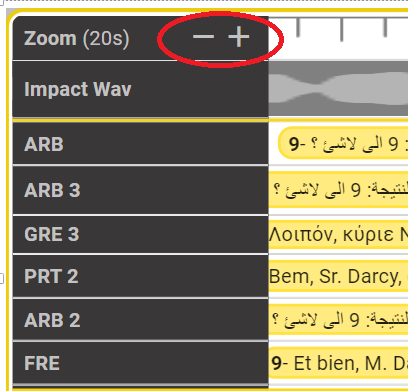
- The Displayed Seconds figure shows the duration of the current view. Range 2 seconds to 200 seconds.
AD and Dubbing track fold controls:
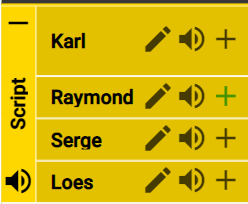
Each Role on the timeline has a + control.
- If there a recorded audio takes for this Role in the visible section of the timeline the + button will be green
Click on the + button to see any Active Takes for the Role

- This will show one or more Active Takes
- An Active take is one that is not muted.
- Active Takes are shown with a blue background
Click on the + button again to show all Takes
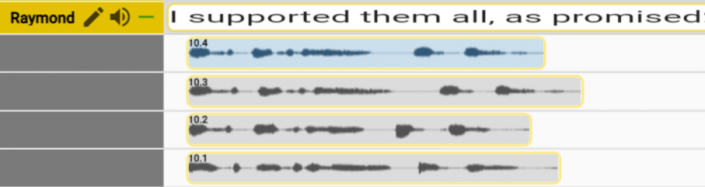
Inactive or Muted takes will be shown with a grey background.
Note: Takes are show with active Takes at the top and inactive Takes below, each in Take number order.
- The central section of the Timeline can be scrolled vertically if there are too many rows to show.
- Use the scroll bar at the right hand end of the Timeline.
- Use the mouse scroll wheel over the left hand title section of the timeline.
The Global + control (on the vertical name bar) opens all closes all Roles at the same time
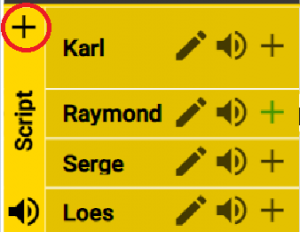
- Hint: Use Shift+ Click on the Role + buttons to open one Role and close all others.

- You can mute each AD track, Dubbing Role and Program Audio individually.
- In a Dubbing File you can
- Mute each Role individually
- Mute all Roles together
- Hint: Use Shift+ Click on the Role Mute buttons to unmute one and mute all others.
- In a Dubbing File you can
Dubbing Text Adaptation edit control:
Once you have a Dubbing Script with all the Lines, Roles and basic timing you may need to do detailed Adaptation for lip-sync timing.
Adaptation is done on the Timeline using drag handles at the beginning and end of each word.
-
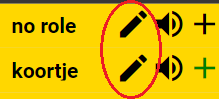
Each separate Role (Character) is represented on a separate track (row) on the timeline.
-
On each track for a Role there is an edit control.
-
Clicking on the pencil button for a Role enables Adaptation editing for that Role
-
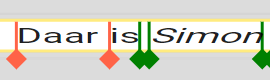
There is a Handle for the start and end of each word
- The start of the first word and the end of the last word are fixed to the ends of the text box times.
- You can edit the start and end points of the text box either by editing the times in the text editor or by using Shift+ Drag over the ends of the text block on the Timeline.
- You can edit the start and end points of the text box either by editing the times in the text editor or by using Shift+ Drag over the ends of the text block on the Timeline.
- Green Handles are unfixed and will move as you make other adjustments.
- Red Handles are fixed and won’t move as you make adjustments
- The start of the first word and the end of the last word are fixed to the ends of the text box times.
-
To move a Handle drag it with the mouse.
- The word timing will change as you move the Handle
- If the Handle is Green it will turn Red and the timing of that handle will be fixed.
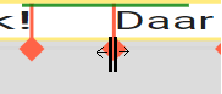
- As you drag the Handle you will see a green limit line above the Handle showing how far you can move it.
-
To unfix a Red Handle Shift+ click on it and it will turn Green and so be unfixed.
-
To add a new Handle in the middle of a word.
- Once added new Handles can’t be removed, but if set to Unfixed (green) will have no effect on the word timing.
-
Any changes you make will be saved automatically.
-
Click on the Edit Pencil icon to turn off Adaptation editing for a Role.
Context Menu
Depending on the which of the components of the timeline is right clicked, a different context menu will be shown.
General options available in all of the timeline areas:
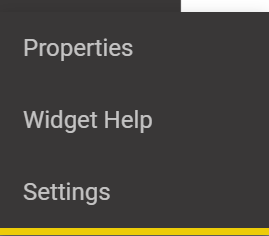
- Properties – Show the Properties of this track (file) in the Project Properties dialog.
- Widget Help – Open a new tab with the help section for this widget
- Settings – Open the settings dialog for this widget
Over the Time track:
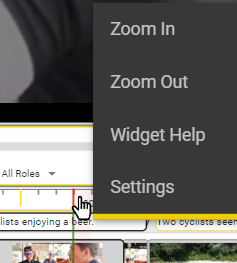
- Zoom in and out - Change the size of the timeline view
- Widget Help – Open a new tab with the help section for this widget
- Settings – Open the settings dialog for this widget
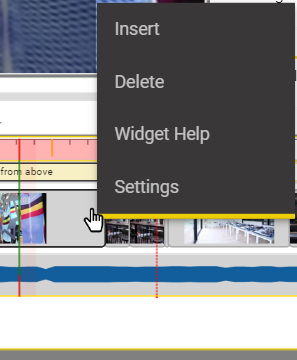
Header area and Empty timeline area:
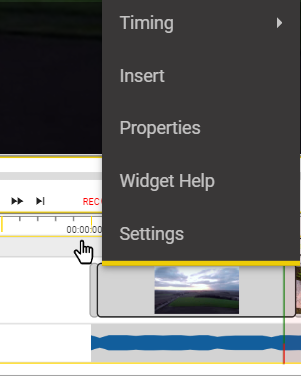
-
Timing - Intervals, Align, Recut and Stretch options that are part of the Timing Tools Widget.
-
Insert - Will insert a new title of the default duration at the current video position – Only present over a text track.
- Note: if there isn’t room for a new Title at the current position you will either get an error message of the new title will be inserted after any title at the current video position.
-
Widget Help – Open a new tab with the help section for this widget.
-
Settings – Open the settings dialog for this widget.
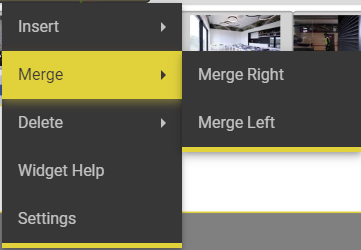
Over a title box:
| Insert | Merge | Delete |
|---|---|---|
 |
 |
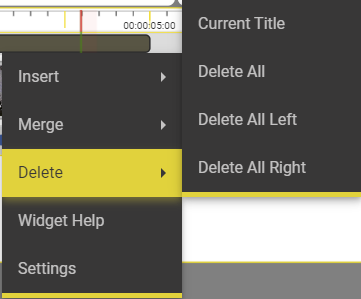 |
- Insert - Insert a new title to the left or right of the current Title
- Merge - Merge left or right with the current Title.
-
Delete - Delete The current Title.
- Delete All Titles
- Delete All Titles Left
- Delete All Titles Right - Widget Help – Open a new tab with the help section for this widget
- Settings – Open the settings dialog for this widget
Over an AD or Dubbing Title box:
- Delete – Delete the selected title and any associates audio Takes
-
Merge – Select merge Right or Left to merge this title with one of its neighbors.
- Any existing audio Takes will be included in the new combined Title.
-
Insert – Select Right or Left to insert a new Title after or before the selected one.
- An error message will show if there’s no space to make the insertion
-
Fade – Make changes to the Fade settings for this Title – AD and VO only.
- Edit Fade open the Edit Fade dialog
- Reset Fade – Reset the fade settings for this Title to the default.
-
Conform Audio – Create a new audio Take by trimming and mixing all current, unmuted, takes
- Useful if you have used multiple sub recordings to achieve the result you want.
- For example when recording the AD for long film credits.
- Useful if you have used multiple sub recordings to achieve the result you want.
- Widget Help – Open a new tab with the help section for this widget
- Settings – Open the settings dialog for this widget
Over a Fade Track – AD Only
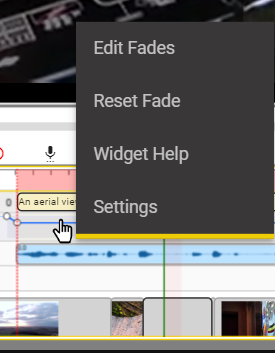
- Edit Fade – Open the Edit Fade dialog
- Reset Fade – Reset the fade settings for this Title to the default.
- Widget Help – Open a new tab with the help section for this widget
- Settings – Open the settings dialog for this widget
Over an audio Take:

- Disable or Enable Take – Toggle between muted and unmuted
-
Trim Take
- Remove Trim – set the audio length to the full extent of the recorded clip.
-
Auto Trim – use the stored Silence level and silence guard setting to automatically trim the clip.
- Note: You can use the Scissors button on the Take waveform (hover over the waveform) to do an Auto Trim.
- Trim to Title – Trim the audio to match the text box length – Warning- this may clip off recorded speech.
- Set Trim Start – calculate the correct trim for the start of the Take – This option is only visible if the media time makes the action possible.
- Set Trim End – calculate the correct trim for the end of the Take – This option is only visible if the media time makes the action possible.
-
Conform Take – Create a new audio Take by trimming and mixing all current, unmuted, takes
- Useful if you have used multiple sub recordings to achieve the result you want.
- For example when recording the AD for long film credits.
- Useful if you have used multiple sub recordings to achieve the result you want.
- Delete Take – remove the selected Take from the timeline.
- Open File Location - will open the external location containing the wav file.
- Widget Help – Open a new tab with the help section for this widget
- Settings – Open the settings dialog for this widget
Over the Shot Change track:
- You can insert and Delete shot change points on the shot change track.
- Useful if you need to fine tune the shot changes during subtitle QC.
- Insert – adds a new shot change at the current video timecode.
-
Delete – remove the shot change at the current video timecode.
- Not visible if there is no shot change at the current timecode.
- Deleting is available when close to a shotchange. When deleting a shotchange, the resulting merge will be based on which side of the shotchange the context menu has been called.
- Widget Help – Open a new tab with the help section for this widget.
- Settings – Open the settings dialog for this widget.
On Hover
Over a title box will show pop up controls and information.
![]()
-
Play button – play the video from just before the selected item to just after.
- For AD and Dubbing text boxes all the associated audios, that are not muted, will play with a preconfigured pre roll and post roll.
-
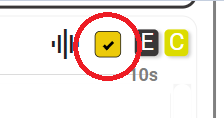
Approve tick box – if enabled
- Approve or un-approve the selected title.
- You can’t approve a Title with no active (unmuted) audio.
- All Approved titles have a green ring around the title number.

- This approval tick box is the same as the one on each title in the text editor and they work together.
-
Set Default Fade – Only visible if the file is an AD Script file.
- Set the fade level for this title to the default defined in the Profile assigned to this file.
Over a audio Take waveform
![]()
-
Play – play just the Take audio using any trim and gain settings – no program audio
- Hint: Double clicking anywhere in the waveform will also play the clip.
- Alt+ Play – Play the whole Take without any trim or gain settings
-
Alt+ Ctrl+ Play – play the trimmed Take in a loop.
- Useful when adjusting the audio level
-
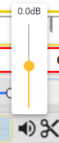
Mute – Mute this specific Take
- Note: Any gain settings will be retained and re-applies if the Take is unmuted.
-
Set Gain - Hover over the Mute control and a gain slider will pop up.
-
- Use this to adjust the gain of the Take.
- Hint: Play the Take in loop mode to hear the effect of the gain changes.
-
-
Trim – Remove leading and trailing silence and align the Take to the start of the text block.
- Trim is non destructive, you can always reveal trimmed audio if required.
- For AD the Fade settings will be adjusted to match, unless Auto Trim is disabled in settings.
- Hint: Shift+ click on the Trim icon will trim without the confirmation dialog popping up.
-
Delete – delete this Take – you will be asked to confirm
- Hint: Shift+ click on the Delete icon will delete without confirmation.
Over a shot-change object will cause a larger image to pop up
Double clicking
- On a text box or shot change - will jump the current media time to the start time of the selected object.
- Anywhere on a program audio track or the timecode - track will jump to the point selected.
- On a Take waveform - will play that Take. Double click again to stop.
- On a shot change - track will move the video time to the beginning of that scene
-
On a Dubbing script row tab – Select All Roles – All row tabs go yellow.
Shift+ Double Clicking
- On any text box on the timeline will jump the selected title to align with the current video time AND all titles in the same file (row) after it will move the same amount.
- Will not allow you to overlap text boxes on the same row.
- Hint: Useful for conforming text tiles to correct for video edits (cuts and inserts)
- On an audio Take
- Will do an Auto Trim to remove leading and training silence.
- Note: This is non destructive and the recorded audio is unchanged. You can always adjust the trim manually or do Undo.
- Will do an Auto Trim to remove leading and training silence.
Alt+ Double Click
- On a text box with AD or Dubbing Audio
- Will Conform all active (unmuted) Takes into a single audio clip and makes that the only active Take.
- All other Takes will be muted
- Hint: Essential when using ESF Files as these don’t support multiple Takes or Trim and Gain data.
Alt+ Double Click
- On a text box with AD or Dubbing Audio
- Will Conform all active (unmuted) Takes into a single audio clip and makes that the only active Take.
- All other Takes will be muted
- Hint: Essential when using ESF Files as these don’t support multiple Takes or Trim and Gain data.
Dragging
-
Drag in the timeline area to drag the video time forwards or backwards.
-
On a touchpad two finger horizontal movements will move the video time.
-
Shift+ Drag is used to move and edit on the timeline:
-
Text boxes

- Shift + Drag in middle to move on timeline – mouse pointer changes to a hand symbol.

- Shift + Drag on ends to edit in and out times – mouse pointer changes to a line move symbol.
-
Text boxes
-
Audio waveforms

-
Shift+ Drag in middle to move on timeline – mouse pointer changes to a hand symbol.
-
Note: In an ESF file the audio can’t start before the beginning of the Text box.
- This is a limitation of the ESF file format. If you need to have more flexibility in where the audio start you should use the more general SRTAD file format
- If the Audio does start before the text box, the waveform will turn Red and a warning message will be shown when hovering over the waveform.
-
Shift+ Drag on ends to edit in and out trim points – mouse pointer changes to a line move symbol.
-
Note: In an ESF file the audio has to be Conformed to take account of any trimming you have done or changes to the gain level…
- This is a limitation of the ESF file format. If you need to have more flexibility in where the audio start you should use the more general SRTAD file format.
- If the Audio has been trimmed, or the gain adjusted, the waveform will turn Red and a warning message will be shown when hovering over the waveform.
-
Fade and gain tracks

- Shift+ Drag on a marker will allow adjustment of the fade or gain settings
- Note: In an ESF file limits are imposed that stop the fade points being outside of the text box area.
- This is a limitation of the ESF file format. If you need to have more flexibility in where fades start and end you should use the more general SRTAD file format.
-
Record Markers
- Shift + Drag on the ends of the red marked area to adjust the in and out times
- On the middle of the red section to move the marked section.
-
Row height
- Shift+ Drag on the bottom edge of a row in the Title area allows the height of a row to be set.
-
Row Order
- Shift+ Drag allows rows to be reordered.
- Rows dragged to the very top or bottom are fixed and don’t scroll vertically with other rows
- Any Row(s) moved into one of these areas is fixed and won’t scroll vertically.
- This can be useful to lock specific Row(s) so they are always in view.
- Dubbing and AD files can only be moved as a set using the ‘handle’ on the very left hand end of the rows
- Roles within a dubbing file can be reordered.
- EG to put the current Role being recorded at the top
-
Ctrl+ Shift+ Drag
- On a text box (AD, Dub or subtitle) will move all the titles on that track together.
- Hint: Useful for fine tuning the alignment of complete subtitle files.
- Note: This is a Recut action and changes the times in the text file.
- On a text box (AD, Dub or subtitle) will move all the titles on that track together.
-
Ctrl+ Alt+ Drag
- On a text box (AD, Dub or subtitle) will move the selected title and all following titles on that track together.
- Will not allow you to overlap text boxes on the same row.
- Hint: Useful for conforming text tiles to correct for video edits (cuts and inserts).
- Note: This is a Recut action and changes the times in the text file.
- See also Shift+ Double Click on a text box – above
- On a text box (AD, Dub or subtitle) will move the selected title and all following titles on that track together.
-
Alt+ Drag
- Anywhere in the Timeline will move the video and all Text columns will synchronise with the video
- This is a shortcut to Rehearse mode, only while the Alt key is held down.
- Anywhere in the Timeline will move the video and all Text columns will synchronise with the video
-
Alt+ Right click in widget area – Open widget specific Settings dialog.
Hotkeys
Space Bar – When there is no text cursor in the subtitle editor or any text areas the Space Bar is used to control video Play.
- Space Bar – Play / Pause
- Shift+ Space Bar – Play reverse/Pause
- Ctrl+ Space Bar – Play in review mode/Pause
- Review mode skips over gaps between titles
- Useful for reviewing a file with long gaps between subtitles or AD sections or reviewing a single Role in a Dubbing file.Ctrl+ Shift+ Space Bar – Loop play/Pause
- Plays the current title in a loop with a small amount of pre and post roll.
- Useful for reviewing AD and Dubbing titles
- Note: you can adjust the audio level during playback to set the required level.
For the full range of applicable mouse actions see the Timeline Widget section of the Hotkeys page.
Settings
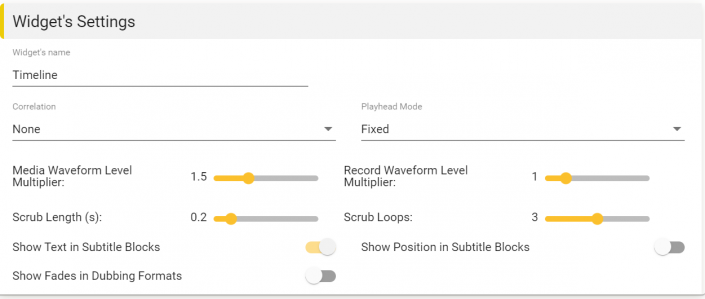
-
The Settings menu from the Timeline Widget allows you to set how the timeline works.
-
Make sure you Save the current Layout after making any changes if you want them to be permanent.
-
Correlation – Select one of the Correlation options if you want this to appear on the timeline
- The correlation track is used when comparing the relative timing of multiple language subtitle files for a single video.
- Hint: Turn this on if you are conforming multiple language files at the same time.
-
Playhead Mode – Controls how the vertical ‘Playhead’ green bar in the timeline works.
- Fixed – the playhead stays fixed and the timetrack moves underneath it.
- Drag the timeline to move the video position.
- Note: Drag the red handles at the ends of the green bar to move the fixed position.
- The bar can be positioned between the 20% to 50% positions on the Timeline.
-
Moving – The Playhead will move across the timeline as the video plays between the 20% and 80% positions.
- Drag the Playhead to select the video position.
- Fixed – the playhead stays fixed and the timetrack moves underneath it.
-
Media Waveform Level Multiplier – Set the size of the program waveform
- Note: This doesn’t change the program audio volume, just the visual size of the waveform.
-
Record Waveform Multiplier: – Set the size of all recorded AD and Dubbing audio waveforms.
- Note: This doesn’t change the audio volume, just the visual size of the waveform.
-
Scrub length – Sets the time, in seconds, of the audio scrub used when single stepping the media.
-
Scrub Loops – Sets the number of times the Scrub clip is played when single stepping the media.
-
Show Subtitle text in blocks – enable or disable the display of the subtitle text in the subtitle blocks on the timeline.
-
Show position in subtitle block – shows a small vertical position indicator in each subtitle block.

- Useful if you need a quick visual check on the timeline of vertical positions – EG when comparing multiple language files.
-
Show Fades in Dubbing Formats – when a dubbing file type is loaded (srtad or TTAL) then this option adds a fade track to each Role.

- This allows voice over recordings to fade the original audio track during the new dialog.
- Used if there is no music and effects (M+E) track available so the original language dialog has to be faded down.
Edit timecodes
You can move subtitle blocks by dragging or clicking as follows:
To drag a single subtitle on the timeline
![]()
- Shift+ Drag the central section of the selected subtitle
- The in and out timecodes will be updated to match the change (recut)
- You can’t move the subtitle past the previous or next subtitle
- Any Min Gap settings are enforced.
To Edit the in and out times of a subtitle.
![]()
- Shift+ Drag one of the end sections of the selected subtitle
- The in or out timecode will be updated to match the change (recut)
- You can’t move the subtitle end point past the previous or next subtitle
- Any Min Gap settings are enforced.
To drag all the subtitles together on the timeline
- Ctrl+ Shift+ Drag
- All the subtitles on the selected track will move
- All subtitle in and out times will be updated (recut)
To drag only the subtitles from the selected subtitle
- Alt+ Ctrl+ Drag the selected subtitle
- The selected subtitle and all following subtitles will move
- Earlier subtitles will be unchanged
- The selected subtitle cant be moved earlier than the previous subtitle
- Any Min Gap limit will be enforced
- Subtitle in and out times for the selected subtitle, and all following subtitles, will be updated (recut)
To align the current subtitle and all following subtitles to the current video time
- Find the first subtitle you need to reposition
- For example you are conforming a subtitle file due to the video being edited.
- Move the video time to the correct in time for the subtitle
- Shift+ Double Click on the selected subtitle
- This will move the selected subtitle to align with the video timecode.
- All following subtitles will move by the same time offset
- All earlier subtitles will be unchanged
- The subtitle in and out times will be updated (recut)
Edit all timecodes on the Timeline
There are multiple ways to edit subtitle timing on the Timeline.
Timecodes can be changed in three ways:
- Adjust just the intervals (gaps) between titles.
- Optionally this can include gaps to shot changes.
- An Offset changes how the text files are displayed in relation to the video and system timecodes
- Changing an Offset will NOT change the timecodes stored in the text (subtitle) file.
- Re-cutting a text file changes some or all of the times inside the file.
- Sometimes you need to change the subtitle in and out times relative to each other.
Edit Audio on the Timeline.
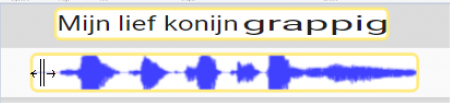
Every audio Take is shown on the Timeline as a separate waveform. Each waveform can be trimmed, moved, gain adjusted and muted.
Waveforms are displayed in different colours:
-
Blue – The audio is Unmuted and will be audible
-
Grey – The audio is muted and won’t be heard.
-
Red stripes with no waveform – the audio wav file is missing.
- The srtad or ESF file are referencing a wav file, but the file is not present in the expected location.
- This can happen if you are sent an srtad or esf file without the associated audio .wav files.
-
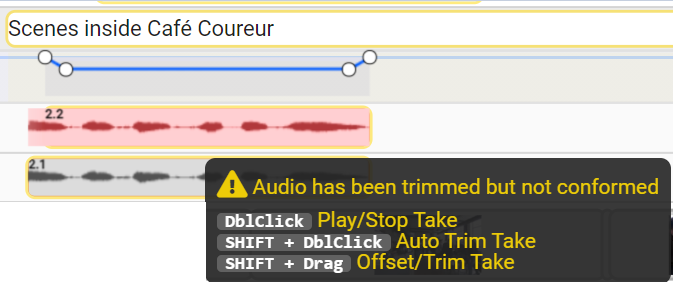
Red – ESF Files only
- The Audio is unmuted but needs to be Conformed to match the limitations of the ESF file format
- The reasons a waveform may be Red in an ESF file are:
- Audio starts before Text box.
- Audio has been trimmed but not conformed.
- Audio gain has been changed but not conformed.
- There is more than one active audio for this Title and it hasn’t been conformed
- Hovering over a red audio waveform will show information on the reasons.
For full details of all the Audio editing controls on the Timeline see the main Timeline section above.
Edit AD Fade Settings
Please check the full tutorial about Fade Settings.
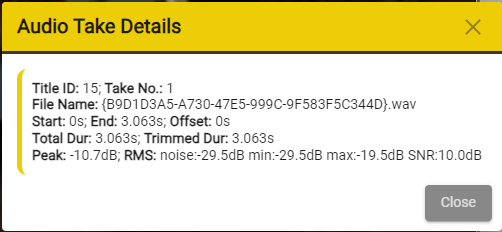
Audio Take Details
Right click on an Audio Take to view:
- Title ID
- Take No.
- The filename

Click on the information button on the right to open the Take Details window.
Text Track