Text Files
You can add a text file to the current Project with or without a format conversion.
Text files include subtitle, caption, AD and dubbing Scripts and other timed text file formats.
You can Import a file from any location visible on your PC or Mac and a new file (in the selected format) will be stored under the \Stellar\Files folder. See File Locations for more information on how and where files are stored in Stellar.
The new file will become part of the current Project.
You can select to import all the contents of the file, the timing information without the text or just the text without the time stamps.
In the case of AD and Dubbing files you can import with or without the associated audio files.
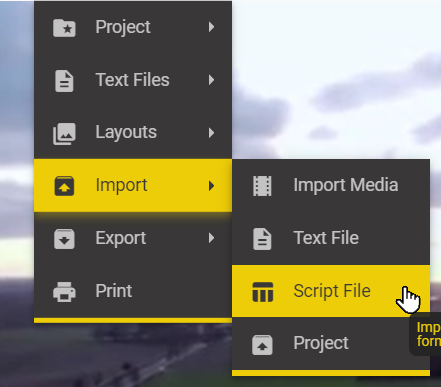
File → Import → Text File

This will open the Import Text File
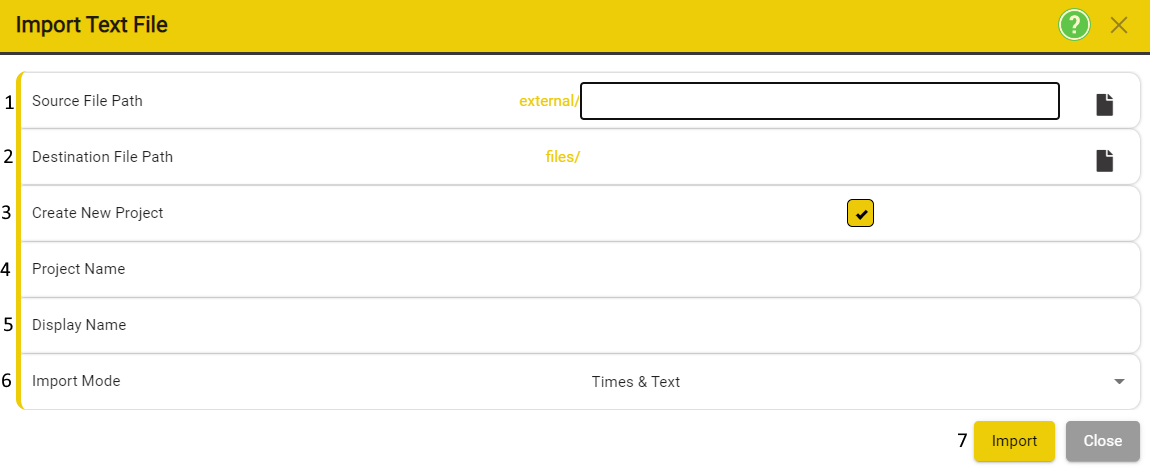
1. Source File Path - Allows you to browse to the path of the file you want to import.
- If the Source file is an AD or Dubbing file a new option will be visible:

- If selected any associated audio files will be imported
- If not selected only the script file (srtad, esf or srtad) will be imported.
2. Destination File Path - Shows where the imported file will be stored. You should not change the destination file path unless you know exactly what you are doing.
- If you want to convert the file to a different type you can select between the standard Internal file types. These are the types that can be edited within Stellar.
- Subtitles – STL, SRT, PAC, FPC & IMSC-Rosetta
- Audio Description – ESF or SRTAD
- Dubbing – SRTDUB & TTAL
- NOTE: for AD and Dubbing files you MUST create a new sub folder for each file. This is to keep the audio WAV files for this Audio Job separate from other wav files for other jobs.
3. Create New Project - Check this if you want to create a new project.
4. Project Name - Allows you to set the Name of the project. If Create new project is selected.
5. Display Name - Allows you to set the Display Name, it can be different than the actual Project Name.
6. Import Mode - Allows you to select the Mode of the Import process.
- Import All – the new file contains all the text and timing information from the source file.
- Import Times Only – The new file only contains blank subtitles. This is useful for creating a blank template when translating between languages
- Import text only – the new file contains text subtitles but no times. – this is useful if a file needs to be retimed.
The new file will be added as the last column in the current Project.
- It is possible you will need to use the drop down selector in the last tab to see the new file, depending on the number of files in your Project.
Media Files
When importing a video, you can choose to create a new project.
File → Import → Import Media
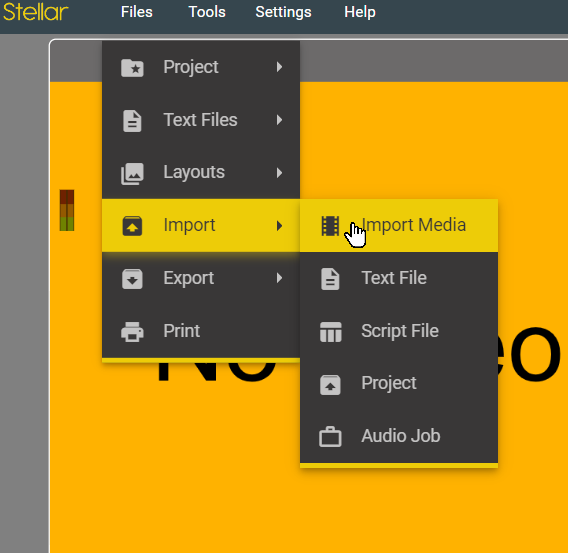
This will open the Import Media Window

To Select the Source Media File press on the File Icon on the right side of the row.

This will open the File Browse window. Most likely, the library will be set to Media - this will allow you to import video that are present in the Stellar/Media folder. To import from other locations on your device, press on the drop-down list and select external.

Navigate to your file, select it and then press OK.

The path to the Source Media File should now be updated to point to the Media File you have selected.
Set the video resolution by using the drop-down menu.

- Normal Resolution – quarter SD resolution – suitable for most uses
- High Resolution – SD resolution – use this if you need to see the picture content in more detail, for AD where you are describing fine details.
- Original Resolution – uses the resolution of the original file. If this is HD or higher it will have an impact on the speed of response of the video controls in Stellar.
Set the Video Frame Rate - Generally, Stellar will Auto Detect the Framerate of the Media, but it can also be manually overridden by using the drop-down menu.
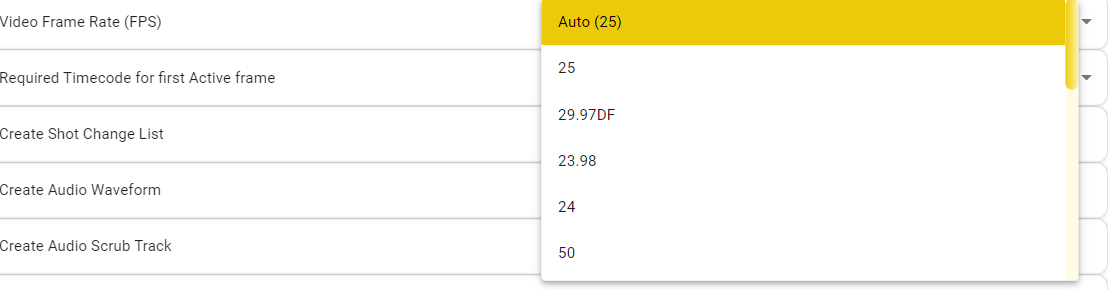
Set the timecode for the first active frame - Stellar will try to detect the timecode from the original file. If this is Not Detected, then you can set it manually using the drop-down menu.

Create Shot Change List – A list of shot changes will be created automatically and added to the new Project
Create Shot Audio Waveform – A graphical image of the audio waveform will be created automatically and added to the new Project
Create Audio Scrub Track – A additional audio track will be created for to provide audio scrubbing during cueing will be created automatically and added to the new Project

Project File – Set the location and name of the new Project – Defaults to the same name as the media file but can be edited.
- If you set a sub folder below Stellar\Projects\ then the new path will be used for the media and any text files that are included in the Project.
- EG. If the Project file is in Stellar\Projects\Netflix\Stranger Things Series 10\
- then the media and text files will be created in:
- Stellar\media\Netflix\Stranger Things Series 10\
- and
- Stellar\files\Netflix\Stranger Things Series 10\
- These will become the default locations for all files added to the Project (EG Import Text file or New Text file)
Include blank text File
- You have the option to create the new Project with a blank file of any of the Internal types
- Select the file type from the dropdown

- The file name and location will default to the Project file path and the project name
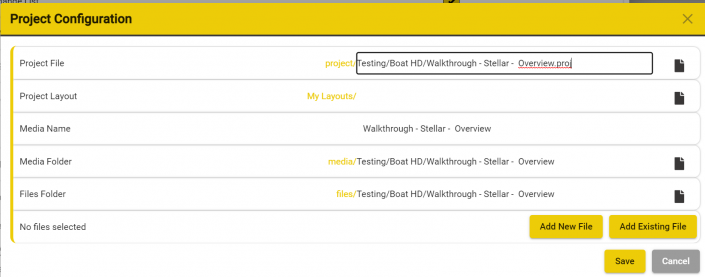
You have the option to add existing Text files and other settings by clicking on the Configure project button.
This will open the Project Configuration dialog.
-
Project File – This will open the same File Browser window that we looked at already.
- Any changes here will reflect in the whole Project
-
Project Layout – You have the option to select a Layout that will be loaded when the Project is opened
- Useful if you want to force the Layout for a new user or for a special Project with custom requirements
- Media Name – read only
- Media Folder – allows you to change the default location for all media in this Project
- Files Folder – allows you to override the default location for all Text files in this Project
- Add New File – Allows you to add one or more new (blank) files of any Internal type to the Project
-
Add Existing File – Allows you to add one or more existing Text files of any Internal type to the Project
- Note: These files must already be in the Stellar\Files folder or subfolders
Import Script File
A Script is a text document that contains timing, text and possibly other information. Scripts come in a huge range of styles and file formats from text files, Word documents or Spreadsheets, each with a different layout.
To Import a Script, first it must be edited and saved as a CSV file in a set format. This is best done with text and spreadsheet editing tools such as Word, Excel, Google Docs and Google Sheets, or any other editing tool.
Save the Script as a .csv file (from Excel or Google Sheets) in this format:

Column A - Serial Number 1,2,3… Optional
Column B – In Timecode - Stellar will do its best to interpret this information. The script editor supports a range of timecode formats and these are interpreted as follows:
- Blank – a basic sequential timecode will be calculated from the Start Timecode set and with in and out cues calculated based on the word count and reading speed set.
- 0000000 = Frame count
- 0000000.000 = Seconds and milliseconds (1 to 3 decimal places and dot and comma separators supported.
- 00:00:00:00 = hh:mm:ss:ff at 25 Fps
- 00:00:00;00 = hh:mm:ss;ff at 29.976 Fps
- 00:00:00 = mm:ss:ff at 25 Fps
- 00:00;00 or 000:00;00= mm:ss;ff at 29.976 Fps
- 00:00 or 000:00 = ss:ff at 25 Fps
- 00;00 or 000;00 = ss;ff at 29.976 Fps
Column C – Out Timecode – Optional - If missing Stellar will use the set Reading/Speaking speed and the In time to calculate an out time.
Column D – Main Text – used for the subtitle or AD/Dubbing script
Column E – Role – only used for Dubbing Scripts. - Sets the Role or Character for each Title.
Columns F-H – Additional Text – Stored as Comments for each title. These can include speaking directions etc.
File → Import → Script
- Input File - Selects the source file, must be in the .csv format set out above.
-
Output File - Set the new file to be created from the script.
- Select the location and set the file name
- Select the file type
- Subtitle .srt – Subtitle File – No Role information will be stored and the file can’t be used to record audio.
- AD .srtad – Audio Description file – No Role information will be stored but can used to record audio.
- Dub .srtdub – Dubbing script file – Role information will be stored, Text adaptation is supported, audio can be recorded.
- Set start Time – Force the time of the first subtitle to be in the range selected.
-
Set Reading Speed – Used to calculate Out timecodes if there are one in the file.
- Timecodes can be easily edited on the timeline after the script has been imported.
- Timecode Frame Rate – Stellar will attempt to work out the timecode frame rate from the file. You can override this by setting a frame rate here.
- Add Script to Current Project – If set the new file (srt, srtad or sdtdub) will be added to the current Project. If not the file will be stored to disk only.
- File Title: the text Title that will be displayed on the timeline and in the subtitle editor for the new file.
- Import – Click to start the import.
- ** Close** – Closes the Import Script window.