Audio Recorder
The Audio Recorder Widget adds additional controls to the Media Controller and a range of hot keys to support local audio recording for Audio Description, Voiceover and Lipsync Dubbing. In order to be able to use the Audio Recorder Widget the Media Controller Widget has to be enabled in your current project.
Audio Recorder Widget also provides quick access to generating audio tracks from existing .srt (.srtad or .srtdub) files by using the Synthetic Voice Plugin.

- Synthetic Voice
- Left click - Render with the default voice that is set in Synthetic Voice Plugin settings.
- Right click - Opens the Synthetic Voice Plugin settings.
- Sets the in marker
- Sets the out marker
- Audio Record Button
-
Only visible if the Audio Recording Widget is loaded and the selected text column is an Audio Description file (.srtad) or a Dubbing file (.srtdub)
-
Disable - Grey - In this case, hover the mouse pointer over the Record Button in order to see what could cause it to be disabled:
- If the script file is marked as ‘read only’ or ‘comments only’ editing mode. In order to verify the status of the script file, you can use the header context menu to check the File Properties of the current selection.
- If the selected text file is not an AD or Dubbing file format (esf, srtad, srtdub or ttal)
- If Rehearsal Mode is turned on. You cannot record while in Rehersal Mode. Use F9 to toggle on/off Rehearsal Mode.
-


| Rehearsal ON | Rehearsal OFF | |
|---|---|---|
| — |
Red if recording is started

- Red and flashing during recording
- Abort - Clicking the button while in this state - the recorded Take will not be saved. - Pressing ESC will also abort the recording
- Stop - Clicking the button while in this state - will save the recorded Take and store it. - Pres F12.
- Loop Record - Can be activate holding Alt + Shift and then Left Clicking on the Record button.
- Endless Record - Can be activate holding Alt and then Left Clicking on the Record button. This will record from the start point and keep recording for a configured maximum time or until the Record button is clicked (Stop).
- Mic Level Set up - Left click opens the microphone level settings and set up.
Choose Microphone
Stellar provides a set-up process for your microphone to ensure that your recordings have good quality.
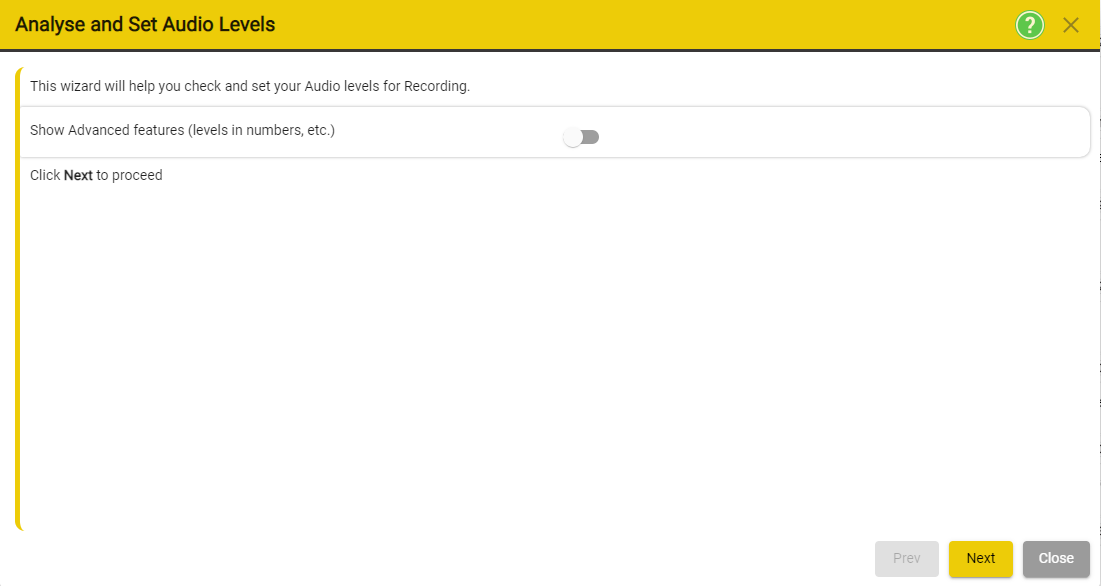
You can enable the - advanced features - by clicking the toggle button. Show Advanced features will provide more details during the set-up process.
Press Next to proceed to the next step.
-
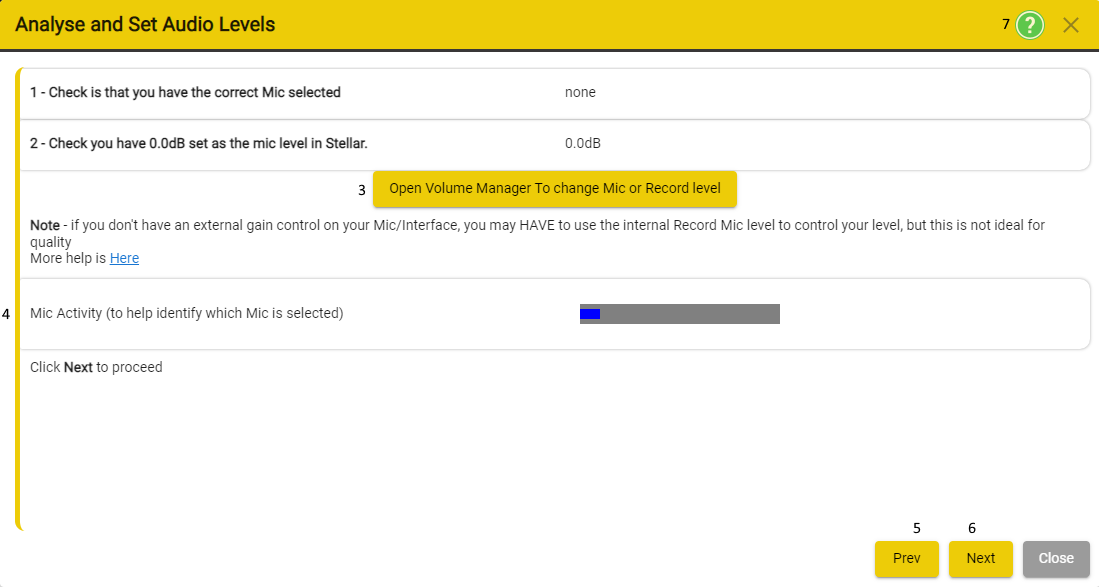
Check if the you have selected the correct microphone.
- When you are doing this for the first time, it will show none. That is because you have yet to select any of the available microphones.
-
Check you have 0.0dB set at the mic level in Stellar - will be set using (3) Volume Manager
-
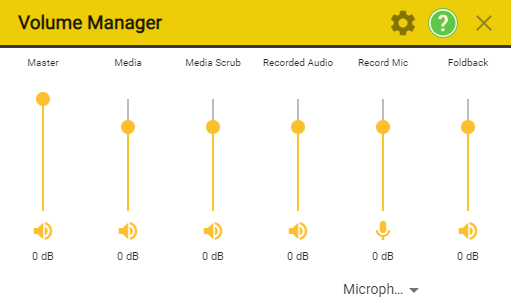
Open Volume Manager to chance Microphone or Recording levels.
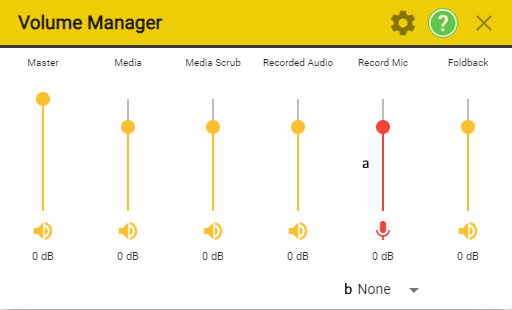
- This is where can chose our microphone from a list of available microphones.
- Adjust the levels of the Microphone/Microphones and for the Recording.
To access the Volume Manager - press Open Volume Manager To change Mic or Record Level.
-
Allows you to adjust the level of the selected microphone.
◊ Red if there is no Microphone Selected
◊Yellow if there is a Microphone Selected -
Allows you to select one of the Microphones which are currently available to be used in Stellar.

-
Once you have selected a Microphone from the list, Stellar will be able to use that Microphone and you will able to adjust it so that the you are able to create quality recordings. The name of the Microphone you have selected will appear both in the Analyse and Audio Levels windows and in the Volume Manager. Furthermore, at this point you should see the Mic Activity - the blue bar on dark grey background - move as the microphone detects sound.

If required, for example if the Microphone level is not 0.0dB, you can use the Record Mic slider - move it up and down - to adjust the dB value until it shows 0dB.
Microphone Calibration
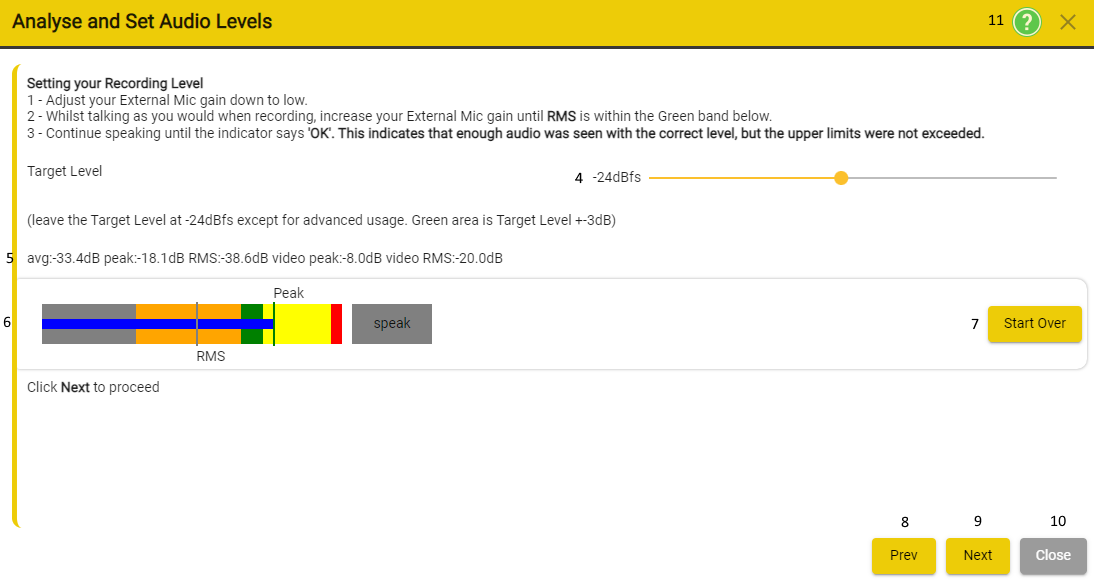
- Adjust your External Mic gain down low
- Whilst talking as you would when recording, increase your External gain until RMS is within the Green band below.
- Continue speaking until the indicator says “OK”. This indicates that enough audio was seen with the correct level, but the upper limits were not exceeded.
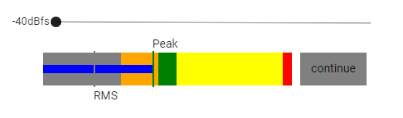
- Target level - slider allows you to move the colored areas presented in section 6.
- Numerical values for the colored areas presented in section 6.
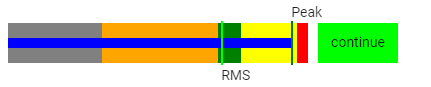
- Visual representation of the volume areas - used for the microphone calibration process.
- Allows you to restart the microphone calibration process.
- Takes you back to the previous step - where you were able to chose the microphone.
- Takes you to the next step.
- Exit the calibration process.
- Help
Calibration Process
In order to calibrate the microphone that we are going to use to record, we will use the UI presented above.
Depending on the type of microphone that you have - you might be able to (1) Adjust the External Microphone Gain. Most microphones have a Knob labelled as gain - please set that Knob to low.
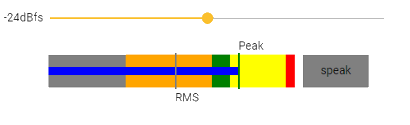
In section 6 ( the grey band that contains several colours) you will see the RMS Marker (vertical line) and the Peak Marker (vertical line) move while you speak.
The goal of this process is to use the external gain Knob to increase the gain of the microphone until the RMS Marker is constantly in the Green Band while you are speaking normally.
Working with the visual UI
-
Initially, the UI will looks similar to image bellow.
RMS Marker and Peak Marker will be moving around, but they will not be in the right colour bands. The Speak button will also have a dark grey colour.

-
While talking, the RMS Marker might go into the Green Band without having do any major adjustments. When the RMS Marker enters the Green Band, it will look like this:

-
Continue speaking normally until the Speak button changes from “speak” on grey background to “continue” on green background.
-
When the RMS Tracker remains in the Green Band while you are speaking normally, after some time the “continue” button will change into “ok”.

-
When you see the “ok” button, your microphone levels are correct and your microphone is calibrated. You can click next to proceed to the next window.
Silence level detection
- Enable/Disable Automatic Silence Detection
- Allows you to go the previous step.
- Close the recording set-up.
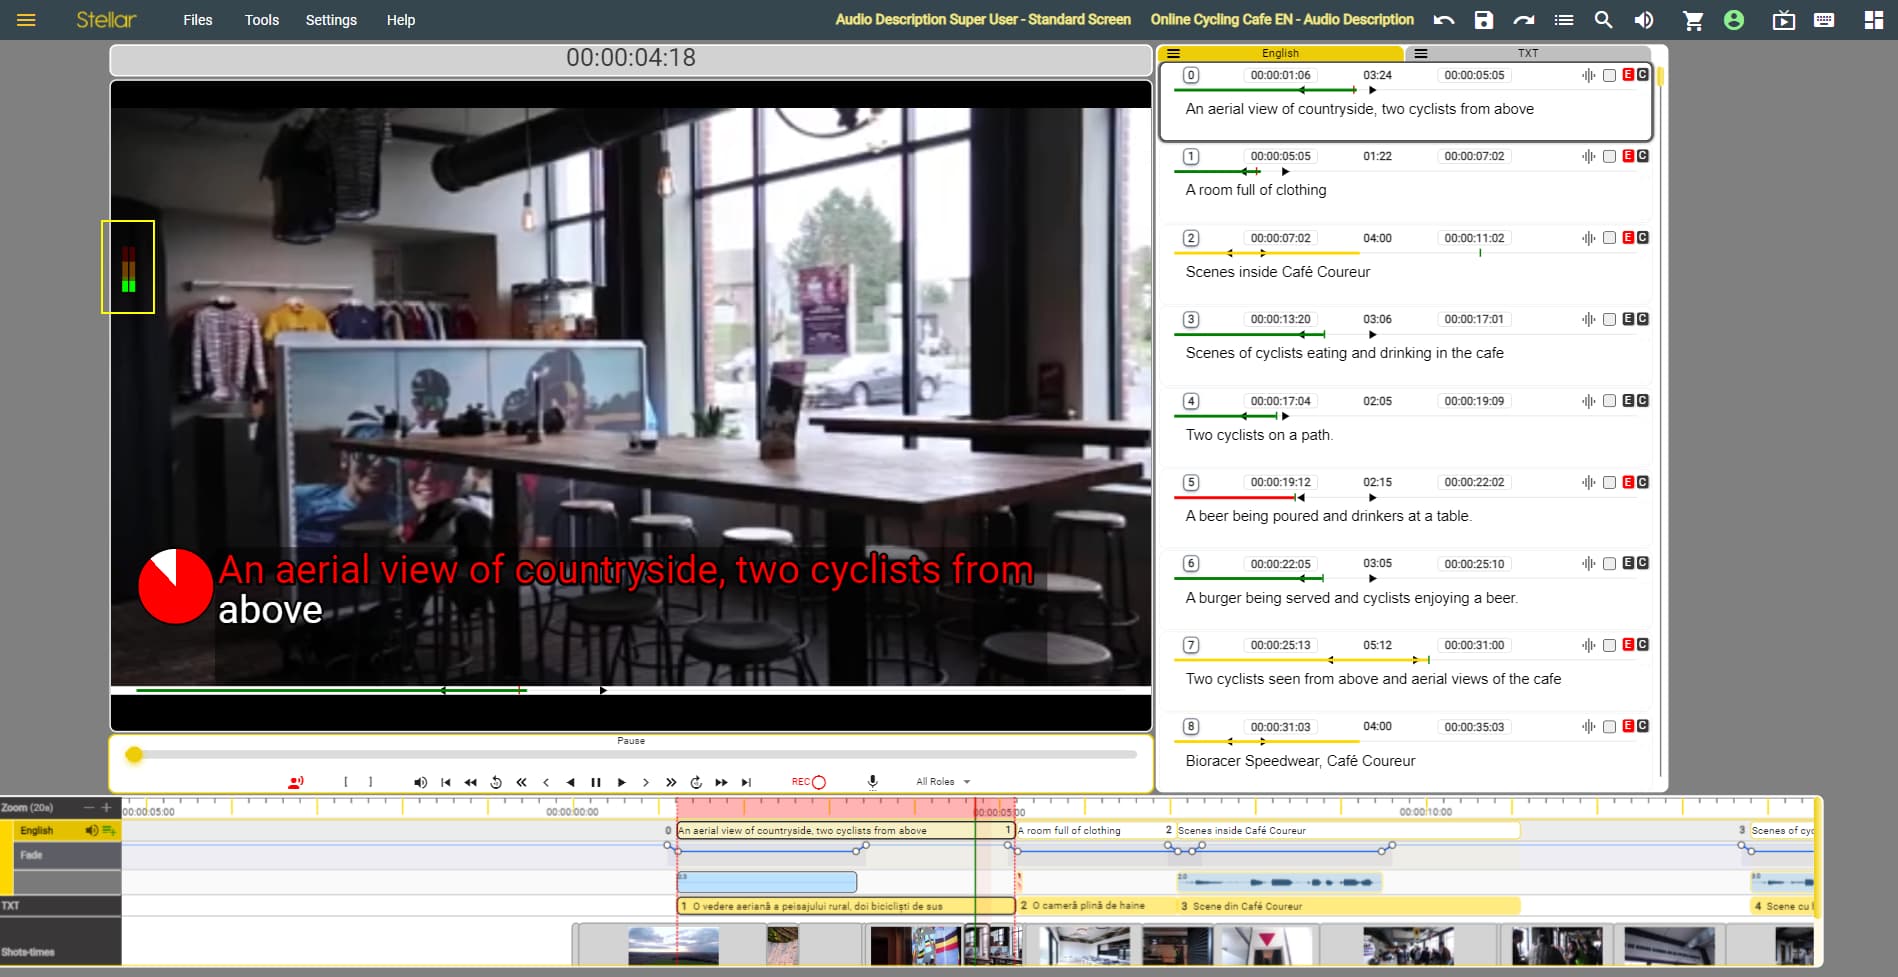
Once you have finished the Microphone Calibration process - the Microphone Level indicator in the upper left side of the video player will oscillate while you speak. This will occur even if you are not actively recording.
Microphone Troubleshooting
Microphone access - Chrome
Stellar needs to have access to your microphone. In order to be able to access the microphone, you have to make sure that Chrome is allowing Stellar to use your microphones.
The easiest way to check this is be clicking on the Camera icon on to top right the Chrome Tab which is running Stellar.
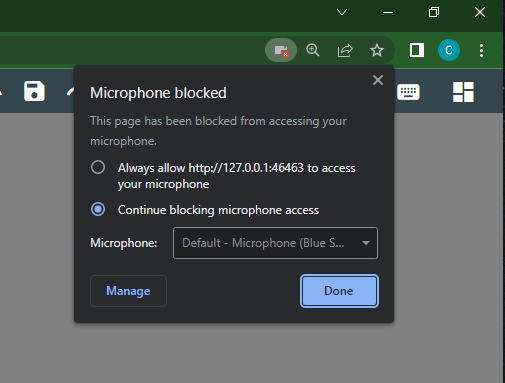
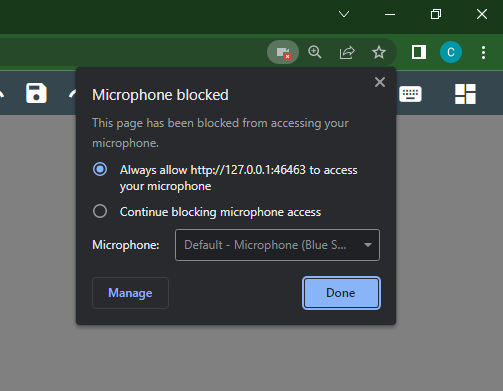
If the icon has a red square on it, that means that Chrome is blocking access to the Microphones. To solve this issue, please check Always Allow. Then press Done, this might solve your current Microphone issues.
Microphone Access - Windows
Start → Type: Microphone Privacy Settings → Click on Microphone Privacy Settings
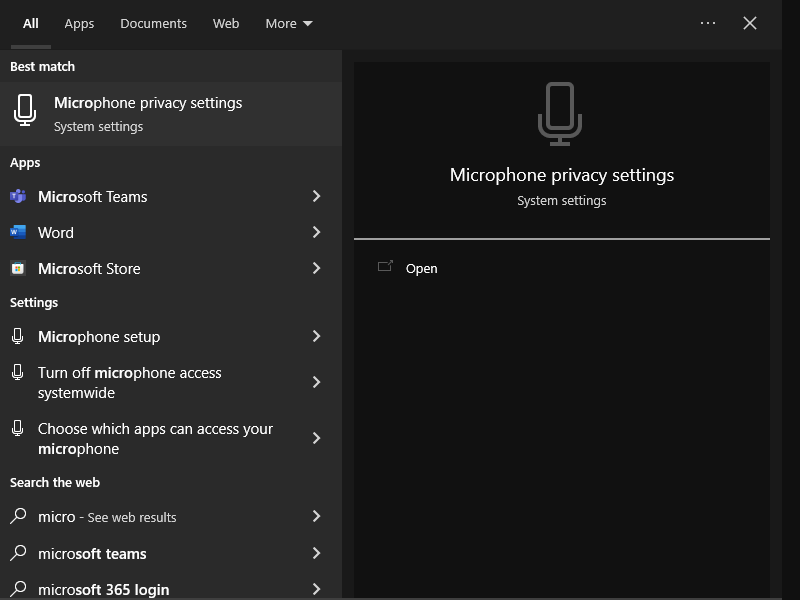
This will take you to the Microphone Settings.
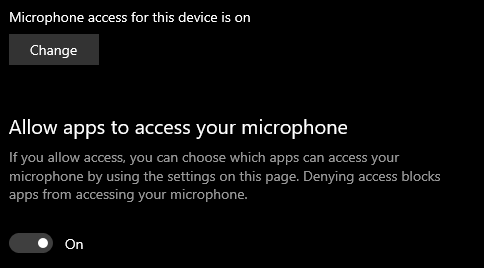
Once at this window, you will have to check if Microphone Access for this device is ON. If it is ON, you should see the following screen:
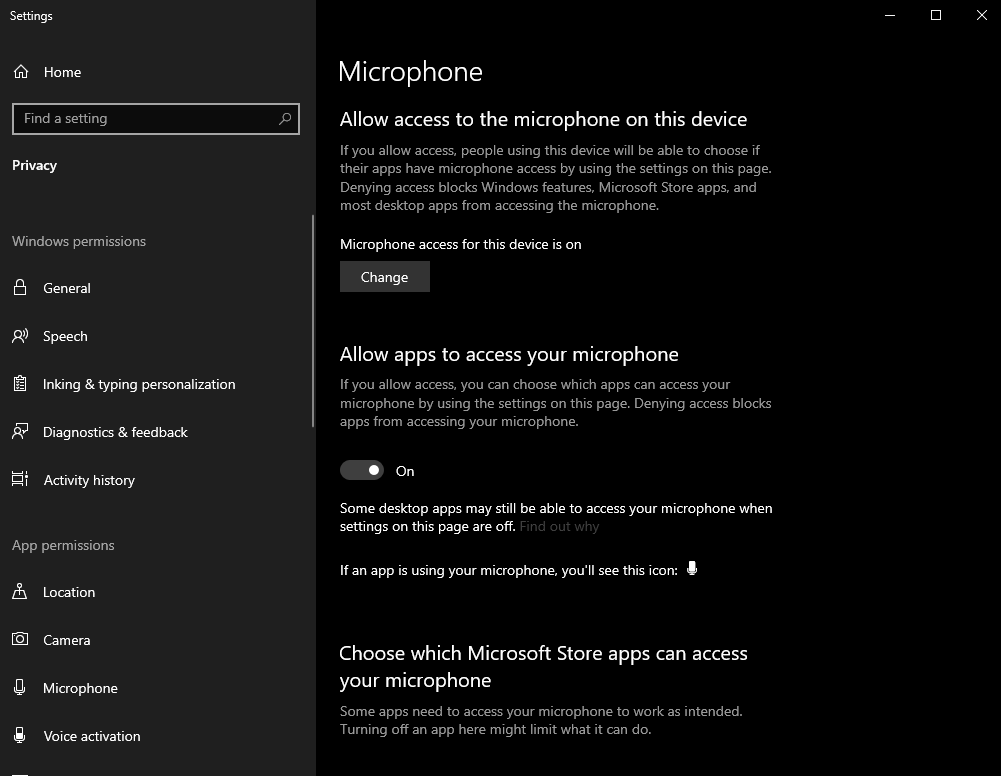
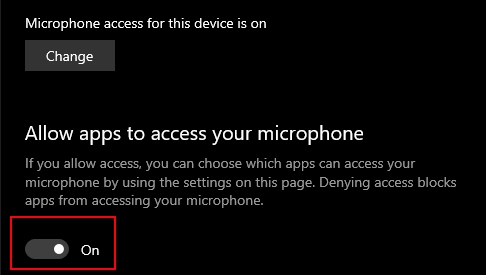
Turning Access ON for Applications.
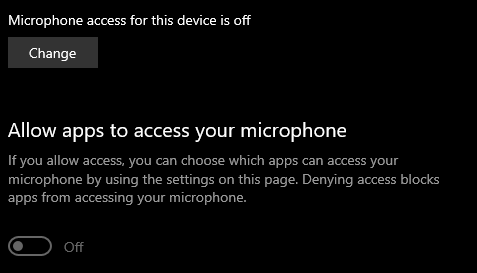
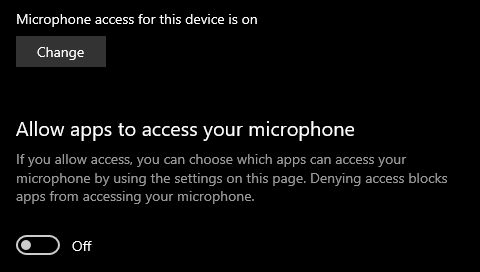
| No Access | Partial Access | Full Access |
|---|---|---|
 |
 |
 |
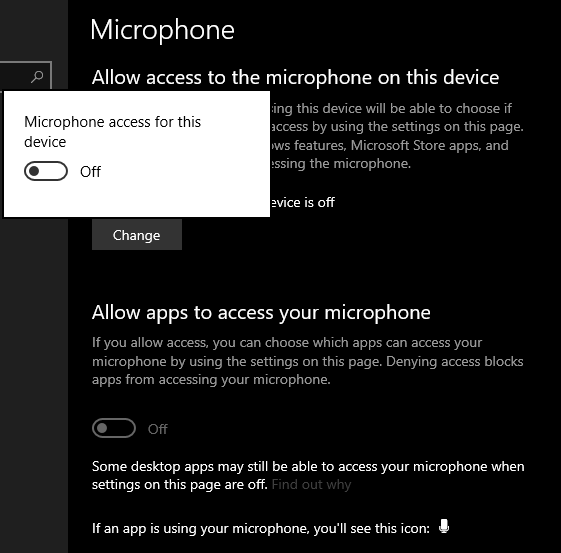
| Microphone access for this device is COMPLETELY disabled, APPLICATIONS can access the microphones on this device | Microphone access for this device is turned ON, but APPLICATIONS can NOT access the microphones on this device. | Microphone access for this device is turned ON, and APPLICATIONS can access the microphones on this device. |
| — | — | — |
 |
|
|
| Click on the Change button then Turn ON the Microphone access | Turn ON Allow apps to access your microphone | No changes are needed, Windows Microphone access is set up correctly. |
 |
|
|
Adjusting Target Levels in Stellar
The Target Level slide will allow you to adjust the location of the bands.
The initial state of the Slider (4) and the Audio Levels UI (6)
If Slider (4) and the Audio Levels UI (6) slider is moved to the maximum position in the right side, the RMS will be in the Green in this situation, the Microphone will be very loud.

If Slider (4) and the Audio Levels UI (6) slider is moved to the minimum position in the left side, the RMS will be in the green in this situation, then the Microphone will quiet.
Adjusting Gain from Stellar
(not recommended, Gain should be adjusted from the analogue)
Adjust gain when the microphone does not have an analogue gain knob.
You can use the Record Mic slide in the Volume manager to adjust the volume of your microphone.
Adjust Microphone level from Windows
Adjust the volume of the Microphone from inside windows.
- Right click on the speaker in the try area
- Open Sound Settings
- Top right - Sound Control Panel
- Recording Tab
- Select your Microphone
- Press Properties
- Select Levels Tab
- You can adjust the levels from here.
- Apply to save the settings
- Then ok on the next window
Audio Recorder Settings
Right click on the record button or go to the Audio Recorder settings in the Widget Settings area.
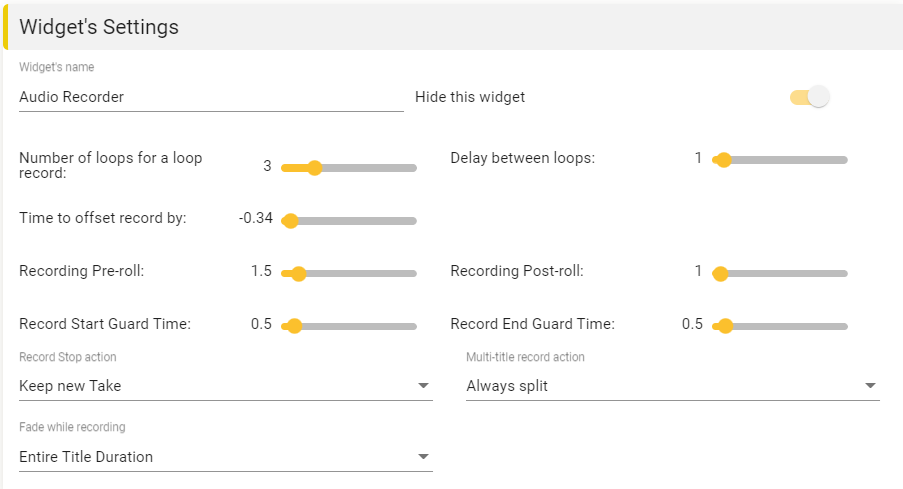
1. Hide this widget – Normally enabled
If turned off an engineering display will show in the main display area.
2. Number of Loops – Set how many loops should be recorded in a Loop Record
Default 3
You can always stop sooner by clicking the Record button in Stop mode or pressing Esc.
3. Delay Between Loops – Set the delay time in seconds between loop recordings
4. Time to Offset record by – Sets the offset to where the Take is placed on the timeline
5. Recording Pre-roll – the time for the video to play before recording.
This sets the time the video plays for before the voice artist starts speaking.
6. Recording Post-roll – the post-roll time for the video after the record end point
This sets the time the video continues to play after the voice artist should stop speaking.
7. Record Start and End Guard Times – Sets the extra record time before and after the expected record time
This allows for audio that starts early or ends late
The guard band will be auto trimmed off but is not deleted and can be revealed by dragging the end trim points on the Take.
8. Record Stop Action – Sets what happens when you stop a recording short, instead of letting it finish automatically.
Abort the Take – No new Take will be recoded
Keep only new Take – A new Take, that stops short, will be kept and the old take muted.
Merge on Timeline with existing Take(s) – the new, short, recording ‘punches in’ on the timeline with all existing Takes.
Existing Takes are trimmed to fit in the new Take, but no audio is lost as you can always retrim any of the Takes.
NOTE: Doesn’t apply to Endless Record mode.
9. Fade while recording:
Active Fade Only
Entire Title Duration
Do not fade
AD Microphone Configuration
How to set up the Audio Description microphone configuration in Windows 10.
Note: It is important that the microphone settings are correct as almost all broadcast quality audio is recorded at 48000Hz.
Windows 10
These instructions apply for Windows 10 devices and you must use a Chrome browser when operating Stellar.
IMPORTANT: Follow these instructions in order. It is possible to get to the setup screen via Settings\System\Sound but you won’t be able to edit the settings!
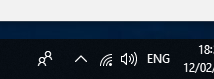
- In the Windows tool bar (bottom right corner of your main screen) Right Click on the Volume Icon.

Expand Image
- Select the Sounds Tab.
Expand Image

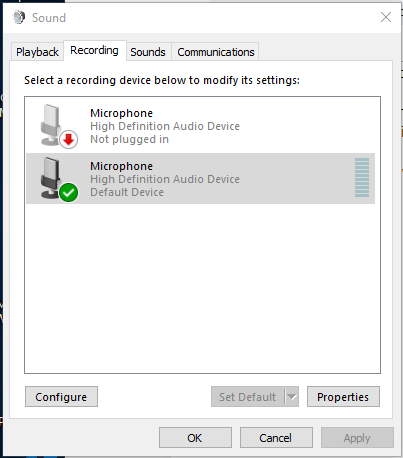
- Select the Recording Tab.
Expand Image
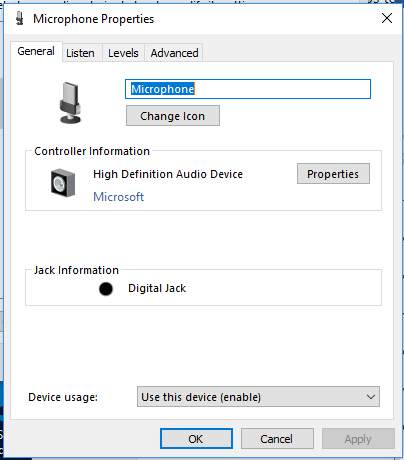
- Right Click on the microphone you wish to use and select Properties.
Expand Image
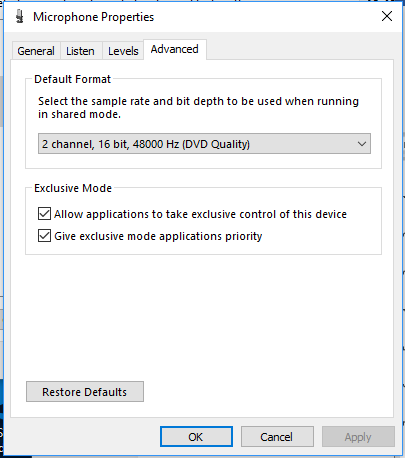
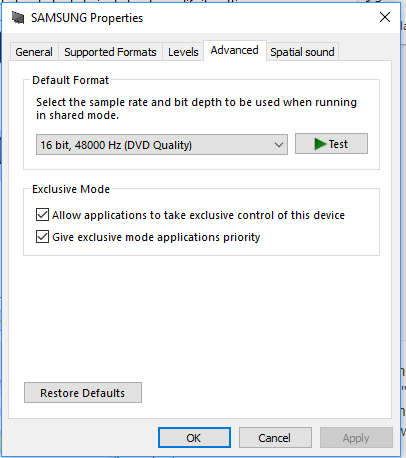
- Select the Advanced Tab.
Expand Image
- Use the Default Format dropdown to select the 48000Hz option, then Click Apply.
Expand Image
Note: If you get a ‘Device In Use’ Error you need to shutdown and restart your PC then try again.
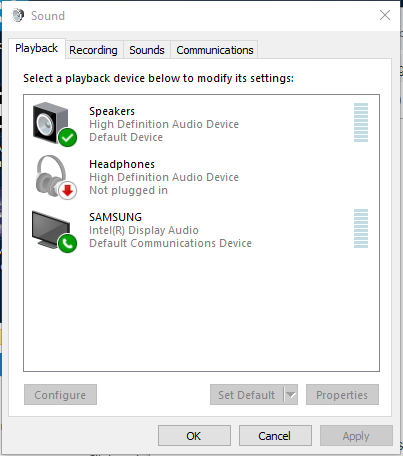
- You MUST also set the Output device to 48000Hz.
Select the Playback Tab.
Expand Image
-
Right Click on each playback device in turn and select Properties.
-
For each one Select the Advanced Tab.
-
In the Default Format dropdown select 48000Hz and then click Apply.
Expand Image
- You can now close the setting dialogue.
Windows 11
These instructions apply for Windows 11 devices and you must use a Chrome browser when operating Stellar.
IMPORTANT: Follow these instructions in order. It is possible to get to the setup screen via Settings\System\Sound but you won’t be able to edit the settings!
-
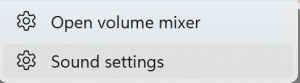
In the Windows tool bar (bottom right corner of your main screen) Right Click on the Volume Icon.
-
Select ‘Sound settings’
Expand Image
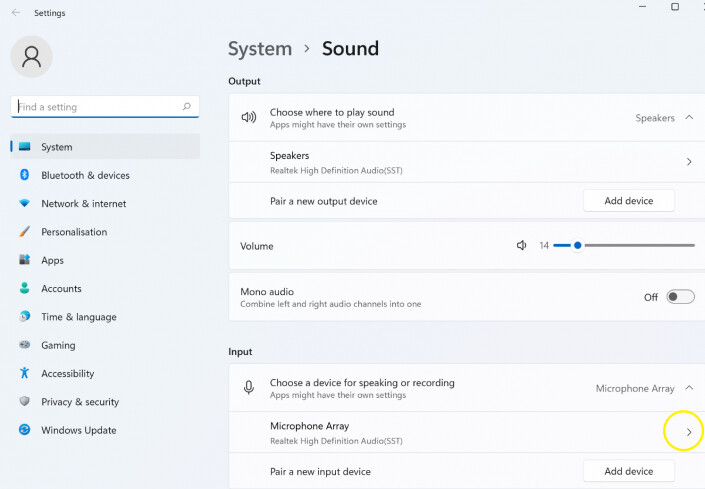
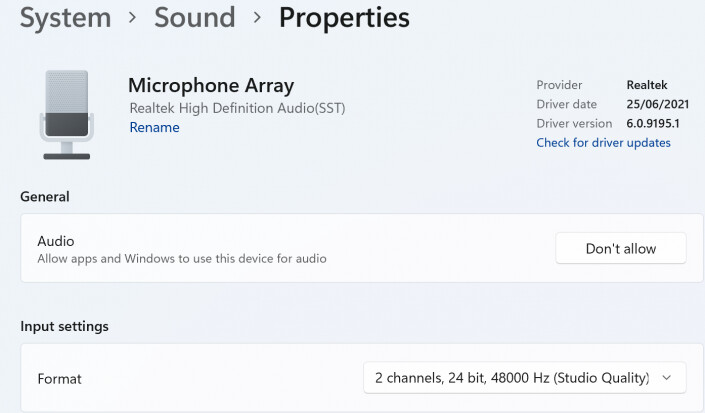
- In the Inputs section, select the microphone you will use for recording and click on the right arrow symbol to show the microphone settings.
- Set Format to 48,000Hz – either 16 or 24 bit as required.
Mac
These instructions apply for Mac running recent version of OS and you must use a Chrome browser when operating Stellar.
-
Select Utilities
-
Select Audio MIDI Setup
-
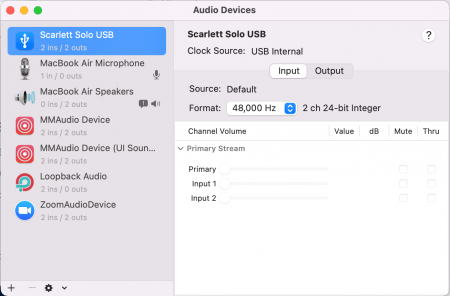
Select the microphone you will be using to record with
-
Set the Format to 48,000Hz – either 16 or 24 bit as required.
-
Make sure the Input and output are set to the same value.