General Usage
Understanding Profiles
A Profile consists of a number of Layers each of which defines a number of Rules that control how a text (Subtitles, Scripts or Transcripts) file will look and what QC checks will be applied to it. Layers are available for a range of settings such as Reading Speed, Timing, Style and Quality Control checks. See Using Layers for more detail.
Note: Creating profiles are a feature that should be used by Super Users or Project Managers. Users should, at most, have to select a Profile for their project - if one was not provided, or the one that was provided was the wrong one.
Note 2: You don’t have to define every Rule in your Profile by hand, often the system default values will be suitable, so just focus on the special Rules you need.
Profiles are structured as a set of Layers each of which contain Rules that set the style, timing and QC rules for a text file. The order in which the Layers are loaded in the Profile sets the priority of each setting.
Priority Order
- Top – File Defaults – Some settings are set by the text file type and can’t be changed.
- EG 37 character line length limit in some subtitle file formats.
- Second – Settings in the Summary Layer
- NOTE: This Layer can only be set once the Profile is loaded in a Project or Task for a specific text file and the changes are local to that Project or Task only.
- They are not stored as part of the Profile but are used to override the Profile in a specific Project or Task.
- NOTE: This Layer can only be set once the Profile is loaded in a Project or Task for a specific text file and the changes are local to that Project or Task only.
- Third onwards – Specific Layers as loaded in the Profile
- If there are two layers of the same Type (EG reading speed) then the Layer furthest tot he right in the Profile Manager display will take priority
- You can use the Order mode to change the order of Layers – see Creating a Profile.
- Bottom – System defaults
- If a Rule is not set at any higher level then the system default setting will be used.
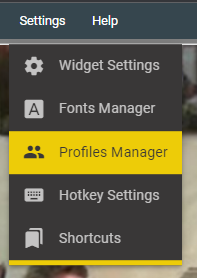
Profiles Manager
Settings → Profiles Manages
The profile manager allows you to work with profile.
- Select profiles
- Edit profiles
- Create your own profiles
The profile manager contains a list of pre-made profiles and layers. These resources can be used as they are, without any need of modification from the user. As they have been developed based the most popular/common provider’ specifications, the user only has to select the appropriate one for their current project.
Nevertheless, if needed you can alter both the profiles and the layers in order to create custom ones that will fit your needs.
Profiles and Layers are stored centrally and can be used in many Projects or Tasks at the same time. If a Layer or Profile is edited then the changes will be reflected in all Projects or Tasks using that Profile. Company Layers and Profiles do not need to be distributed to Users as they are automatically accessed from a central server.
The Profile Manager is designed for Super Users and Project Managers and would not normally be used by subtitles, translators, script writers or voice artists. The goal of this feature is to allow people assigned by a company to create / update / assign profiles based on the needs of the clients. Furthermore, the profiles also establish the parameters that will be used during the QC process.
Profiles Tab
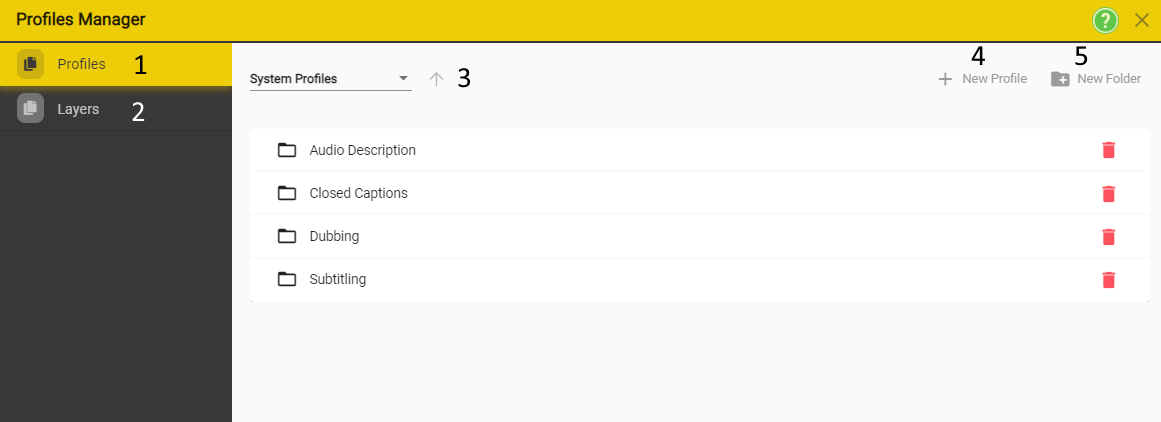
- Profiles Tab - allows you to access the Profiles Explorer
- Layers Tab - allows you to access the Layers Explorer
- The Drop Down List - Allows you to select one of the existing Libraries of Profiles:
a. My Profiles - Your custom profiles
b. System Profiles - Pre-made profiles by Yella
c. Company Profiles - Profiles made by your company - New Profile - Allows you to create a new profile
- New Folder - Allows you to create a folder inside the currently selected Profile Library
- Trash Can - will delete the coresponding folder
After selecting a folder, you should be seeing something similar to the following image.

| Library | Editable | Access | Permitted Actions | Availability |
|---|---|---|---|---|
| My Profiles | User | User |  |
Local on user machine |
| System Profiles | None | Everyone |  |
Online |
| Company Profiles | Company Manager / Admin | Company Manager / Admin. | |
Online |
| Users belonging to the company. | |
Online |
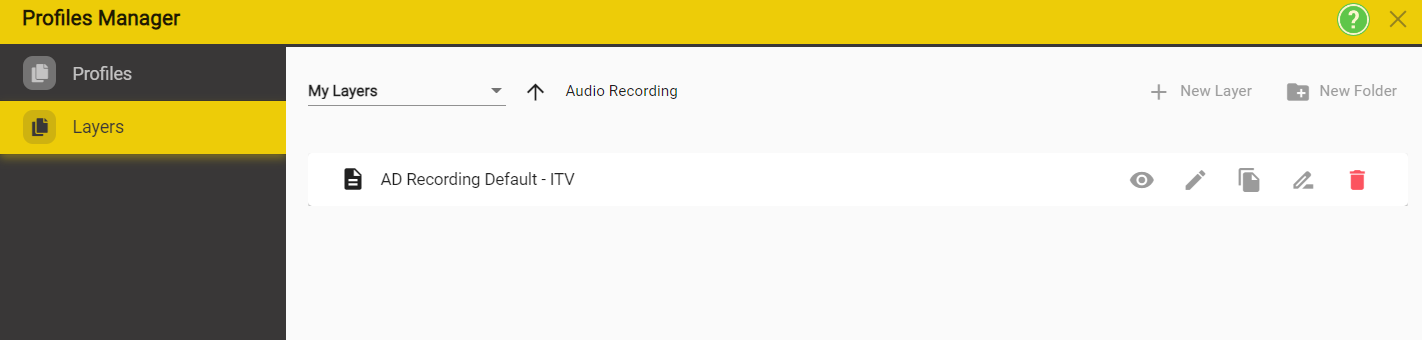
| Icon | Action | Description |
|---|---|---|
 |
View the Profile | Displays a non editable view of the Profile and all associated Layers. |
 |
Edit the Profile | Displays an editable view of the Profile and all associated Layers. |
 |
Duplicate a Profile | Make a copy of the Profile. |
 |
Move or Rename a Profile | Moving or renaming a profile. |
 |
Delete Profile | Note: You can not Undo the deletion of a Profile. |
Layers Tab
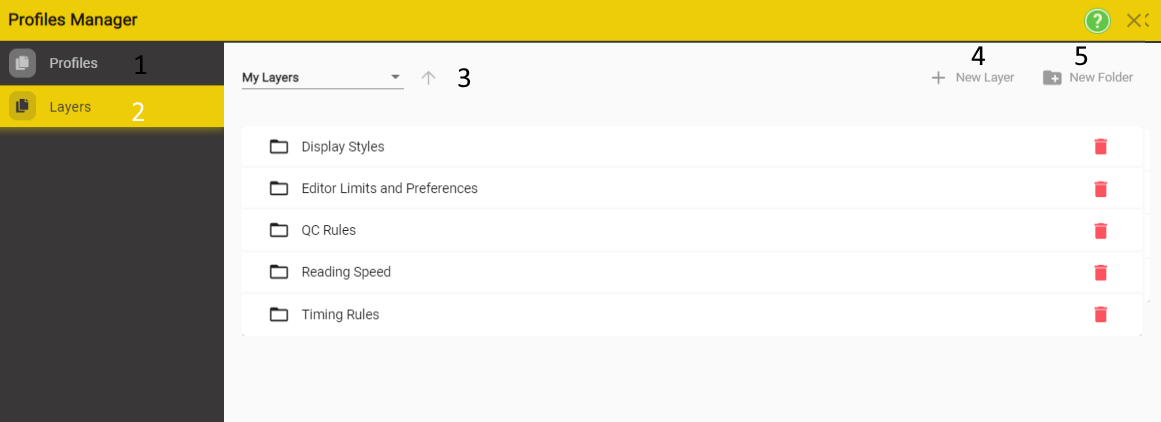
- Layers Tab - allows you to access the Layers Explorer
- Layers Tab - allows you to access the Layers Explorer
- The Drop Down List - Allows you to select one of the existing Libraries of Layers:
a. My Layers - Your custom Layers
b. System Layers - Pre-made Layers by Yella
c. Company Layers - Layers made by your company - New Layer - Allows you to create a new Layer
- New Folder - Allows you to create a folder inside the currently selected Layer Library
- Trash Can - will delete the coresponding folder
After selecting a folder, you should be seeing something similar to the following image.
| Library | Editable | Access | Permitted Actions | Availability |
|---|---|---|---|---|
| My Layers | User | User | |
Local on user machine |
| System Layers | None | Everyone | |
Online |
| Company Layers | Company Manager / Admin | Company Manager / Admin. | |
Online |
| Users belonging to the company. | |
Online |
| Icon | Action | Description |
|---|---|---|
|
View the Layer | Displays a non editable view of the Layer and all associated Layers. |
|
Edit the Layer | Displays an editable view of the Layer and all associated Layers. |
|
Duplicate a Layer | Make a copy of the Layer. |
|
Move or Rename a Layer | Moving or renaming a Layer. |
|
Delete Layer | Note: You can not Undo the deletion of a Layer. |
Selecting and Assigning a Profile
Each individual Text File (subtitles, scripts or transcriptions) in a Project can have a Profile assigned.
When adding a new or existing file to a project, you will have the option to select a Profile.
If no profile was selected before, the Style Profile line will be empty. To select a new profile, use the dropdown list to select from the list.
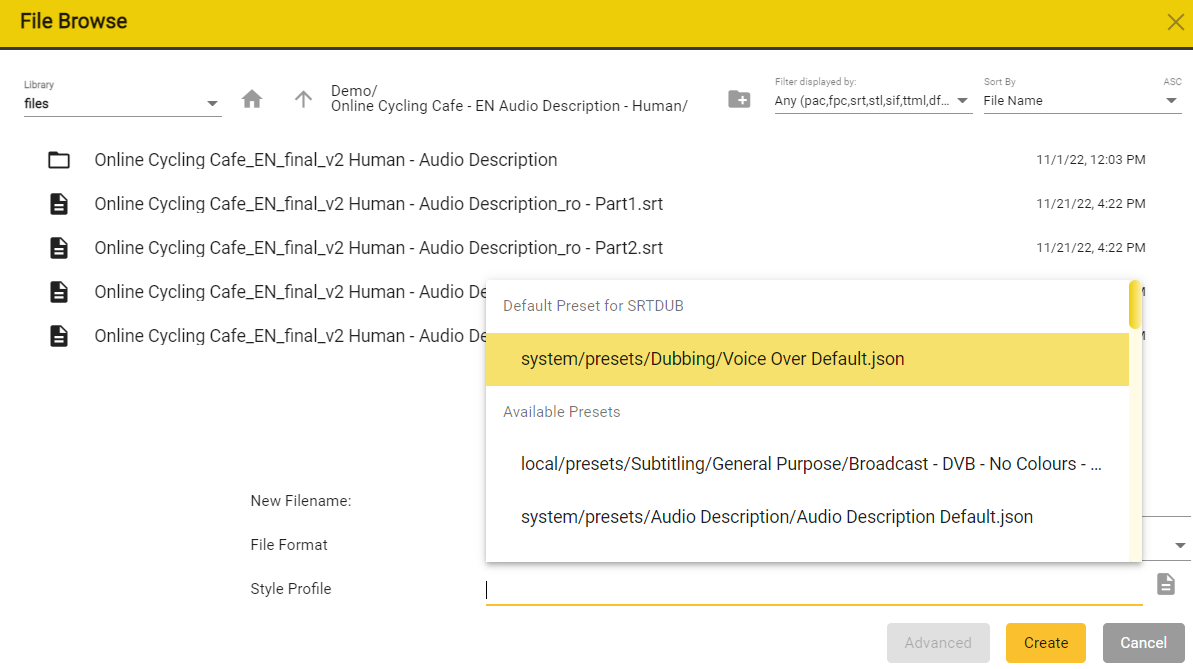
If you already have had a profile previously selected, then the Style Profile line will default to the last one used. To select a new one, press the small circled x icon on the right side of the name of the selected profile. You can then use the drop down list to select one of the available profiles.

To access all the profiles available to your account, press ![]() to open the profile browser.
to open the profile browser.

| Icon | Action |
|---|---|
| Home Icon | Will take you to the home directory. |
| Up Arrow | Will allow you to do up one folder. |
| Triangle Pointing down | Allows you to select one of the profiles libraries. |
| Library | Description |
|---|---|
| My profiles | Your personal profiles. |
| Company Profiles | Profiles made available through your company. |
| System Profiles | Pre-made profiles which are provided by Stellar. |
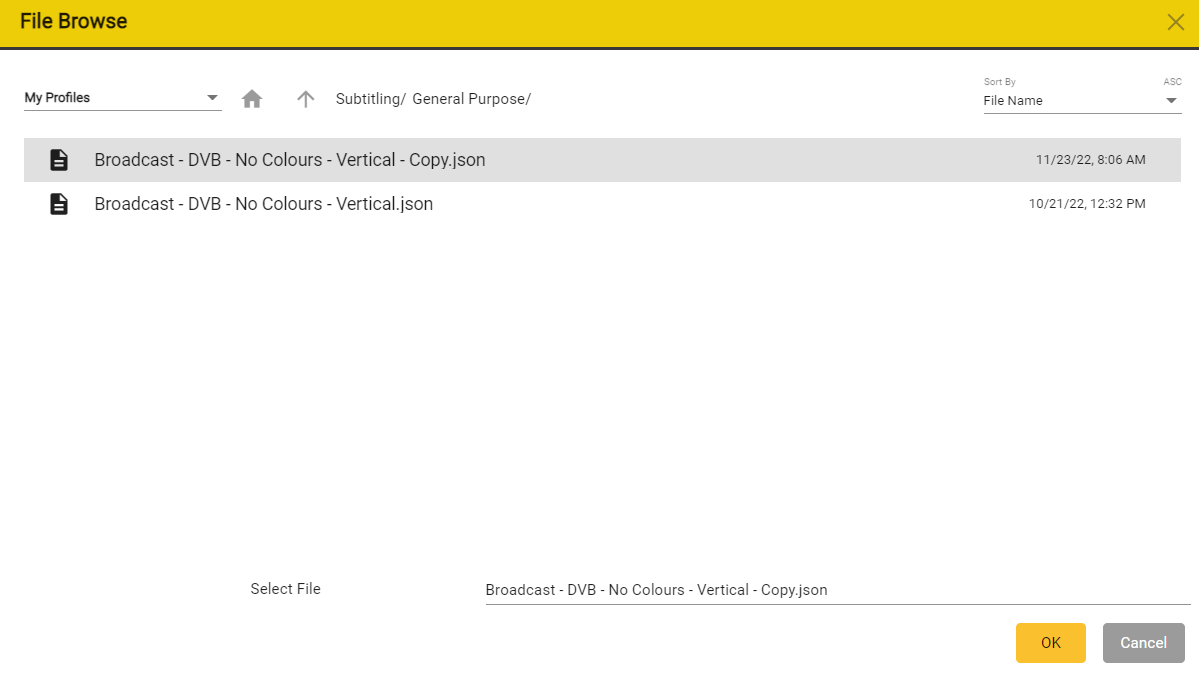
Navigate to your desired profile, select it, and then press ok to set the profile.
The profile is now assigned to the new text file that you are about to create.
Once the text file has been created and added to the project, you can access Profiles through the context menu. To open the context menu, right click on the column name corresponding to your chosen text file, and then click Style Profile.

You should now have the Styles Configurator window open.

Click on the File icon near the Pencil Icon to open the File browser. Once you have opened the Browser, you can navigate to the Profile that you want to select.
Single Project Profile Override
Profiles and Layers are stored centrally and can be used in many Projects at the same time.
If a Layer or Profile is edited then the changes will be reflected in all Projects or Tasks using that Profile.
This makes the Profile and Layer system very powerful but there will be times when you want to make a quick change that will only apply to the current Project, and not effect other Projects using the same Profile.
NB - In the case in which you find yourself making the exact same profile changes for in multiple files, you should consider creating a new profile that contains those exact changes. As a result you will be able to apply the same changes thought selecting a profile, rather than having to manually alter layers for each your projects.
To override Profile settings for the currently selected column/file:
Right click in the top tab of the text column you want to make the edits to, and select Style Profile. (If more than one text file is loaded in the Project, make sure you select the right one)
The profiles configuration window will open.

In order to access the layers which are part of the current profile, you have to press the pencil button. This action will open the Profiles Manager which will then allow your to modify individual settings for the currently selected profile.
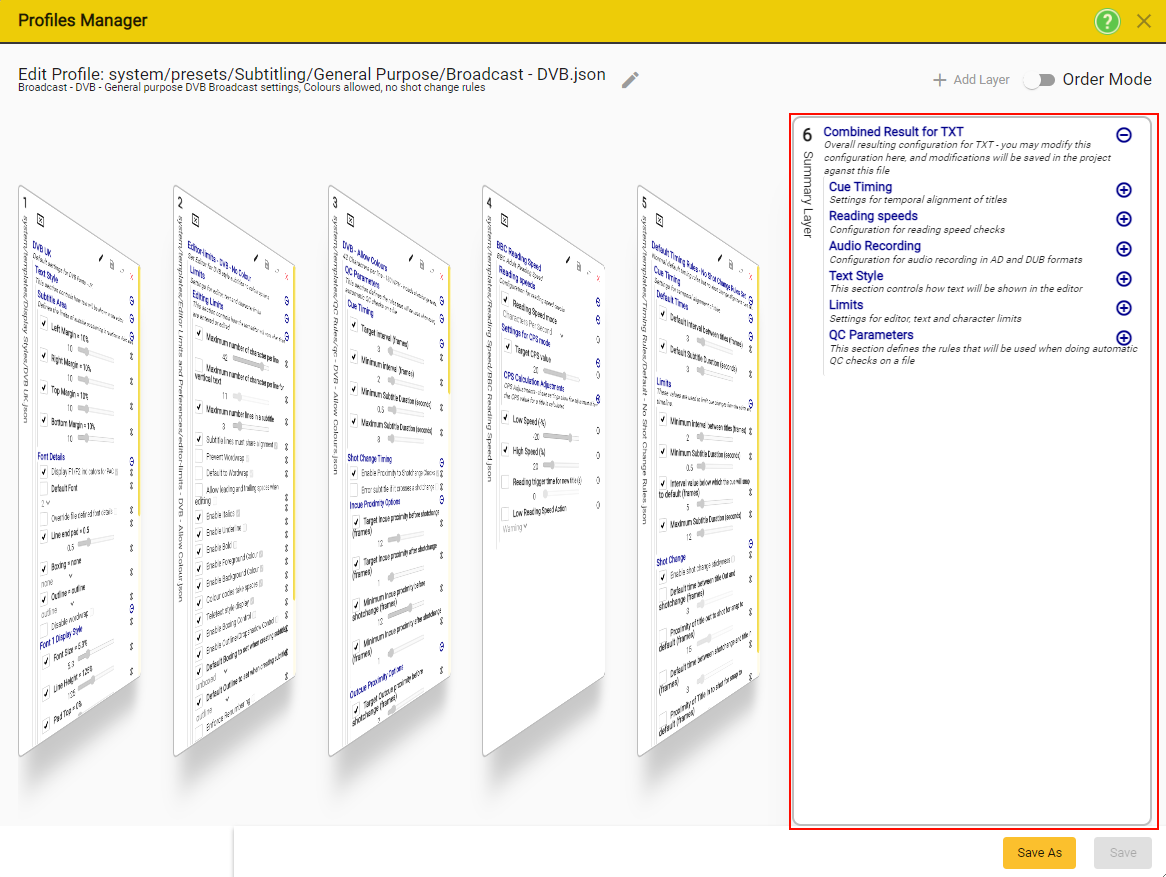
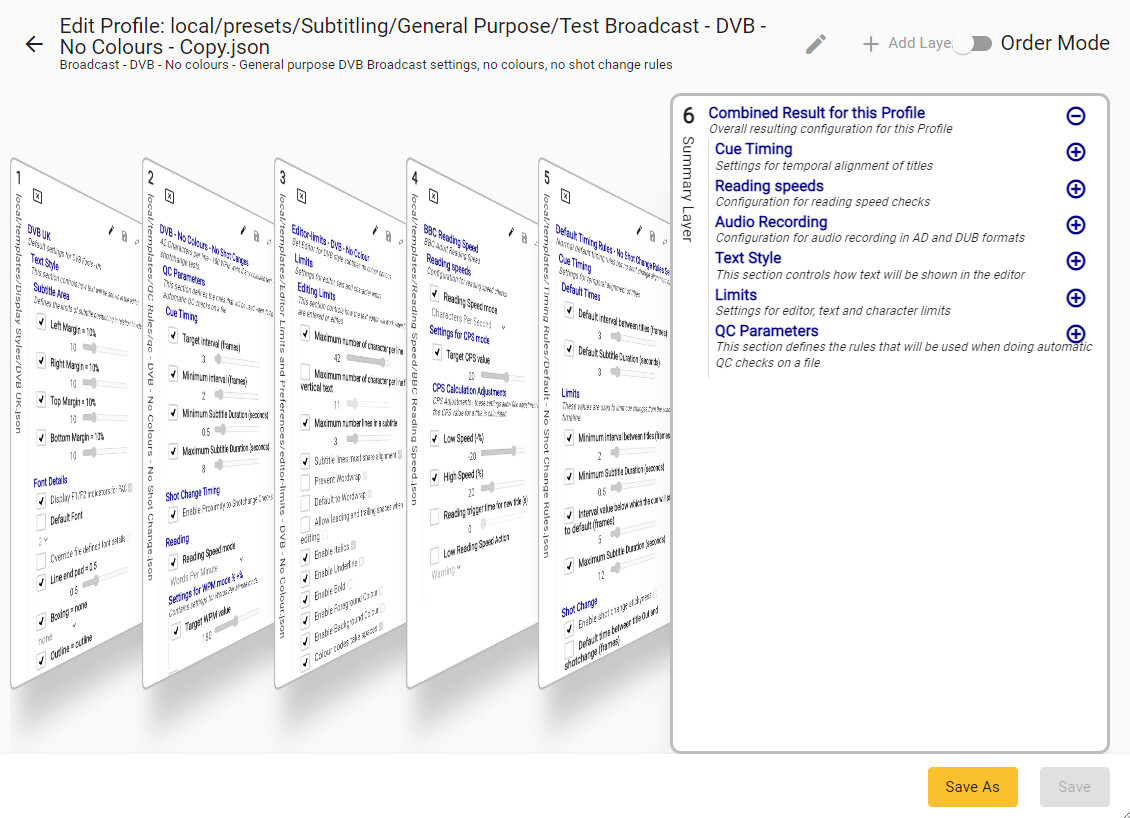
For this use case, we will focus on the Summary Layer which contains the Combined Results for the File you are currently editing.
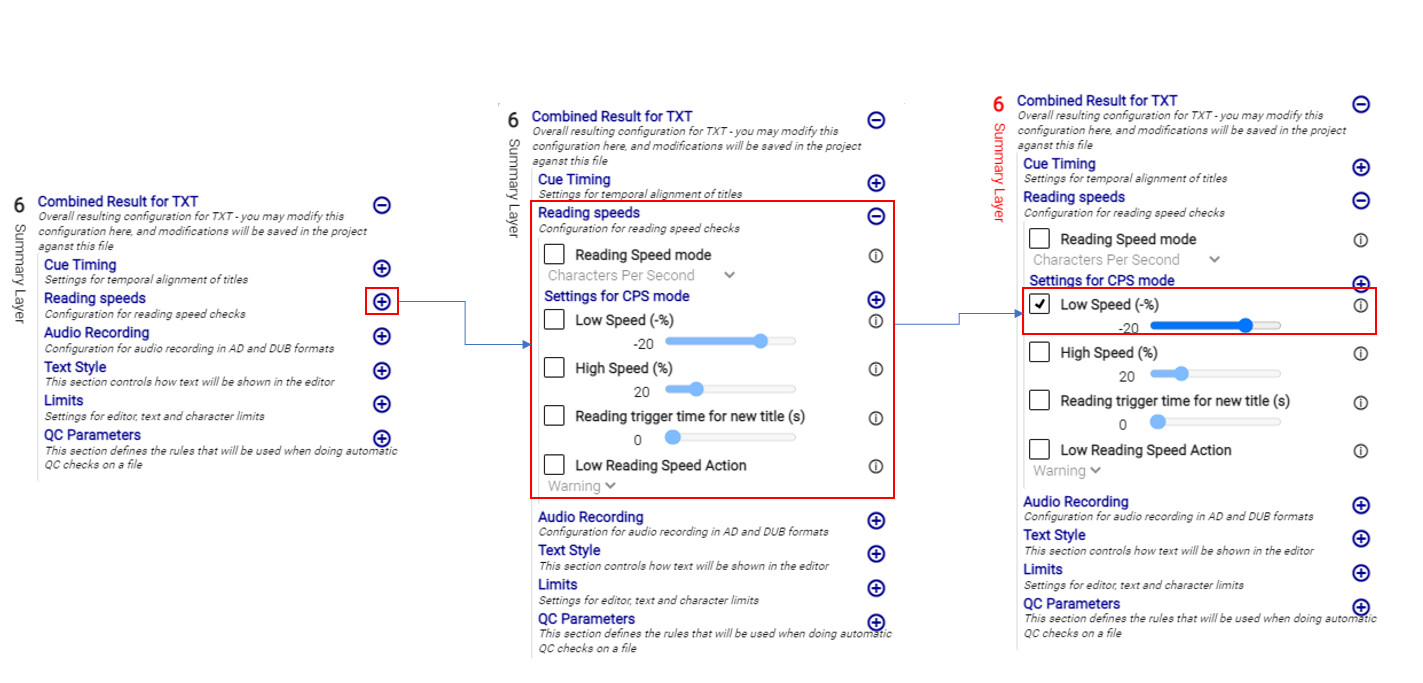
- In order to change any of the settings, you first have to expand the section that contains the specific setting that you want to chance.
- To expand a section, click on the blue circled + icon.
- For example, if we want to change a setting that belongs to the Reading Speed section, we expand that section and then select the entry that we want to modify.
- In order to modify an entry, you have to first tick the box corresponding to the setting you want to change. If the box is not ticked, you will not be able to change the values.
| Icon | Action |
|---|---|
| Left click - Will collapse the list of options. | |
| Left click - Will expand the list of options. | |
| Shift + Left Click - Will expand the entire entry corresponding to the plus sign you selected. |
Once you have done all the changes that you planned to do, you can proceed with saving your new settings.
| Button | Description |
|---|---|
| Save | Saves the changes to CURRENT profile. No changes to the actual Profile or other Projects / Tasks containing the Profile. |
| Save As | Will allow you to save the modified profile as a new separate one. |
| Discard Changes | Will allow you to exit the Profile Mange without saving any of your changes. |
You can override specific settings for a Profile in the Current Project for a specific File. Any changes you make in the Summary Layer will only apply to the selected file in the current Project.
Advanced Usage
Creating Profiles
You can create a new Profile from scratch, but often it is easier to Duplicate an existing Profile and then edit that to get the desired result. See Duplicating a Profile and Editing a Profile.

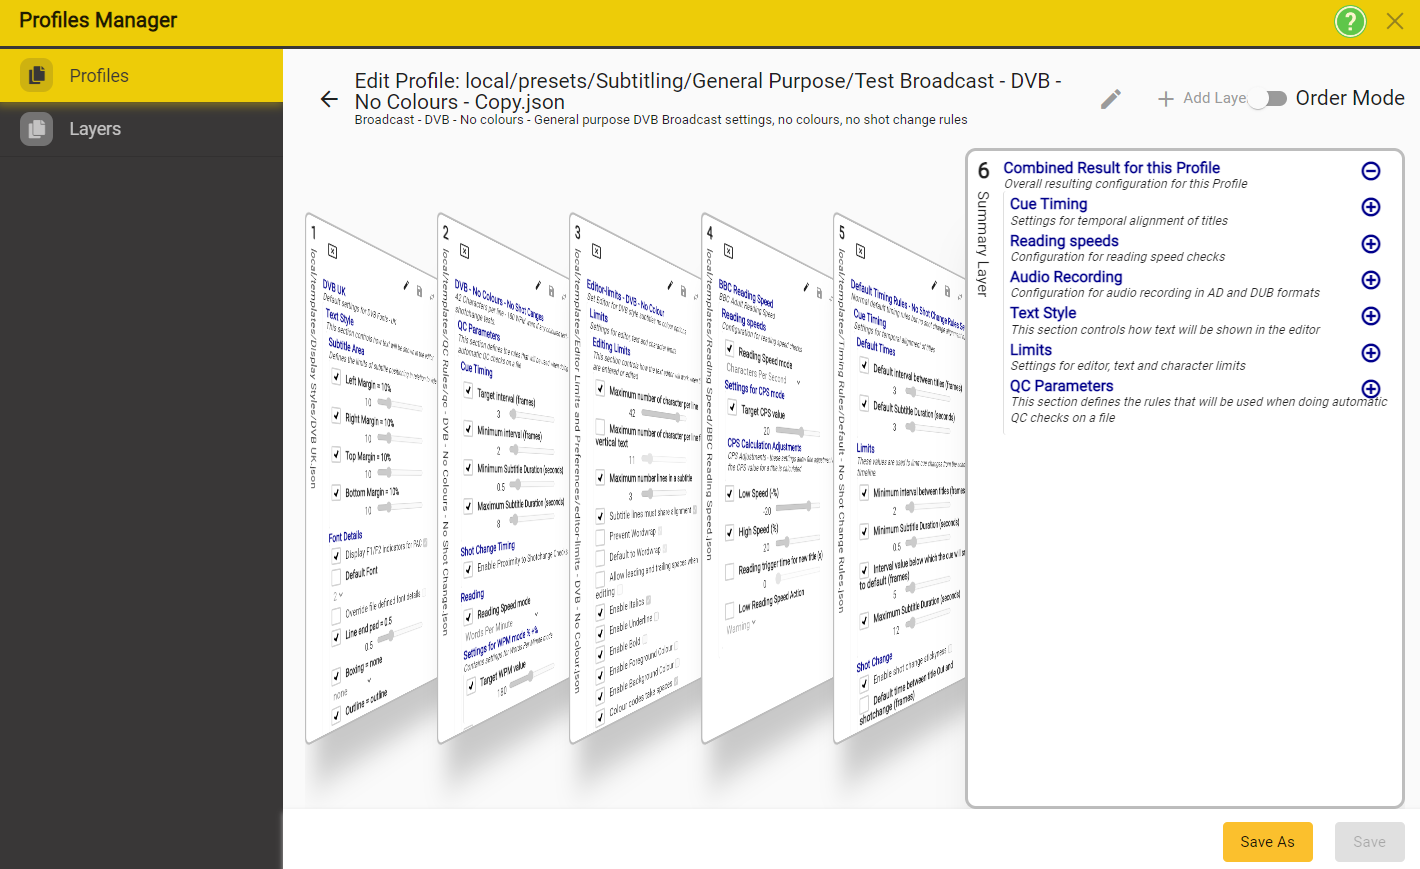
To create a new Profile → New Profile → Will open the Create New Profile Window

The Summary Layer shows all the possible rules and will always show the current output value for each Rule.
- With no Layers loaded this will always show the system Default value for each Rule.
To add a new layer → Add Layer
-
You can now browse to see all the Layers in the Company and System Layers and select one to add to the Profile.
- You can add System Layers, but you will not be able to edit them.
- When you add a Layer it will appear as a panel within the Profile view
-
Move the mouse pointer over the available Layers to make one of them visible and editable
Check Editing profiles in order to learn how to edit the layers that are present in a Profile.
Duplicate Profiles
Duplicating an existing Profile is often a good way of creating a new Profile, rather than starting from scratch.
For example if you have created a Profile for a client for content aimed at adults but now need a Profile for children’s content it is often easier to duplicate the adult version and then change just the reading speed layer for the children’s version.
When a Profile is duplicated you will normally keep the references to all the same Layers. So the new Profile will be identical to the original, and use the same actual Layers. When you edit the new Profile it is important to keep this in mind. You can use the ‘Copy layers to new locations’ options if you want to make a whole new set of separate Layers, but this option should be used with caution as it will result in large numbers of new Layers. Many of which will be identical to other Layers, so defeating the objective of reusable Layers.
- Open Profiles Manager → Settings → Profile Manager
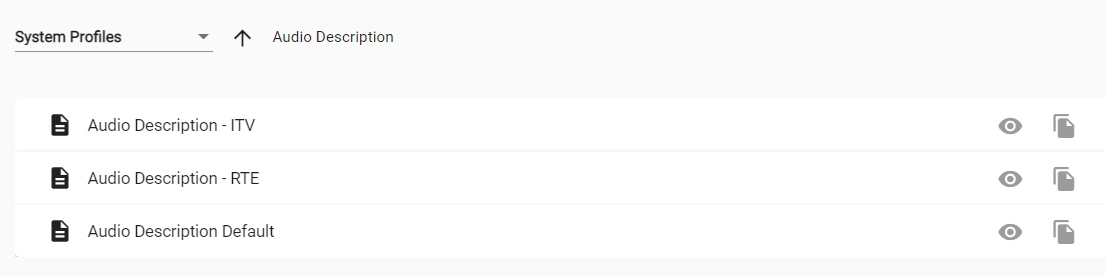
- In the profiles tab → use the drop down list to navigate to System Profiles
- In System Profiles → Choose the profile you want to duplicate: Double on the folder containing the profile you want to duplicate.
- To duplicate a profile, click on the
 to duplicate the profile.
 - This will open the File Browse window - The default path that will open will be in the My Profiles library. You can use the drop down menu in the top left to select the Company Profiles library.
- Once you have selected the right path and gave a name to your new profile, you can press OK to proceed.
- The Profile Configuration window will open, where you will be able to change certain settings based on the profile that you are duplicating.

- Destination - The path where the Profile will be saved. This was previously selected using the File Browser. If you want to change the path, you can click on the File icon on the right side - this open the File Browse window and allow you to selected a new path.
- Name - The name of the profile
- Description - You can add a piece of text that will described the purpose of this Profile.
Suitable for - You have the option to define what file types the Profile applies to. This is used to Filter the Profiles available when adding the Profile to a specific text file… Click on the drop-down list to see the file options.
| Suitable For | File Format |
|---|---|
| Any File Format | Will be suitable for all File Formats |
| Any AD Format | Will be suitable for Audio Description file formats |
| Any Dubbing Format | Will be suitable for Dubbing file formats |
| Any AD & Dubbing Format | Will be suitable for Audio Description and Dubbing file formats |
| Specific File Formats | Will be suitable fort the file formats that are chosen by the user |
- Copy Layers to new Location - this is an advanced option and is not normally required
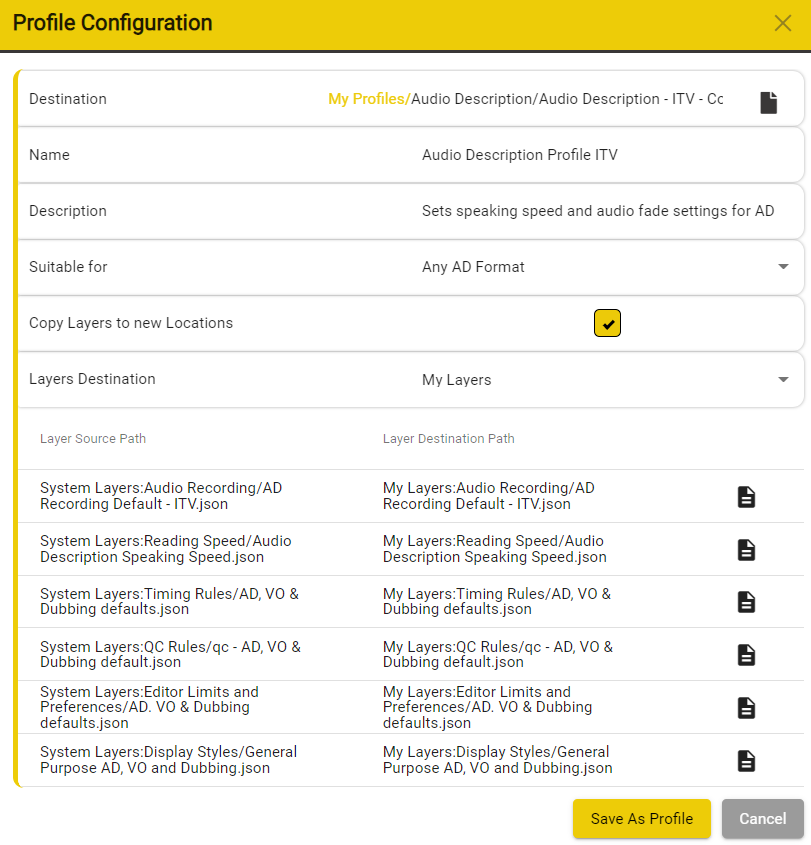
- Select either Company Layers or My Layers as the destination for the new Layers
- You can’t select System Layers
- The Destination path and Name will default to the same as the source Profile, but with ‘-copy’ appended
- Click on the file browse button to change the Name/Path.
Once everything has been set up, you can press on Save As Profile.
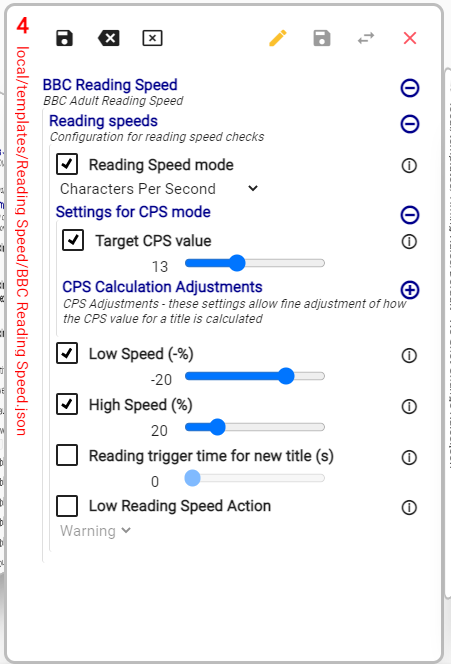
Layer Order
- Because the order in which the Layers are shown in the Profile, from left to right, can effect the way the Rules are applied it is important to Understand Profiles.
- If the Profile only contains one Layer of each Type (reading speed, timing, QC etc.) then the order will have no effect because there will only be one definition of each Rule in the Profile.
- However if there are two Layers of the same type – maybe to override a setting in the first Layer – then the order of the Layers matters.
| Drag and drop Layers to change the order | |
| Save any changes as a new file and replace the existing Layer with the new version. | |
| Opens a Save As browser to set the new filename and location. | |
| Defaults to the same folder as the current Layer. | |
| Replace the Layer with an alternative. Open a browser to pick a different Layer. | |
| Remove the Layer from the Profile. The Layer is only removed, not deleted. | |
 |
Adds a new Layer to the Profile. The New Layer will be added at the highest priority Layer. Opens a file selection browser dialog. |
Editing Profiles
Settings → Profiles Manager → Profiles Tab → My Profiles or Company Profiles → Browse to the Profile that you want to edit.

Click on the Pencil icon coresponding to the profile that you intend to edit. This will expose the layers present in the profile that you decided to edit.

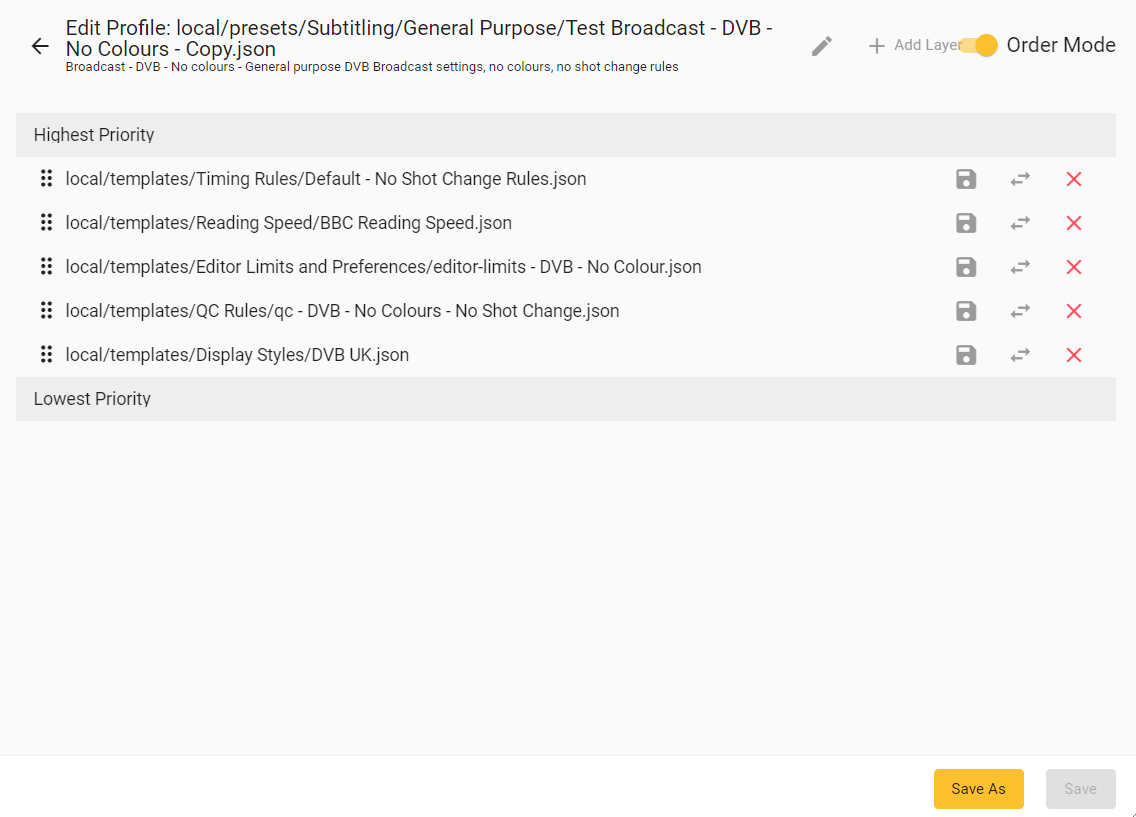
- You can see all the Layers in the Profile with the lowest priority Layer on the left through to the top priority Summary Layer on the right.
- Note: The Summary Layer is always present and can’t be removed
- Note: You can’t change the Summary layer settings as these only apply when the Profile is assigned to a text file in a specific Project.
- Moving the mouse pointer over the Layers will bring each one into view in turn. This is how you select a Layer to be viewed or edited within a Profile.
In order to edit a layer, you have to unlock the layer. This will allow you to modify settings that are present in that layer.
| Icon | Description |
|---|---|
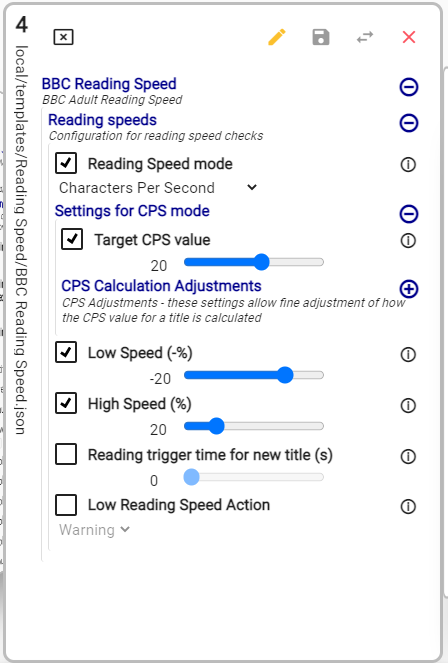
| Save changes back to the same Layer. Click on the black save button to save changes back to the same Layer. | |
| Abandon all changes since the last save. Click on the white X button to abandon the recent changes. | |
| Reset the Layer to default values. Click on the black X button to remove all edits from the current Layer and reset it to its default settings. | |
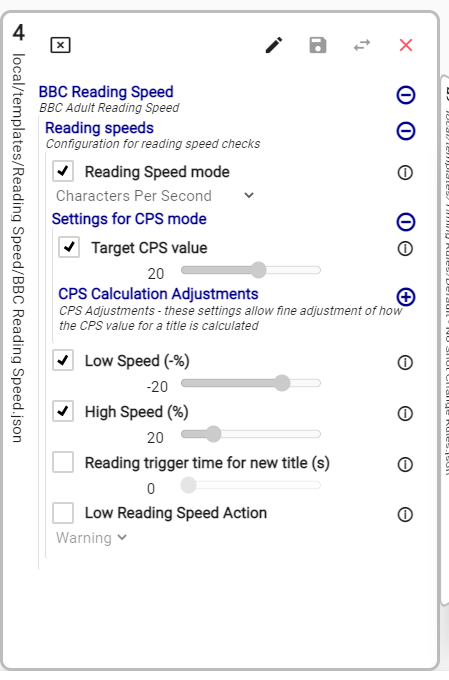
| Edit the Rules settings in this Layer: | |
| Click pencil once to enable editing. | |
| The pencil will turn yellow and you can now edit the values in the layer. | |
| Editing is enabled. | |
| Click once to disable editing. | |
| The pencil will turn grey. | |
| Save the edited Layer as a new | |
| Click on the grey Save button to make a new copy of the Layer and add this to the current Profile in place of the current Layer | |
| Replace this Layer with an alternative: | |
| Click on the two arrows button to browse for a replacement Layer | |
| The Browser will open in the same folder location as the Layer being replaced. | |
| Remove the Layer: | |
| Click on the red cross button to remove the Layer from the Profile. | |
| The Layer will still be available. |
| Unsaved Edits | Saved Edits |
|---|---|
 |
 |
| Locked and Inactive | Unlocked and Inactive | Locked and Active | Unlocked and Active |
|---|---|---|---|
 |
 |
 |
 |
| The layer is locked: To unlock please press on the Pencil Icon | The layer is unlocked: To edit the rule please press the check box. | The rule is active and editable:To edit the rule, unlock the Layer | The rule is active and editable: You can now edit the values. |
Duplicating Profiles
- Open Profiles Manager - Settings ->Profile Manager
- In the profiles tab → use the drop down list to navigate to System Profiles
- In System Profiles → Choose the profile you want to duplicate: Double on the folder containing the profile you want to duplicate.
- To duplicate a profile, click on the to duplicate the profile.
- This will open the File Browse window - The default path that will open will be in the My Profiles library. You can use the drop down menu in the top left to select the Company Profiles library.
- Once you have selected the right path you can press OK to proceed.
- The Profile Configuration window will open, where you will be able to change certain settings based on the profile that you are duplicating.