Creating Layers
There are two methods that allow you to create a layer:
- Duplicating an existing layer and then modifying it so that it fits your purpose.
- Creating a layer from zero.
Duplicating an existing Layer
- Open Profiles Manager - Settings ->Profile Manager
- In the profiles tab → use the drop down list to navigate to System Profiles
- In System Layers → Choose the profile you want to duplicate: Double click on the folder containing the profile you want to duplicate.
- To duplicate a layer, click on the

- This will open the File Browse window - The default path that will open will be in the My Layers library. You can use the drop down menu in the top left to select the Company Layers library.
- Once you have selected the right path you can press OK to proceed.
- The Layer Configuration window will open, where you will be able to change certain settings based on the profile that you are duplicating.
Creating a new layer
To create a new Layer, open the Profile Manger and select the Layers Tab.
Settings → Profile Manager → Layer Tab → My Layers Library or Company Layers Library
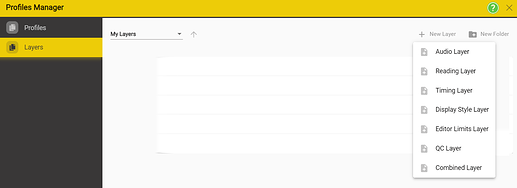
Once you have selected the Library in which you want to create your layer, press on the New Layer button in the top right section.
Pressing on the New Layer will open a menu that will allow you to pick which type of Layer you want to create. There are several layers types from which you can choose:
- Audio Layer
- Reading Layer
- Timing Layer
- Display Style Layer
- Editor Limits Layer
- QC Layer
- Combined Layer
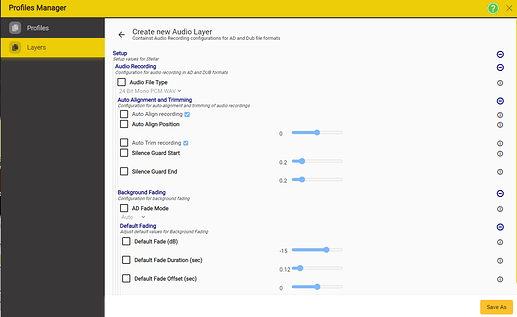
Choosing a layer type would bring up all the Rules that it contains.
By default none of the Rules are selected and the controls will be grey and disabled. To set a specific Rule in this Layer check the box next to the Rule, and the control will be enabled.
| Inactive | Active |
|---|---|
 |
 |
Notes:
- Only enable the Rules you want to set in the Layer. Often it is best to leave the default rules and only change those Rules where the default value is not what you want.
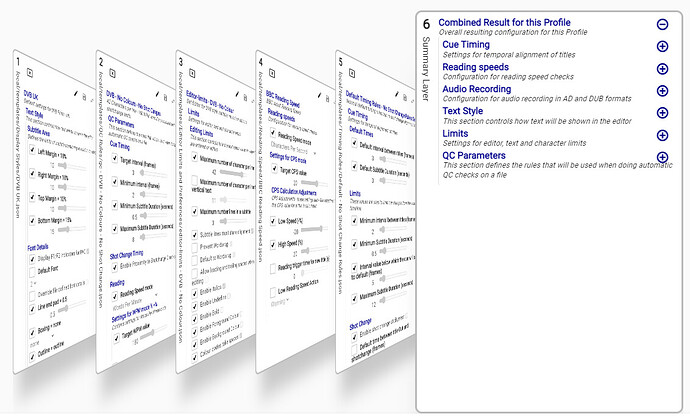
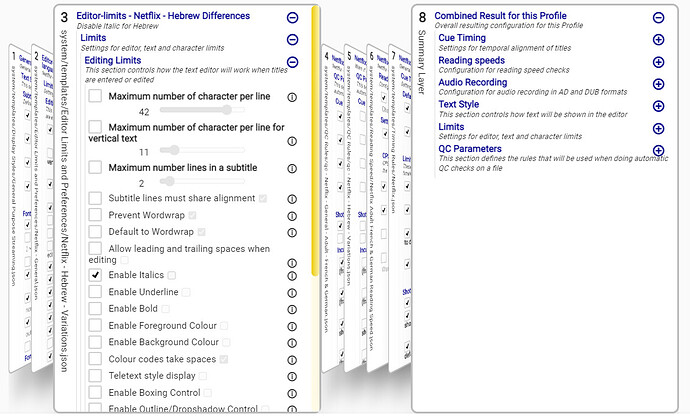
- Because Layers are hierarchical it is possible to have two Layers of the same Type in a Profile with the second one overriding a single Rule in the first one. The right-most layer, will override the previous layers.
- For example: You may have a Style Rule for Most Netflix content but when the language is Hebrew you need to disable italics and set QC warnings if italics is present.
- Rather than create a whole new pair of Editing Limit and QC Layers you can continue to use the general Netflix Layers but in the Hebrew Profile add Layers that override just the italics settings.
- This way you won’t have to maintain two or more complete Layers which are specific to different languages.
-
Once you have set the Rules you need click Save As, and select Company Layers or My Layers and a Folder and set a file name and then press OK.
Note: You can’t save to the Systems Layers -
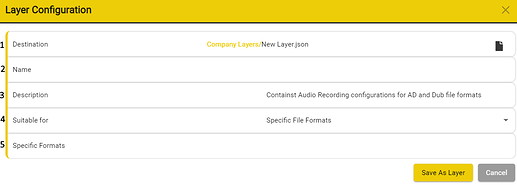
After pressing OK, you will be prompted with a Layer Configuration dialog box.
Configuring Layers
- Destination - Allows you to set the path of the Layer that you are about to save. This path should have already been selected in the previous steps, but if you need to change the path, this is where you can do that before saving.
- Name – A human readable name for the Layer – put a more detailed description here EG ‘Netflix Adult French & German etc. Reading Speed’.
- Description – A text field where you can add more details if required. EG ‘Netflix – Adult – French, German, Brazilian Portuguese, Italian’
- Suitable For – You have the option to define what file types the Layer applies to. This is used to Filter the Layers available when creating Profiles. Click on the drop-down list to see the file options:
| Suitable For | File Format |
|---|---|
| Any File Format | Will be suitable for all File Formats. |
| Any AD Format | Will be suitable for Audio Description file formats. |
| Any Dubbing Format | Will be suitable for Dubbing file formats. |
| Any AD & Dubbing Format | Will be suitable for Audio Description and Dubbing file formats. |
| Specific File Formats | Will be suitable fort the file formats that are chosen by the user. |
-
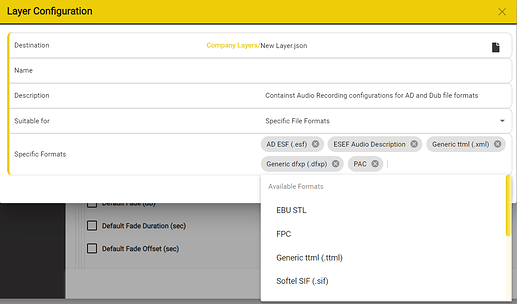
Specific Formats - Allows the user to select specific file formats from a drop down list. Only available if Specific File Formats is chosen at point 4.
Selecting a format will add it into the Specific Formats List. To remove it, press on the white x on a dark grey background icon corresponding to the file format you wish to remove.
-
To save the layer, press Save Layer.
Editing Layers
Settings → Profiles Manager → Layers → Choose either My Layers or Company Layers → Navigate to the layer that you want to edit.
| View the Layer | Displays a non editable view of the Layers. | |
|---|---|---|
| Edit the Layer | Displays an editable view of the Layer. | |
| Duplicate a Layer | Make a copy of the Layer. | |
| Move or Rename a Layer | Moving or renaming a Layer also allows you to change the Layer Configuration. | |
| Delete Layer | Note: You can not Undo the deletion of a Layer. |
There are two ways you can edit a Layer:
- You can press on the Edit Layer Button - to open all the Rules contained in a Layer.
- You can press the Move or Rename button - to…. Move or Rename the currently selected layer.
Before changing the value of Rule, you have to first enable it by using the checkmark.
This will allow you to edit the values of that specific rules.
Only enable editing for rules that you know you have change as this will reduce the occurrence of errors appearing during the editing process.
| Inactive | Active |
|---|---|
 |
 |
To save the edited Layer, press on the Save As layer.
If you are only overwriting the current Layer, you can press OK.
You can only Edit Layers that are present in the My Layers or Company Layers paths. System Layers cannot be saved, but you can copy them and create a new layer.
Layer Use Cases
-
You have a very limited number of different output styles and Rules:
- You may be a broadcaster with just one output style and only different reading speed rules for adult and children’s programs
- In this case you would use Combined Layers to create just two Layers, one for adult’s and one for children’s programming
- These would be used in two Profiles and no other Layers or Profiles would be required
- Any future Rule changes could be made to both Layers (if common to both)
-
You need to manage hundreds of different style settings from multiple clients:
- You are a subtitle service provider with hundreds of clients each with one or many separate style requirements.
- In this case you will want to rationalize the number of different Profiles by splitting the Rules into separate Layers and organizing these in a hierarchy.
- For example: Netflix have different reading speeds for different language groups and within these different speeds for adult’s and children’s programs. In addition there are limitations in some languages but not in others, EG no italics in Hebrew.
- By creating two separate Reading Speed Layers for each Language group you can keep the reading speed rules in two Layers for all Netflix content and not have to create a separate Layer for each of potentially 50+ languages.


