Automatic Speech Recognition (ASR)
The ASR option can be added by adding an instance of the AI Tools widget. This widget will appear in the Tools drop down menu present on the left side of the menu bar.
The ASR menu allows the user to use Automatic Speech Recognition to extract text from their media by using various ASR services:
- Apptek Transcribe
- Rev AI
- Google Speech-To-Text
- Amazon Transcribe
- Speechmatics
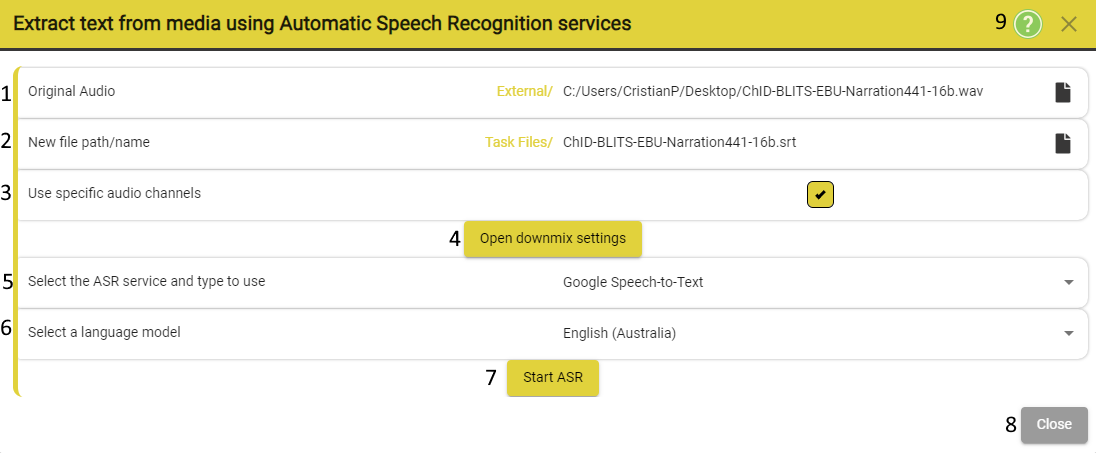
Extracting text from media using Automatic Speech Recognition services
Top Menu Bar → Tool → AI Tools → ASR
-
The path to the Original Audio - If there is a video loaded into the project, the path will automatically be populated with the original source video, if this is still accessible.
-
The new file path/name - This is the path were the new file will be saved. By default the name will be the same as the video. Nevertheless, you can change the name of the file. ! DO NOT ! delete the .srt ending.
-
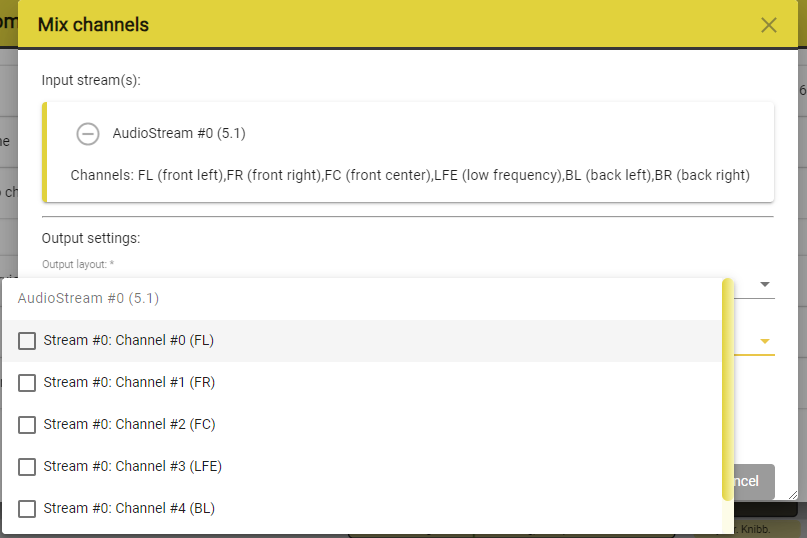
Use specific audio channels - Allows the user to select one or a combination of audio channels to be used for ASR.
-
Select the ASR service - This menu allows you to select the third-party ASR service that you want to use.
Apptek Transcribe - Enable punctuation - Enable/Disable punctuation for the ASR services which offer this option.
Speechmatics - Select the output locale - Select the language locale.
Speechmatics - Select accuracy - Pick between enhanced / standard. More info on Speechmatics Website -
Select Language model - Depending on which ASR service you have selected, this menu will contain a variety of models that you can use to perform the ASR process on your media.
-
Start ASR - Once you are happy with the settings you have selected, you can press this button to start the ASR process.
-
Close - Closes the current ASR window.
-
Help - Opens up a help page dedicated to this process/widget.
FAQ: How can I use ASR in my project?
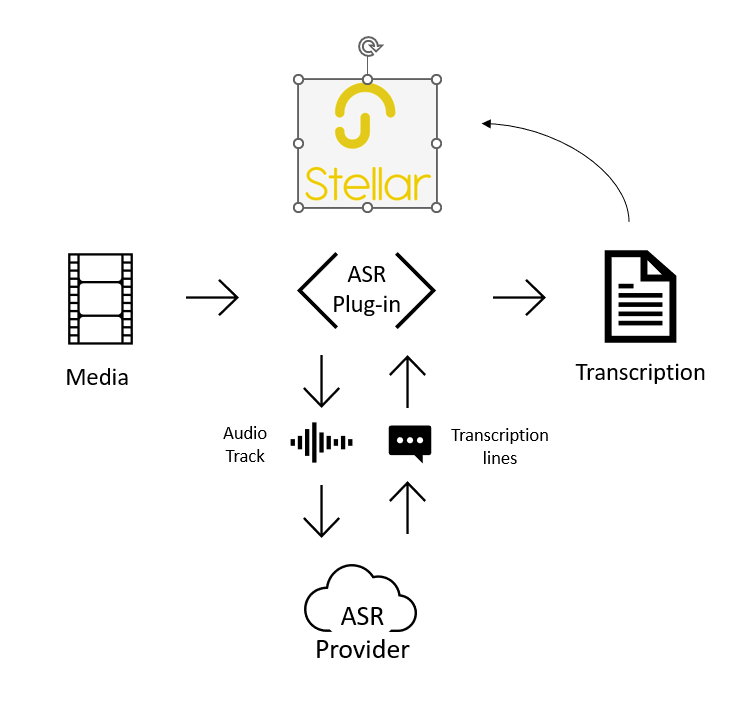
Answer: The ASR plug-in can be used to generate transcripts from the audio track of the video that is loaded into Stellar.
FAQ: How will the results of this process look?
Answer: The resulting transcript will be added to your current project as a new text file.
FAQ: What services does it use?
Answer: Stellar is using external Automatic Speech Recognition (ASR) services, such as the ones mentioned in the list above.
FAQ: Does this mean that the audio part of my content is being sent to a third party to be processed?
Answer: The ASR services described above are provided by external/third-party entities. If you do not want to send your audio track to an external provider of ASR, please do not use this ASR Plugin.
FAQ: How does the interfacing between Stellar and these external ASR providers work?
Answer: The audio track is sent to the to the ASR provider/providers that you selected. The ASR provider then performs the ASR process and we received the data and insert it into your current project as a text file.
FAQ: Which of the supported services is the best?
Answer: We are interfacing with all of the above ASR services, but we cannot recommend any of them as we believe that users are better equipped to decided based on the type of content they aim to use ASR on. With the included 20€ credit that you get when registering, you can test the quality of the above mentioned services and then decide on which one is works better for your use-case.
FAQ: What are the costs for using the ASR plugin?
Answer: 1 Item = 30 min chunk costs €0.50 + ASR direct cost - depending on the service or services selected.
Audio Alignment
The Audio Alignment option allows you to convert a plain text file to subtitles using Automatic Speech Recognition.
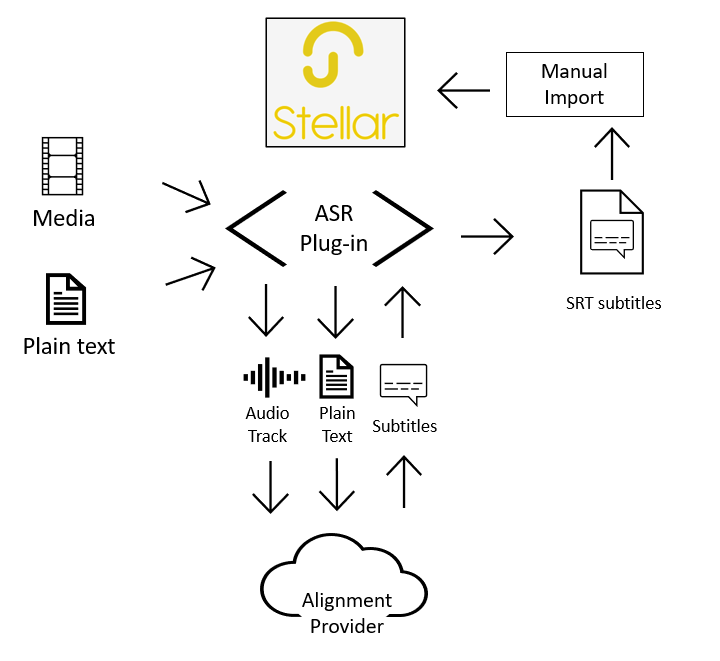
Since ASR can be used to transcribe the speech in an audio file and create a text file, ASR can also be used to align existing text files to the speech present in the audio track. This effectively leads to the creation of a subtitles file from a text file that has no timing information. Before starting the process, you will need to have a piece of media and the plain text that you want to be aligned in order to create the subtitles.
Currently, Stellar supports Apptek audioalign which offers audio alignment for 5 languages: English, French, German, Italian and Spanish.
Top Menu Bar → Tool → AI Tools → Audio Alignment
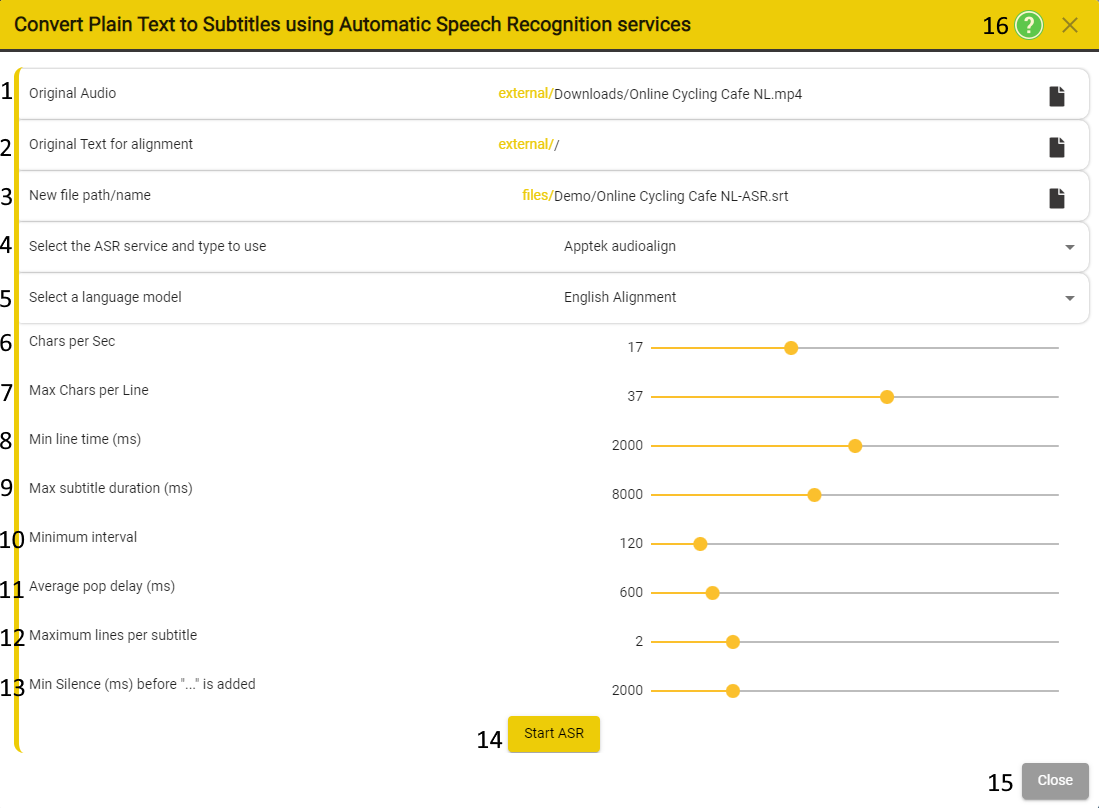
- Original Audio - If there is a video loaded into the project, the path will automatically be populated with the current video.
- Original Text for Alignment - The path to the plain text file (without any timing data). It can be uploaded by clicking the dark grey file icon on the right side.
- The new file path/name - This is the path were the new file will be saved. By default the name will be the same as the video. Nevertheless, you can change the name of the file. ! DO NOT ! delete the .srt ending.
- Select the ASR service - This menu allows you to select the third-party ASR service that you want to use. Currently - the Apptek Audioalign service is the only option that you can select.
- Select Language model - Depending on which ASR service you have selected, this menu will contain a variety of models that you can use to perform the ASR process on your media.
- Chars per Second - Set the Characters per second rate to be used when calculating subtitle durations.
- Max Chars per Line – Set the maximum number of text character per line that should be used when calculating the text layout.
- Min Line Time(ms) – Set the minimum time allowed for a single line subtitle to be on screen, in milliseconds(ms).
- Max Subtitle Duration(ms) – set the maximum amount of time a subtitle should be visible on screen, in milliseconds(ms).
- Minimum Interval – set the minimum time for the interval (gap) between two subtitles, in milliseconds(ms).
- Average Pop Delay – set the average time a subtitle should stay visible after the text has been spoken.
- Maximum lines per Subtitle – set the maximum number of lines to be used when calculating how to split the text into subtitles.
-
Min silence before “…” added – Set the minimum time between words before ellipses “…” are added:
- These are added if the ASR engine has calculated that there is a pause in speech but not then end of a sentence.
- In this case ellipses will be added to the end of the first subtitle and the beginning of the next, to indicate a continuation.
- Start ASR - Once you are happy with the settings you have selected, you can press this button to start the ASR process.
- Close - Closes the current ASR window.
- Help - Opens up a help page dedicated to this process/widget.
FAQ: How can I use ASR Alignment in my project?
Answer: The ASR plug-in can be used to align existing text files to the speech present in the audio track.
FAQ: How will the results of this process look?
Answer: This process will create a new .srt subtitle file which can then be loaded into your Stellar project.
FAQ: How long does it take to perform this process?
Answer: Depending on the length of the media and how fast the external services processes your job this may take some time.
FAQ: Can I do something else while this process is running?
Answer: Yes, you can safely close(using the close button) the window once you started the process.
FAQ: How can I check if the process has finished?
Answer: Use the three lines button present in the right side of the Top Menu Bar. The button is situated between the Redo and the Find icons.
![]()
FAQ: How can I import the generated .srt file into my project?
Answer**: Once the process has been completed, you can add it to your project from the file menu. Files → Text Files - Add to Project → Find your .srt file and load it into your project.
FAQ: How does the interfacing between Stellar and these external ASR providers work?
Answer: The audio track and the plain text file are sent to the to the Alignment providers that you selected. The provider uses these files to generate an .srt subtitles files which then can be imported into your project.
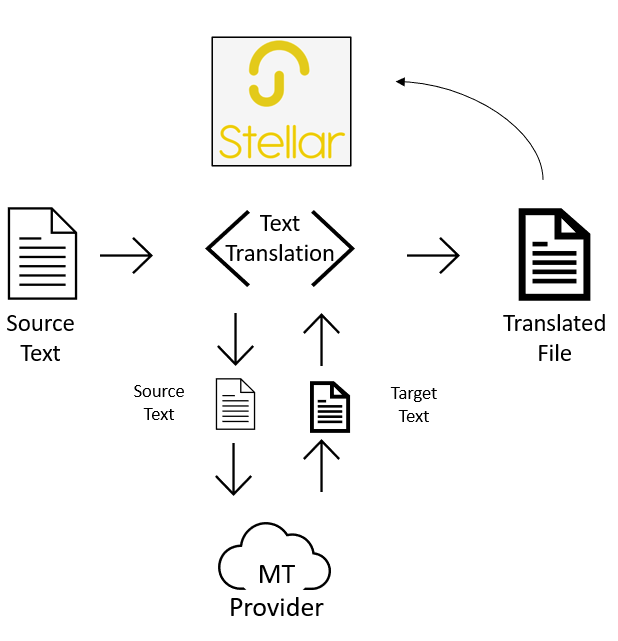
Translate Text File
Top Menu Bar → Tool → AI Tools → Translate Text File
Stellar provides the option of using third-party machine translation engines to translate text files.
The text is sent to a third-party Machine Translation provider. The two providers available in Stellar are Google and AppTek.
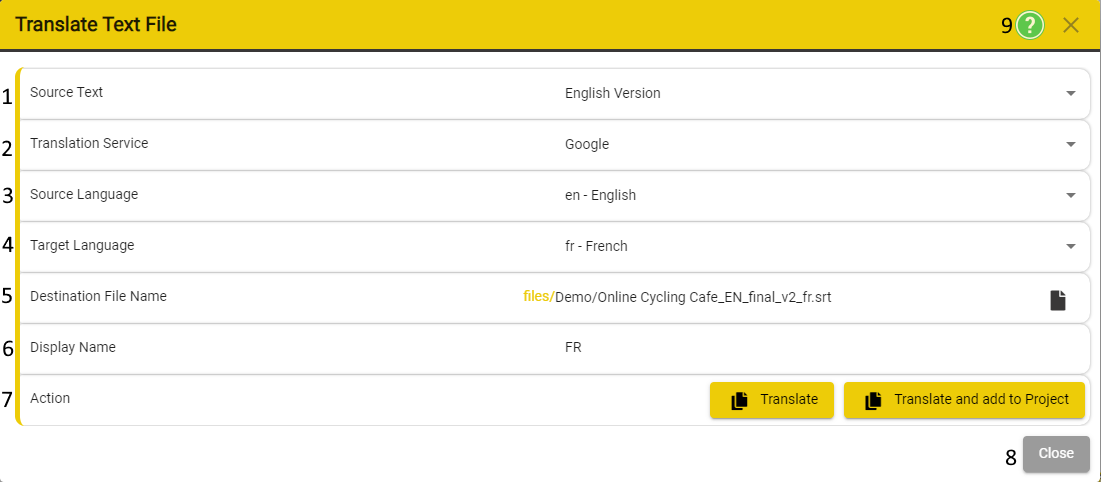
- Source Text - Allows you to select the source text. By default it select the current column in the project.
- Translation Services - Allows you to select the Translation Service provider from a list of available Machine Translation Providers.
-
Source Language - Allow you to set the language of the Source Text.
- Some Providers are able to Autodetect the language of the Source Text
-
Target Language - Allow you to select from a list of language available for the current selected Machine Translation Provider.
- There might be situations in which your target language is not present in a Provider’s language list. In this case, you will have to switch to another Provider from the list
-
Destination File Name - Allows you to select the path where the translated file will be saved.
- The save location has to be somewhere inside the /Stellar/Files folder or any sub-folder that is present in this path.
- The file type of a translation text will be a .SRT, but you can choose between .SRT, .SRTAD or .SRTDUB
- Display Name – Sets the name for the Column and Timeline Track if the new file is added to the current Stellar Project.
-
Action - Allows you to chose what happens to the translated file once the translation process finishes:
- Translate - only translate the text without adding it to your project.
- Translate and add to Project - adds the translated text to you project upon completion of the translation process.
FAQ: How can I use the Translate Text option in my project?
Answer: You can use the Translate Text option to add Machine Translated version of the original text to your project.
FAQ: How will the results of this process look?
Answer: This process will create a new .srt (.strad or .srtdub) subtitle file can then be loaded into your Stellar project.
FAQ: How long does it take to perform this process?
Answer: Depending on the length of the media and how fast the external services processes, but usually it happens fast.
FAQ: How can I import the generated .srt (.strad or .srtdub) file into my project?
Answer: Once the process has been completed, you can add it to your project from the file menu. Files → Text Files - Add to Project → Find your .srt (.strad or .srtdub) file and load it into your project.
FAQ: How does the interfacing between Stellar and these external Machine Translation providers work?
Answer: The text file is sent to the to the Machine Translation providers that you selected. The provider uses these files to generate a translated .srt (.srtad or .strdub) that can then be imported in your Stellar project.