Edit Fades
The fade effect applies to the original audio not the ad track.
Tools → Audio Tools - Audio Tools Fades - Will open the General Fade Editing Settings.
Right click on the fade UI element. - Will open the Fade Editing Settings window for the current fade.

You can know if you are editing only one fade if the Edit fade settings window has a “Target Title ID” row.
Each audio clip in an AD file has an associated fade setting, this controls how much, and when, the program audio will be faded down during the AD audio. The fade metadata will always be written in the .srtad/.srtdub file.
The UI element for the Fade Data looks like this:
![]()
And is positioned in the fade band that is present between the Script Band and the Audio Band on the timeline.
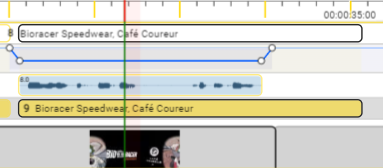
Each fade has 4 round handles which can be moved around in order to alter the fade effect. ! In the case of ESF files - the fade start and end markers handles cannot be moved outside the confines of the box.!
Right click on the fade you want to edit → then select Edit Fades to open the Edit Fades Window
Alternatively, you can set the Fade to any of the 4 pre-set values. You can do this either by selecting one of the values (normal, quiet, loud, mute) or use the corresponding key combination.

This will open the Edit Fade Settings Window
- Source file - Allows you to select which Audio Description or Voiceover file you want to set/write the fade data in - Defaults to the current selected file in the Subtitling Widget
-
Apply to all titles of this file
- if checked - Stellar will set all the fades in the existing file to the same settings.
- unchecked - only the currently selected fade will be changed.
X. If only one fade is being edited - then the Target ID Title of the title corresponding to fade will be shown here.
-
Edit Type - Allows you to select the way in which the fades will be changed.
-
Absolute Values - set the fade(s) to the values set in dB and seconds
Absolute Fade Level (dB) - sets the absolute fade level in dBs. From -50dB to 0dB.
Fade Slope - sets the slope of the fade in seconds. From 0s to 2s. -
Relative Adjustment - change fade(s) by a relative amount in dBs
-
Recalculate fade - will recalculate the times of the selected fade(s) to match the current audio clips.
-
-
Absolute Fade Level (dB) - See point 3 - Absolute Values
-
Fade Slope (seconds) - See point 3 - Absolute Values
-
Use Default Values - resets the values to their default state.
-
Fade Presets - List of available preset values.
-
Recalculate fade position - recalculates the fade position to match the current audio clips.
-
Apply Fade - Will apply the current settings to the fade(s).
-
Close - Exit the window without saving.


Fade Handle Tutorial
![]()
Each fade contains 4 handles:
a - start marker
d - end marker
b - fade in end marker
c - fade out start maker
Moving the Markers - the markers can be move by holding Shift and Left Click Dragging them
There are two types of movement that can be done with a selected marker.
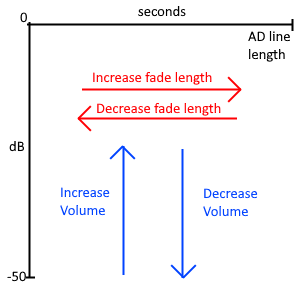
Up - Increases the Volume
Down - Decreases the Volume
Left - Reduces the length of the fade
Right - Increases the length of the fade
![]()
Setting the start of the fade interval - move the a handle (start marker) left or right
Setting the end of the fade interval - move the d handle (end marker) left or right
Setting the end of the fade in interval - move the b handle (fade in end marker) right or left
Setting the start of the fade out interval - move the c handle (fade out start marker) right or left
Set the volume maximum point of the fade in interval - move the b handle (fade in end marker) up and down
Set the volume maximum point of the fade out interval - move the c handle (fade out start marker) up and down